CubicPy
| *日本語 | English* |
![]()
CubicPy - A 3D programming learning app for placing and building physics objects with code
Call it “CubicPy” - or simply “CuPy” for short!
Application Description
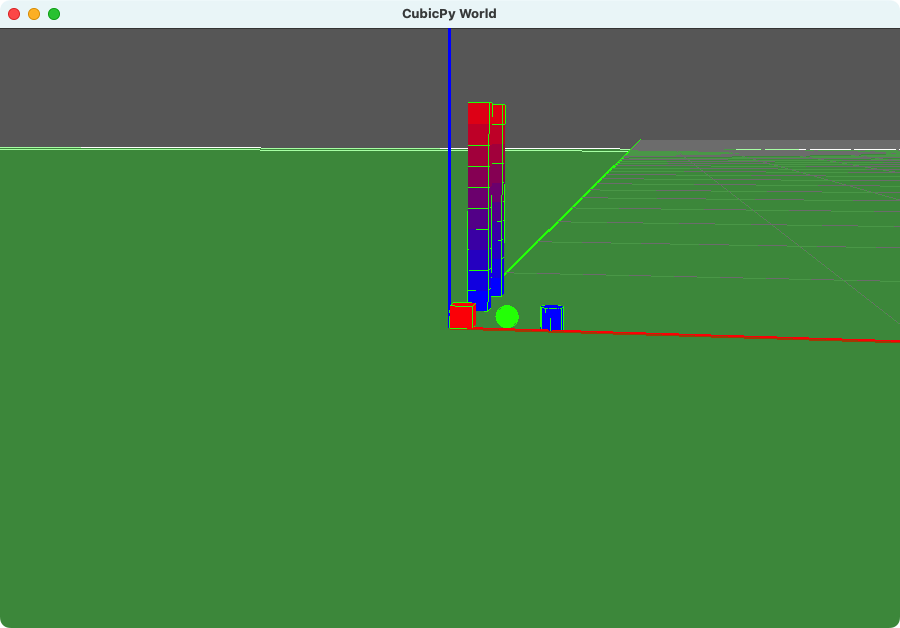
CubicPy is an application that allows you to place objects in 3D space using Python code and build worlds that operate with realistic physics simulations. You can freely place boxes, spheres, and other objects to create structures and learn programming while experiencing physical laws such as gravity and collisions.
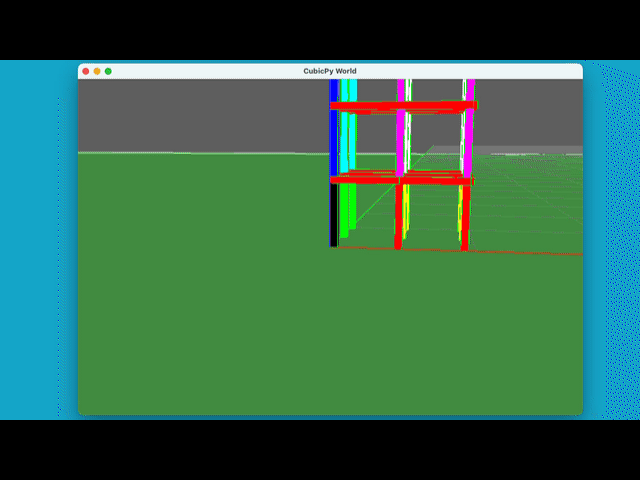
The constructed objects and structures can be observed undergoing realistic collapse processes by tilting the ground or removing objects using physics simulations. You can also change the gravity factor to observe physical behavior under different gravitational environments. Additionally, you can set initial velocity vectors for objects and launch them.
Installation
pip install cubicpy
Using the cubicpy Command
After installation, you can easily run from the command line:
# Run a randomly selected sample code
cubicpy

# Display help
cubicpy --help
cubicpy -h

# Display sample list
cubicpy --list
cubicpy -l

# Run a specific sample
cubicpy --example cube_tower_sample
cubicpy -e cube_tower_sample

# Run your own Python file
cubicpy your_body_data_script.py

# Run with modified gravity factor (specifies the power of 10 to multiply gravity by)
cubicpy --gravity 0.01 --example cube_tower_sample
cubicpy -g 0.01 -e cube_tower_sample

# Run with custom window size (1280x720)
cubicpy -e cube_tower_sample -w 1280,720
cubicpy --window-size 1280,720 -e cube_tower_sample

# Run with specific camera lens type (perspective or orthographic)
cubicpy -e cube_tower_sample -c orthographic
cubicpy --camera-lens orthographic -e cube_tower_sample

# Run in websocket mode
cubicpy -e cube_tower_sample --external
cubicpy -e cube_tower_sample -x

# Run in websocket mode with specific room
cubicpy -e cube_tower_sample --external --room 1000
cubicpy -e cube_tower_sample -x -m 1000

# Run with custom restitution coefficient (0-1)
cubicpy -e cube_tower_sample --restitution 0.8
cubicpy -e cube_tower_sample -r 0.8

# Run with custom friction coefficient (0-1)
cubicpy -e cube_tower_sample --friction 0.5
cubicpy -e cube_tower_sample -f 0.5
Sample Code Examples
Creating a Tower of Boxes (cube_tower_sample.py)

# Create an array of object data
body_data = []

# Stack 10 levels of cubes
for i in range(10):
    body_data.append({
        'type': 'cube',
        'pos': (0, 0, i),  # Position: x, y, z
        'scale': (1, 1, 1),  # Size: width, depth, height
        'color': (i/10, 0, 1-i/10),  # Color: red, green, blue (0-1)
        'mass': 1  # Mass (optional)
    })
Launching Objects with Initial Velocity Vectors
# Create a projectile
body_data.append({
    'type': 'sphere',
    'pos': (5, 5, 2),  # Position: x, y, z
    'scale': (1, 1, 1),  # Size
    'color': (1, 0, 0),  # Red color
    'mass': 5,  # Mass
    'velocity': (10, -5, 3)  # Initial velocity vector: x, y, z direction
})
Other Samples for Command Mode
Additional sample code can be found in the “codes” directory. Run with cubicpy your_file.py command.
Object Definition Details (for cubicpy command)
Details of object definitions to add to the body_data list:
| Parameter | Description | Required | Default Value |
|---|---|---|---|
type |
Object type: ‘cube’, ‘sphere’, ‘cylinder’ | Required | - |
pos |
Position coordinates (x, y, z) | Required | - |
scale |
Size (width, depth, height) | Optional | (1, 1, 1) |
color |
Color (red, green, blue) - values from 0 to 1 | Optional | (0.5, 0.5, 0.5) |
mass |
Mass (0: fixed object) | Optional | 1 |
color_alpha |
Transparency (0: transparent to 1: opaque) | Optional | 1 |
hpr |
Rotation degree angles (heading, pitch, roll) | Optional | (0, 0, 0) |
base_point |
Position reference point | Optional | 0 |
remove |
Removed Object | Optional | False |
vec |
Initial velocity vector (x, y, z) | Optional | (0, 0, 0) |
※ base_point can be set to the following values:
0: The corner nearest to the origin is the reference1: The center of the bottom surface is the reference2: The center of gravity is the reference
Building Worlds with the cubicpy Command
- Create a Python file in the format of the sample
- Run it with the
cubicpy your_file.pycommand
Sample Code for API Mode
from cubicpy import CubicPyApp

# Instantiate
app = CubicPyApp(gravity_factor=0.01)

# Adding individual objects
# Add objects using API
app.add_cube(position=(0, 0, 0), scale=(1, 1, 1), color=(1, 0, 0))
app.add_sphere(position=(2, 0, 0),  scale=(1, 1, 1), color=(0, 1, 0))
app.add_cylinder(position=(4, 0, 0),  scale=(1, 1, 1), color=(0, 0, 1))

# Add an object with initial velocity vector
app.add_sphere(
    position=(5, 5, 2),
    scale=(1, 1, 1),
    color=(1, 0, 0),
    mass=5,
    vec=(10, -5, 3)  # Will be launched when space key is pressed
)

# Adding multiple objects (loop)
for i in range(10):
    app.add_cube(
        position=(0, 5, i),
        color=(i/10, 0, 1-i/10)
    )

# Adding body_data for compatibility with cubicpy command
body_data = []
for i in range(10):
    body_data.append({
        'type': 'cube',
        'pos': (0, 10, i),
        'scale': (1, 1, 1),
        'color': (i / 10, 0, 1 - i / 10),
        'mass': 1,
        'color_alpha': 1,
    })

app.from_body_data(body_data)

# Run simulation
app.run()
Other Samples for API Mode
Additional sample code can be found in the “api_codes” directory. Run with python your_file.py command.
API Mode Method Details
CubicPyApp Class
CubicPyApp(code_file=None, gravity_factor=1, window_size=(900, 600), camera_lens='perspective'
    restitution=0.5, friction=0.5)
code_file: Path to Python file to execute (optional)gravity_factor: Gravity factor (optional, default: 1)window_size: Window size (optional, default: (900, 600))camera_lens: Camera lens type (‘perspective’ or ‘orthographic’, optional, default: ‘perspective’)restitution: Coefficient of restitution (0: no bounce to 1: perfect elastic collision, default: 0.5)friction: Coefficient of friction (0: no friction to 1: high friction, default: 0.5)
Object Addition Methods
Adding a Box
add_cube(position=(0, 0, 0), scale=(1, 1, 1), color=(0.5, 0.5, 0.5), mass=1, color_alpha=1, hpr=(0, 0, 0), base_point=0, remove=False, vec=(0, 0, 0))
position: Position coordinates (x, y, z)scale: Size (width, depth, height)color: Color (red, green, blue) - values from 0 to 1mass: Mass (0: fixed object)color_alpha: Transparency (0: transparent to 1: opaque)hpr: Rotation degree angles (heading, pitch, roll)base_point: Position reference pointremove: Removed object (Boolean)vec: Initial velocity vector (x, y, z) - applied when space key is pressed
Adding a Sphere
add_sphere(position=(0, 0, 0), scale=(1, 1, 1), color=(0.5, 0.5, 0.5), mass=1, color_alpha=1, hpr=(0, 0, 0), base_point=0, remove=False, vec=(0, 0, 0))
- Parameters are the same as
add_cube
Adding a Cylinder
add_cylinder(position=(0, 0, 0), scale=(1, 1, 1), color=(0.5, 0.5, 0.5), mass=1, color_alpha=1, hpr=(0, 0, 0), base_point=0, remove=False, vec=(0, 0, 0))
- Parameters are the same as
add_cube
Generic Object Addition
add(obj_type, **kwargs)
- obj_type: Type of object (‘cube’, ‘sphere’, ‘cylinder’)
- **kwargs: Object parameters (the following keyword arguments can be used)
- position or pos: Position coordinates
- scale: Size
- color: Color
- mass: Mass
- color_alpha: Transparency
- hpr: Rotation degree angles (heading, pitch, roll)
- base_point: Position reference
- remove: Removed Object - can be deleted with the X key
- vec: Initial velocity vector - applied when space key is pressed
Building Objects from body_data List
from_body_data(body_data)
body_data: List of object definitions (dictionaries) as used by the cubicpy command
Text Display API Methods
You can display text on the application screen.
set_top_left_text(text)
Displays text at the top-left corner of the screen.
- text: The text to display
set_bottom_left_text(text)
Displays text at the bottom-left corner of the screen.
- text: The text to display
Coordinate Transformation Methods
CubicPy provides coordinate transformation methods that work similarly to Processing, allowing you to place objects relative to different coordinate systems. These methods make complex object positioning much easier.
List of Transformation Methods
push_matrix()   # Saves the current transformation state to the stack and creates a new transformation node
pop_matrix()    # Restores the transformation state from the stack
translate(x, y, z)    # Moves to the specified position
rotate_hpr(h, p, r)   # Rotates using HPR (Heading-Pitch-Roll)
reset_matrix()   # Resets all transformations
Usage Example
Here’s an example that places three towers at different positions using coordinate transformations:
from cubicpy import CubicPyApp

# Instantiate
app = CubicPyApp(gravity_factor=1, window_size=(1800, 1200))

# First tower (placed at the origin)
for i in range(10):
    app.add_cube(
        position=(0, 0, i),
        color=(i / 10, 0, 1 - i / 10)
    )

# First transformation
app.push_matrix()
app.translate(5, 5, 0)  # Move coordinate system to position (5,5,0)

# Second tower (placed relative to position (5,5,0))
for i in range(10):
    app.add_cube(
        position=(0, 0, i),  # This position is relative to the new coordinate system
        color=(i / 10, 1 - i / 10, 0)
    )

# Second transformation
app.push_matrix()
app.translate(5, 5, 0)  # Move another (5,5,0) (total of (10,10,0) from original origin)
app.rotate_hpr(45, 10, 0)  # Rotate 45 degrees around Y-axis, 10 degrees around X-axis

# Third tower (placed relative to the newest coordinate system with rotation applied)
for i in range(10):
    app.add_cube(
        position=(0, 0, i),  # This position is relative to the latest coordinate system
        color=(0, i / 10, 1 - i / 10)
    )

# Return from second transformation
app.pop_matrix()

# Return from first transformation
app.pop_matrix()

# Run simulation
app.run()
How Coordinate Transformations Work
Coordinate transformations are managed using a stack structure:
- When you call
push_matrix(), the current transformation state is saved to the stack and a new transformation node is created - You modify the coordinate system using
translate()orrotate_hpr() - Objects you add are placed relative to the current coordinate system
- When you call
pop_matrix(), you return to the previous coordinate system reset_matrix()clears the entire stack and returns to the initial state
This functionality makes it easy to build complex structures using relative coordinates. For example, it’s useful when you want to place different parts of a house (walls, roof, windows) in relative positions and then move the entire house.
Important Notes
- Always use
push_matrix()andpop_matrix()in pairs - Pay attention to the order of
pop_matrix()calls when creating multiple layers - Use
reset_matrix()to reset the state during debugging
World Operation Methods
run()  # Build and run the world
reset()  # Reset the world
launch_objects()  # Launch objects with initial velocity vectors (also triggered by space key)
Building Worlds with API Mode
- Create a CubicPyApp instance in your Python script
- Add objects using methods like
add_cube(),add_sphere(), etc. - Call the
run()method to build and run the world - If needed, use the
reset()method to rebuild - Run with
python your_script.py
Application Controls
- Arrow keys: Change camera angle
- SHIFT + W/S/A/D/Q/E: Move camera target point
- Mouse wheel: Zoom in/out (perspective mode) or change display range (orthographic mode)
- W/S/A/D: Tilt the ground
- F/G: Change gravity strength
- R: Reset (also resets camera position and target point)
- Z: Toggle debug display
- X: Remove selected objects one by one
- Space key: Launch objects with velocity vectors (
vec) - ESC: Exit
WebSocket Mode
CubicPy can receive object data via WebSocket from external applications. This allows for real-time interaction between CubicPy and other applications.
Establish WebSocket communication using the room name displayed in the top-left corner of the screen.
Starting WebSocket Server
To start CubicPy in WebSocket mode, use the following command:
cubicpy --external

cubicpy -x
Example: Sending Data from Voxelamming Client
You can send data to CubicPy from a Voxelamming client application. Here’s an example using Python:
# Import Voxelamming class from voxelamming package
from voxelamming import Voxelamming

# Specify the room name displayed in the CubicPy application
room_name = "1000"
# Create an instance of Voxelamming class
vox = Voxelamming(room_name)

# Set voxel size
vox.set_box_size(1)
# Set voxel placement interval
vox.set_build_interval(0.01)

# Set position and color for voxel placement
for i in range(100):
    vox.create_box(-1, i, 0, r=0, g=1, b=1, alpha=1)
    vox.create_box(0, i, 0, r=1, g=0, b=0, alpha=1)
    vox.create_box(1, i, 0, r=1, g=1, b=0, alpha=1)
    vox.create_box(2, i, 0, r=0, g=1, b=1, alpha=1)

# Set positions for voxel removal
for i in range(50):
    vox.remove_box(0, i * 2 + 1, 0)
    vox.remove_box(1, i * 2, 0)

# Send voxel data to the application
vox.send_data("main")
# vox.close_connection()
Installation and Running
# Install voxelamming package
$ pip install voxelamming
$ pip install --upgrade voxelamming

# Run the sample
$ cd sample/python
$ python main.py
# or
$ python3 main.py
Other Sample Codes for Websocket Mode
Additional sample codes are available in the “websocket_codes” directory. Supported languages include Python, JavaScript, Ruby, Swift, and Scratch3.
For more details, please refer to the Voxelamming official website:
Requirements
- Python 3.9 or higher
- Panda3D
- NumPy
These dependencies are automatically installed with pip install cubicpy.
About the Font
This application uses “PixelMplus” font, which is a TrueType font designed to recreate the appearance of 8-bit gaming console bitmap fonts.
License Information
PixelMplus font is provided under the M+ FONT LICENSE. This license allows free use, copying, and redistribution with or without modification, including for commercial purposes (without warranty).
For more information and font downloads, please visit: https://github.com/itouhiro/PixelMplus
Copyright
Released under the MIT License. See the LICENSE file for details.
Contribution
Bug reports and feature improvement suggestions are welcome via GitHub Issues or Pull Requests. New sample creation and documentation improvements are also welcome.
Development and Release Process
Testing CLI mode
Before releasing a new version to PyPI, test cli.py on local file.
PYTHONPATH=$PYTHONPATH:. python cubicpy/cli.py
Testing Before Release
Before releasing a new version to PyPI, it’s important to run the tests to ensure everything works correctly:
# Install development dependencies
pip install pytest

# Run all tests
pytest

# Run specific test file
pytest tests/test_physics.py
Publishing to PyPI
After confirming that all tests pass, you can publish the package to PyPI:
# Install build tools
pip install build twine

# Build the package
python -m build

# Upload to PyPI (requires PyPI account and token)
python -m twine upload dist/*
For more information about PyPI tokens, see the PyPI documentation.
Have fun learning programming with CubicPy!