ボクセラミング - ARプログラミング学習アプリ
![]()
ボクセラミングは、ARを用いたプログラミング学習アプリです。プログラミング初心者でも、視覚的に楽しくプログラミングを学ぶことができます。ボクセラミングは、iOS 16以上のiPhoneとiPad、そしてApple Vision Proに対応しています。
ボクセラミングとは
Voxelamming = ボクセル + プログラミング
ボクセラミングは、AR技術を使ってプログラミングを学べるアプリです。ボクセル (3D空間における最小単位の立方体) をコードで配置し、インタラクティブな3D作品を作ることができます。
対象ユーザー:
- プログラミング初心者:視覚的なフィードバックを得ながら、プログラミングの基礎を学ぶことができます。
- ジェネラティブアーティスト:コードを使って、創造性豊かな3Dアート作品を生み出すことができます。
特徴
- ARによる直感的な操作: 現実世界にボクセルを配置することで、空間認識能力を高めながらプログラミングを学べます。
- 多彩なプログラミング言語: Scratch3 MOD、Python、JavaScript (Node.js)、Ruby、Swiftに対応しています。
- クロスプラットフォーム: Windows、Mac、iOS (iPhone, iPad, Apple Vision Pro) で動作します。
- 無料: 無料でダウンロードして利用できます。
使い方
ボクセラミングを使うには、以下の3つのステップが必要です。
- デバイスの準備: iOS 16以上のiPhoneまたはiPad、あるいはApple Vision Proが必要です。
- 平面アンカーの設置: アプリを起動し、画面の指示に従って現実世界の平面にアンカーを設置します。
- ボクセルのモデリング: パソコンを使って、ボクセルの位置、色、サイズなどを指定するコードを作成し、アプリに送信します。あるいは、アプリ内エディターで直接コードを入力することもできます。
1. デバイスの準備
App Storeからボクセラミングアプリをダウンロードし、インストールしてください。
2. 平面アンカーの設置
iPhone/iPadの場合
- ボクセラミングアプリを起動します。
- 初回起動時は、カメラの使用許可を求められます。「はい」をタップして許可してください。
- カメラが起動すると、ARが自動で現実世界の平面を探します。平面検知の印(赤緑青の座標軸)が出たら、画面をタップして平面アンカーを設置します。平面アンカーは白と黒のタイルで構成されています。
Apple Vision Proの場合
- ボクセラミング Studioアプリを起動します。
- 「Set Base Anchor」ボタンをタップして、ベースアンカーを設置します。ベースアンカーは白と黒のタイルで構成されています。
- ベースアンカーは、ドラッグして移動することができます。
3. ボクセルのモデリング(プログラミング)
パソコンでのプログラミング
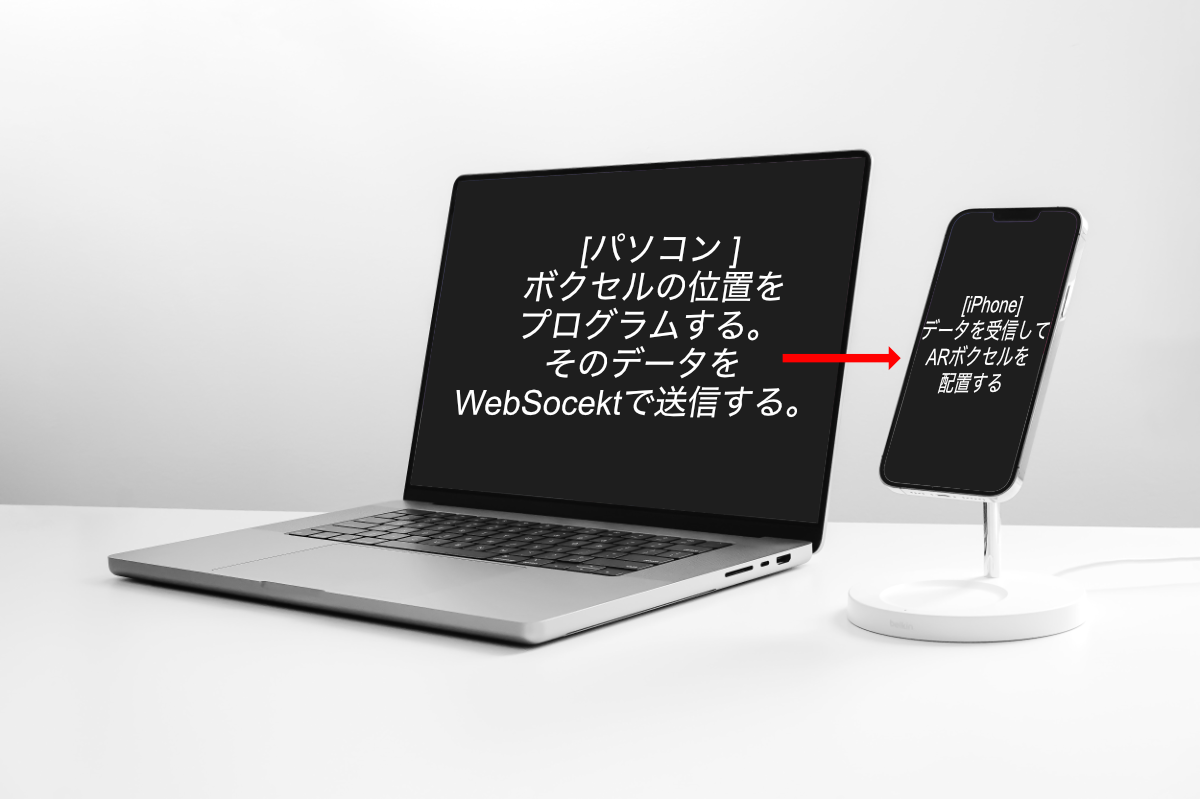
パソコン (Windows, Mac) を使って、ボクセルを配置するためのコードを作成します。
- プログラミング言語を選択: Scratch3 MOD、Python、JavaScript (Node.js)、Ruby、Swiftから選択できます。
- WebSocketサーバーのルーム名を確認: デバイスでボクセラミングアプリを起動し、画面中央に表示されているルーム名を確認します。
- サンプルコードを参考に: sampleフォルダー のサンプルコードを参考に、独自のコードを作成します。
アプリ内エディターでのプログラミング
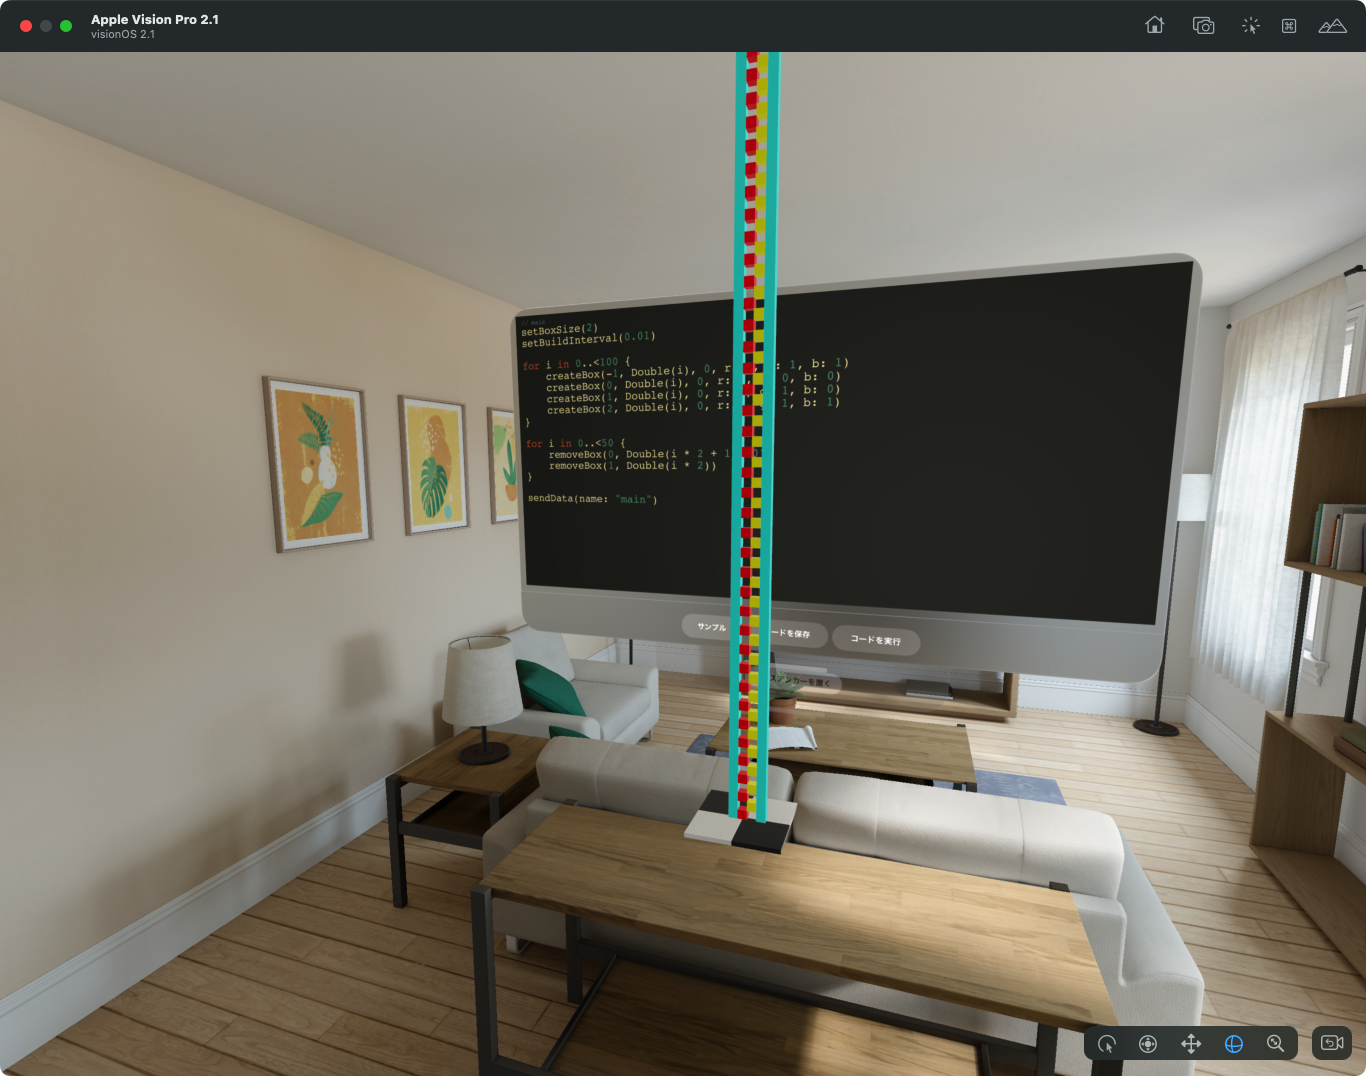
ボクセラミングアプリ内のエディターを使って、直接コードを入力することもできます。
- エディターを起動: ボクセラミングアプリを起動し、左上の「コードエディタ」を選択します。
- コードを入力: ボクセルの位置、色、サイズなどを指定するコードを入力します。コードはSwiftライクなDLS (Domain Specific Language) である、VoxelammingSwiftで記述します。VoxelammingSwiftは、Swift言語の構文に似ていますが、すべtの構文がサポートされているわけではありません。また、Voxelammingのメソッドで実行できなものもあります。
- サンプルコード コードエディタの左下の「サンプル」から、サンプルコードを選択して、編集することもできます。サンプルコードを参考に独自のコードを作成できます。
- 実行: 「実行」ボタンをタップして、コードを実行します。
- コードの保存: 「保存」ボタンをタップして、コードを保存します。
- コードの読み込み: 「読み込み」ボタンをタップして、保存したコードを読み込みます。
ボクセルデータ
ボクセルデータは、ボクセルの位置、色、サイズなどを指定するデータです。
- 位置: 平面アンカーを基準としたx軸、y軸、z軸の値で指定します (単位はセンチメートル)。
- x軸: 左右
- y軸: 上下
- z軸: 奥行き (手前がプラス)
- サイズ: 1.0cmを基準とした小数で指定します。
- 色: RGB値で、0から1までの小数で指定します。
- 設置間隔: ボクセルが設置される間隔を秒単位で指定します。デフォルトは0.01秒間隔でボクセルが設置されていきます。
例:赤いボクセルを (x: 10, y: 5, z: -2) の位置に、サイズ2倍で設置する
# Python
vox.set_box_size(2.0)  # サイズを2倍に設定
vox.create_box(10, 5, -2, 1, 0, 0)  # 赤いボクセルを設置
vox.send_data() # データ送信
メソッドの説明
| メソッド名 | 説明 | 引数 |
|---|---|---|
set_room_name(room_name) | デバイスと通信するためのルーム名を設定します。 | room_name: ルーム名 (string) |
set_box_size(size) | ボクセルのサイズを設定します (デフォルト: 1.0)。 | size: サイズ (float) |
set_build_interval(interval) | ボクセルの設置間隔を設定します (デフォルト: 0.01秒)。 | interval: 間隔 (float) |
change_shape(shape) | ボクセルの形状を変更します。 | shape: 形状 ("box", "sphere", "plane") |
change_material(is_metallic, roughness) | ボクセルの材質を変更します。 | is_metallic: 金属にするかどうか (boolean), roughness: 粗さ (float) |
create_box(x, y, z, r, g, b, alpha) | ボクセルを設置します。 | x, y, z: 位置 (float), r, g, b, alpha: 色 (float, 0-1) |
create_box(x, y, z, texture) | テクスチャ付きのボクセルを設置します。 | x, y, z: 位置 (float), texture: テクスチャ名 (string) |
remove_box(x, y, z) | ボクセルを削除します。 | x, y, z: 位置 (float) |
write_sentence(sentence, x, y, z, r, g, b, alpha, font_size, is_fixed_width) | 文字列をボクセルで描画します。 | sentence: 文字列 (string), x, y, z: 位置 (float), r, g, b, alpha: 色 (float, 0-1), font_size: フォントサイズ (8, 12, 16, 24), is_fixed_width: 固定長にするか (0 or 1) |
set_light(x, y, z, r, g, b, alpha, intensity, interval, light_type) | ライトを設置します。 | x, y, z: 位置 (float), r, g, b, alpha: 色 (float, 0-1), intensity: 強さ (float), interval: 点滅間隔 (float), light_type: ライトの種類 ("point", "spot", "directional") |
set_command(command) | コマンドを実行します。 | command: コマンド ("axis", "japaneseCastle", "float", "liteRender") |
draw_line(x1, y1, z1, x2, y2, z2, r, g, b, alpha) | 2点間に線を描画します。 | x1, y1, z1: 始点 (float), x2, y2, z2: 終点 (float), r, g, b, alpha: 色 (float, 0-1) |
create_model(model_name, x, y, z, pitch, yaw, roll, scale, entity_name) | 内蔵のモデル(USDZ)を作成します。 | model_name: モデル名 (string), x, y, z: 移動量 (float), pitch, yaw, roll: 回転量 (float) , scale: スケール (float), entity_name: 作成したモデルにつける名前 (string) |
move_model(entity_name, x, y, z, pitch, yaw, roll, scale) | 作成したモデル(USDZ)を移動します。 | entity_name: 作成したモデルにつける名前 (string), x, y, z: 移動量 (float), pitch, yaw, roll: 回転量 (float) , scale: スケール (float) |
send_data(name) | ボクセルデータをデバイスに送信します。name引数を設定すると、ボクセルデータを履歴として保存して、再現することができます。 | |
clear_data() | ボクセルデータを初期化します。 | |
transform(x, y, z, pitch, yaw, roll) | ボクセルの座標系を移動・回転します。 | x, y, z: 移動量 (float), pitch, yaw, roll: 回転量 (float) |
animate(x, y, z, pitch, yaw, roll, scale, interval) | ボクセルをアニメーションさせます。 | x, y, z: 移動量 (float), pitch, yaw, roll: 回転量 (float), scale: スケール (float), interval: 間隔 (float) |
animate_global(x, y, z, pitch, yaw, roll, scale, interval) | 全てのボクセルをアニメーションさせます。 | x, y, z: 移動量 (float), pitch, yaw, roll: 回転量 (float), scale: スケール (float), interval: 間隔 (float) |
push_matrix() | 現在の座標系をスタックに保存します。 | |
pop_matrix() | スタックから座標系を復元します。 | |
frame_in() | フレームの記録を開始します。 | |
frame_out() | フレームの記録を終了します。 | |
set_frame_fps(fps) | フレームレートを設定します (デフォルト: 2)。 | fps: フレームレート (int) |
set_frame_repeats(repeats) | フレームの再生回数を設定します (デフォルト: 10)。 | repeats: 再生回数 (int) |
| ゲームメソッド名 | 説明 | 引数 |
set_game_screen_size(width, height, angle=90, r=1, g=1, b=0, alpha=0.5) | ゲーム画面を設定します。 | width, height: 画面サイズ (float), angle: 角度 (float) , r, g, b, alpha: 色 (float, 0-1) |
set_game_score(score, x=0, y=0) | ゲームスコアを設定します。 | score: ゲームのスコア(int), x, y: 位置 (float) |
send_game_over() | ゲームオーバーを設定します。 | |
send_game_clear() | ゲームクリアを設定します。 | |
create_sprite(sprite_name, color_list, x, y, direction=90, scale=1, visible=True) | スプライトを作成します。 | sprite_name: スプライトの名前 (string), color_list: ドットの色データ (string), x, y: 位置 (float), direction: 角度 (float), sclae: スケール (float), visiable: 表示 (boolean) |
move_sprite(sprite_name, x, y, direction=90, scale=1, visible=True) | スプライトを移動します。 | sprite_name: スプライトの名前 (string), x, y: 位置 (float), direction: 角度 (float), sclae: スケール (float), visiable: 表示 (boolean) |
move_sprite_clone(sprite_name, x, y, direction=90, scale=1,) | スプライトのクローンを移動します。複数回の実行が可能で、複数のスプライトを作成するときに使います。 | sprite_name: スプライトの名前 (string), x, y: 位置 (float), direction: 角度 (float), sclae: スケール (float) |
display_dot(sprite_name, x, y, direction=90, scale=1) | 弾やパティクルなど複数のドットを配置する時に使用します。 | sprite_name: スプライトの名前 (string), x, y: 位置 (float), direction: 角度 (float), sclae: スケール (float) |
display_text(sprite_name, x, y, direction=90, scale=1, is_vertical=True, align='') | ゲーム画面にテキストを表示します。 | sprite_name: スプライトの名前 (string), x, y: 位置 (float), direction: 角度 (float), sclae: スケール (float), is_vertical: 縦書き表示 (boolean), align: 文字寄せ('Top', 'Bottom', 'Right', 'Left' の組み合わせ) |
注記:
- 上記のメソッド名はPythonの例です。他の言語では、メソッド名が異なる場合があります。
- 詳細は、各言語のサンプルコードを参照してください。
4. 実行と確認
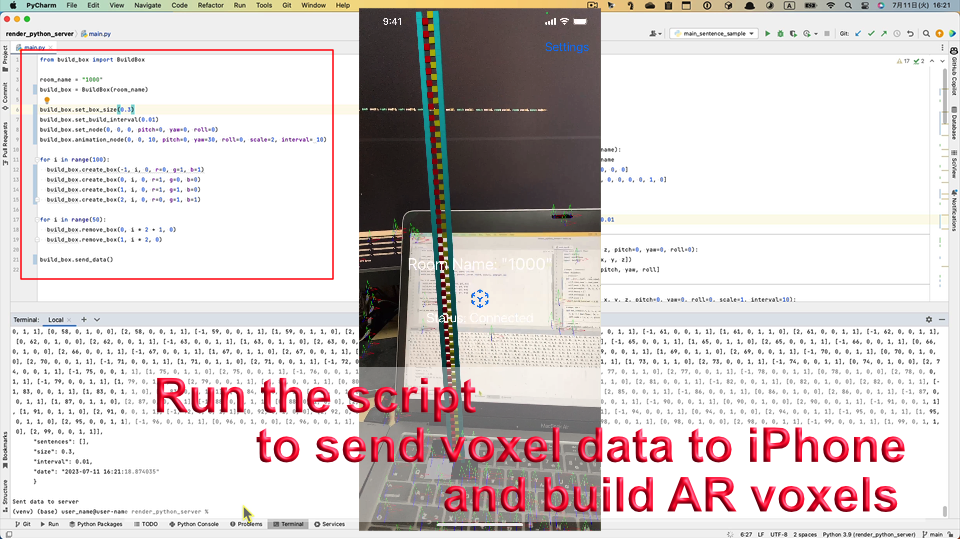
作成したコードを実行すると、デバイスにボクセルデータが送信され、AR空間上にボクセルが構築されます。
サンプルスクリプト
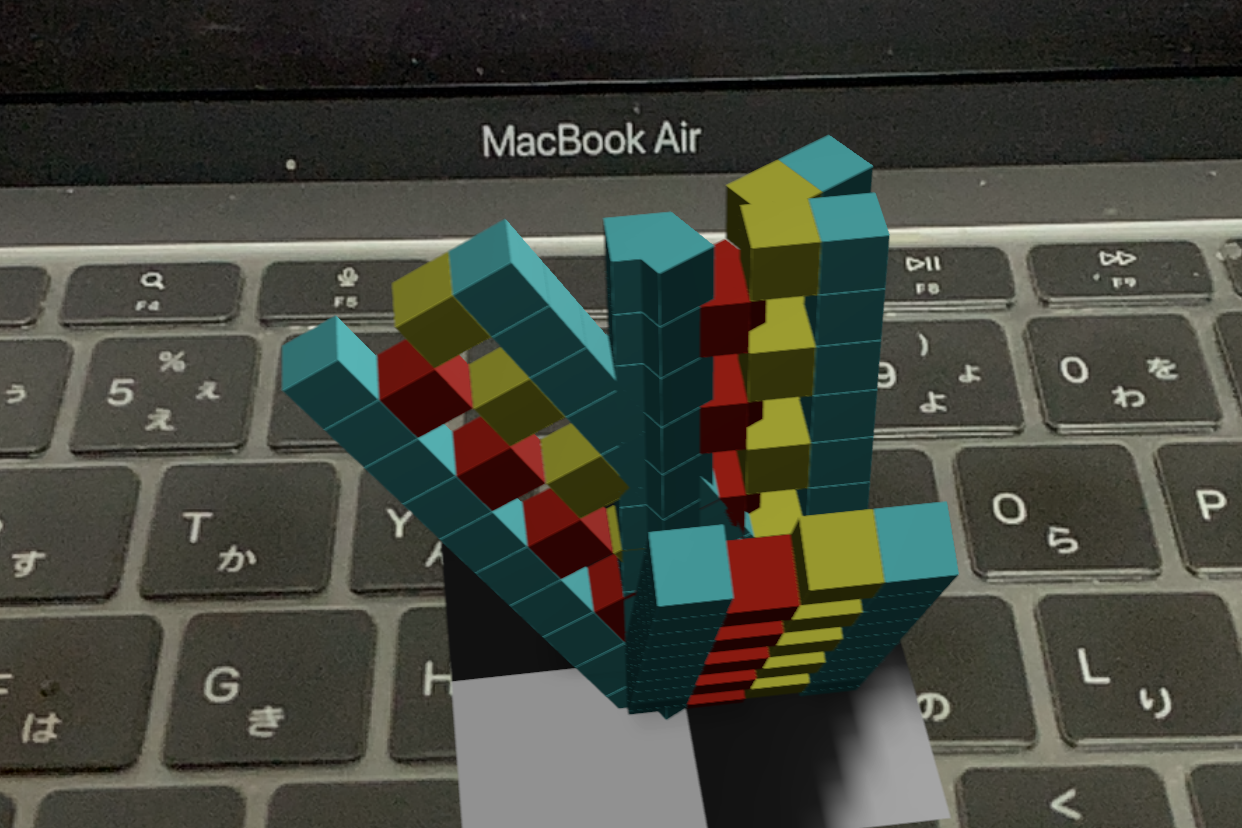
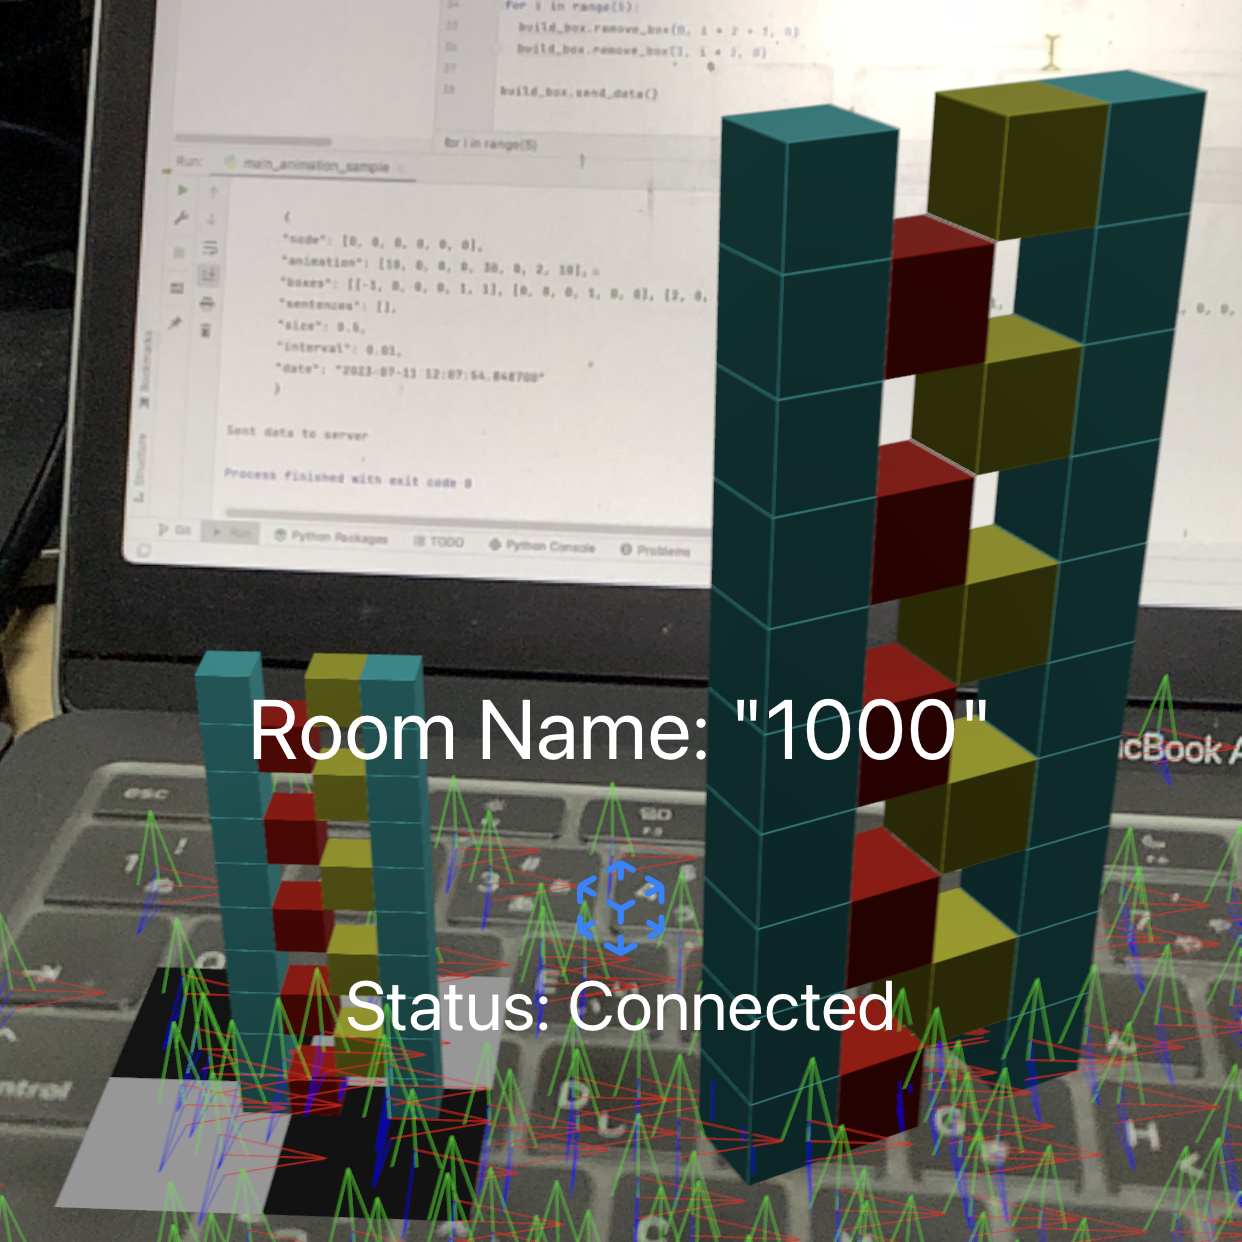
sampleフォルダーに、サンプルスクリプトを用意しました。以下のスクリプトを実行すると、トップ画像のようなボクセルが設置されます。
Scratch3 MOD
ボクセラミング拡張機能を読み込んで、スクリプトを作成してください。
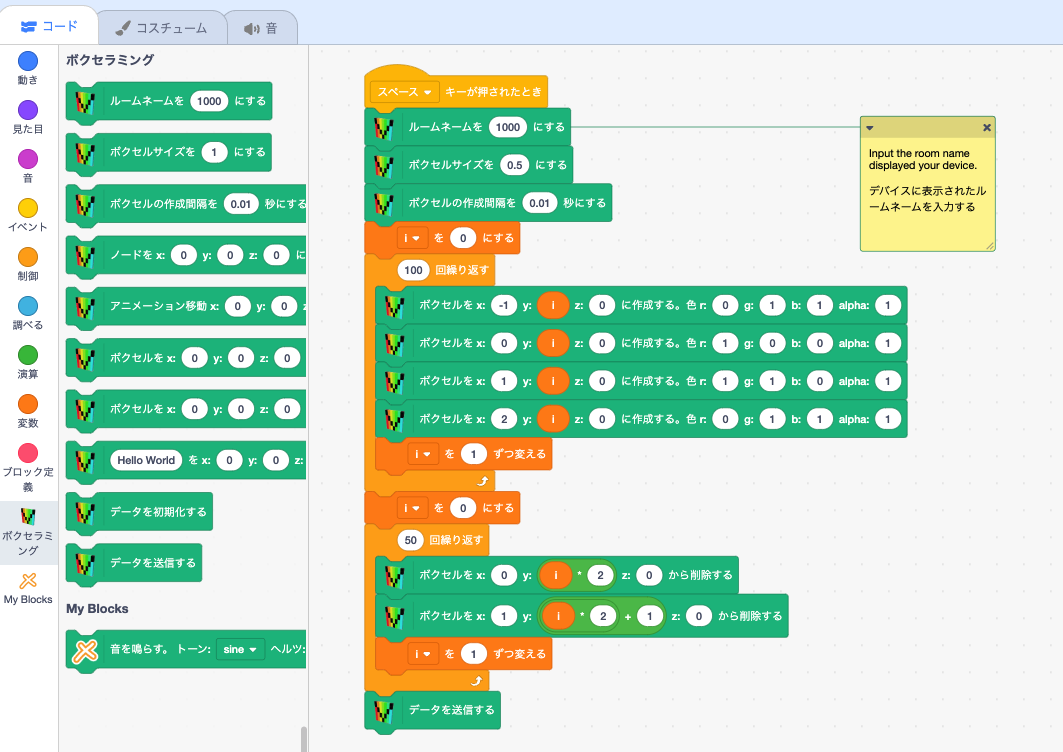
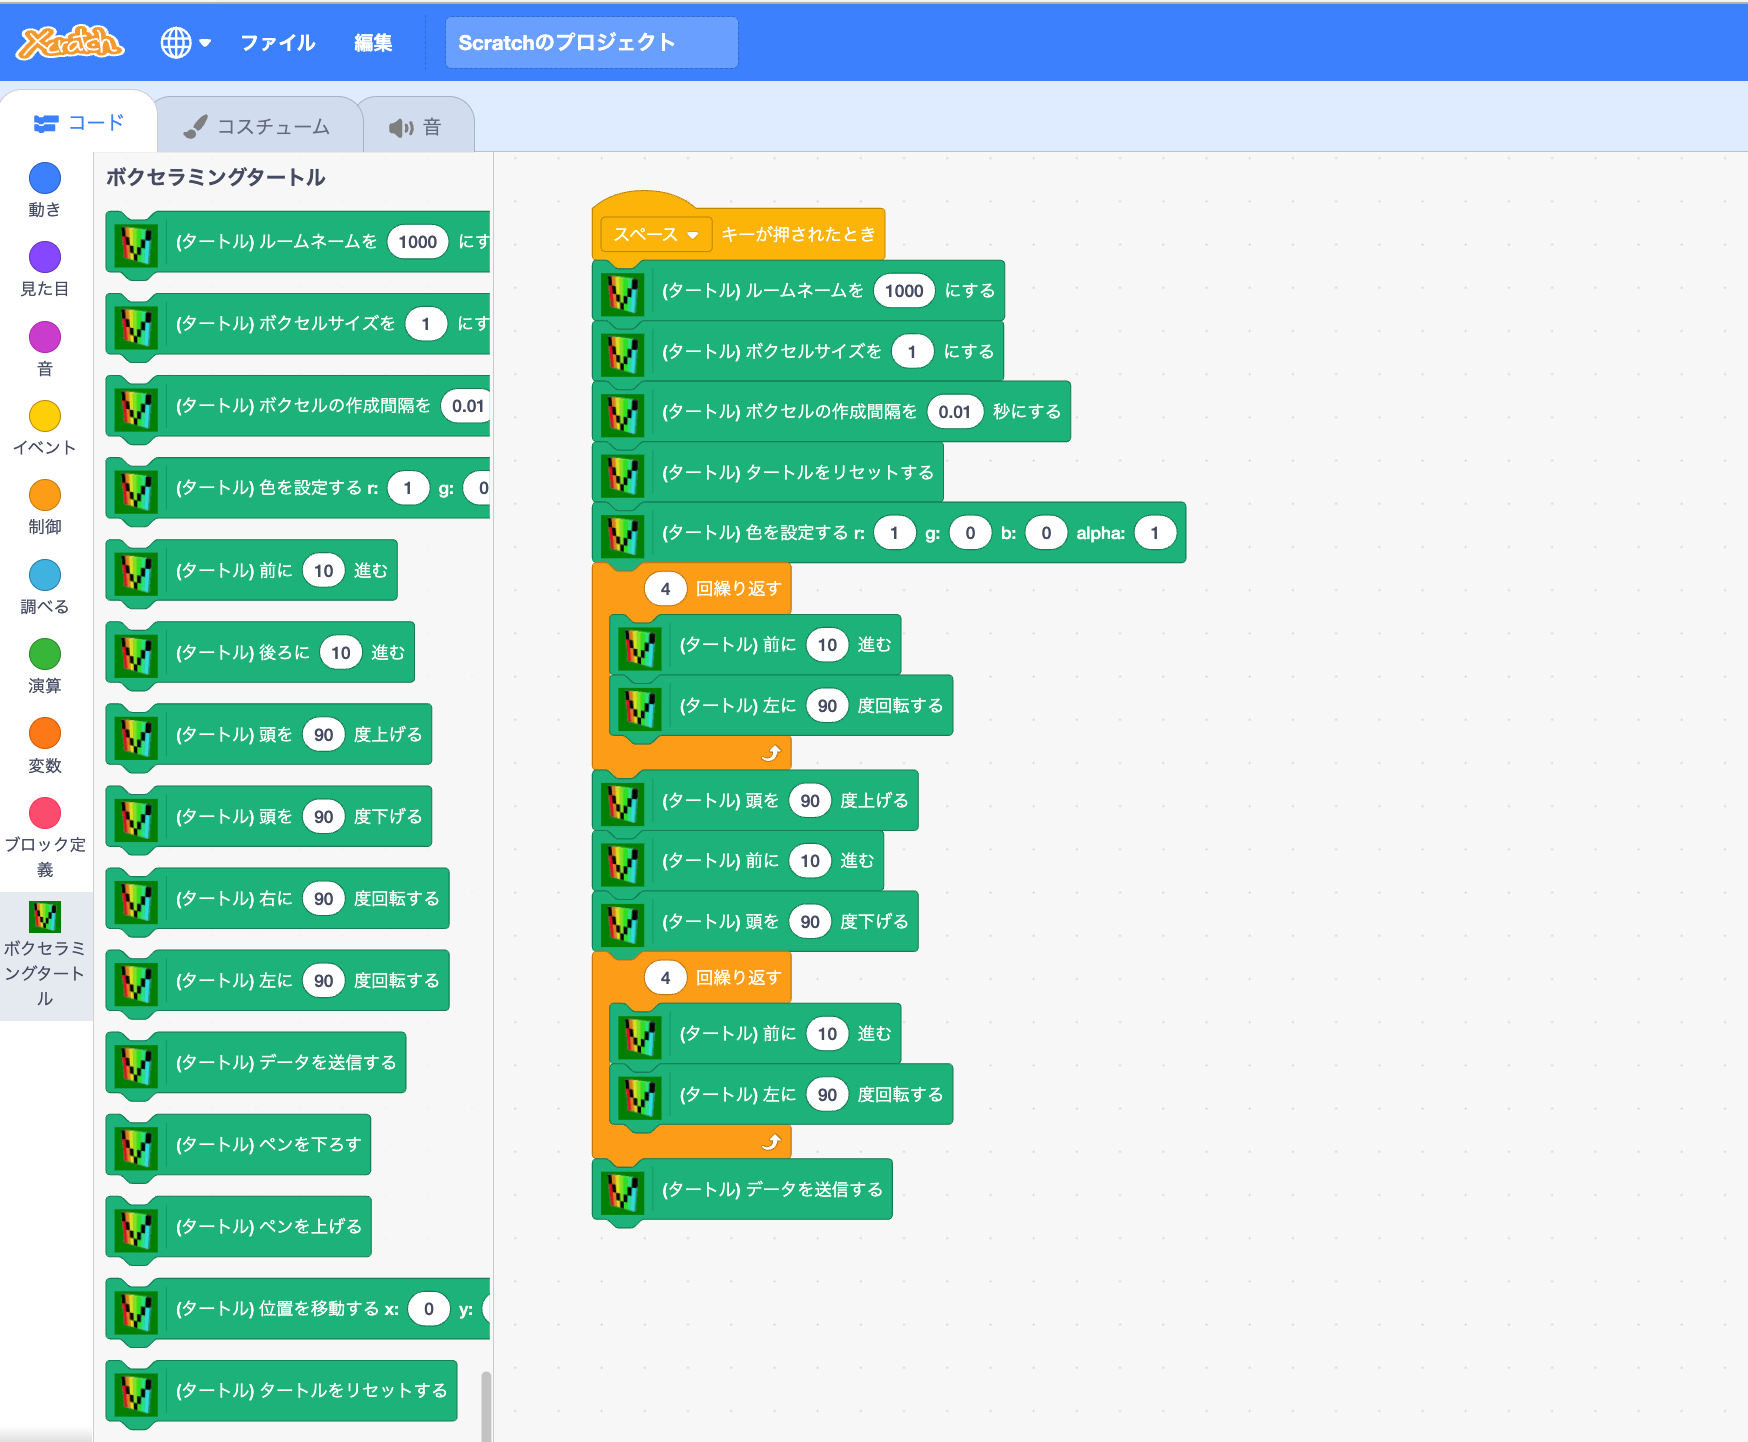
Scratch3 MOD(タートルプログラミング)
Scratch3 MODのタートルプログラミングを使って、ボクセルを設置することができます。直感的にボクセルを設置できるので、プログラミング初心者、特に子どもにおすすめです。
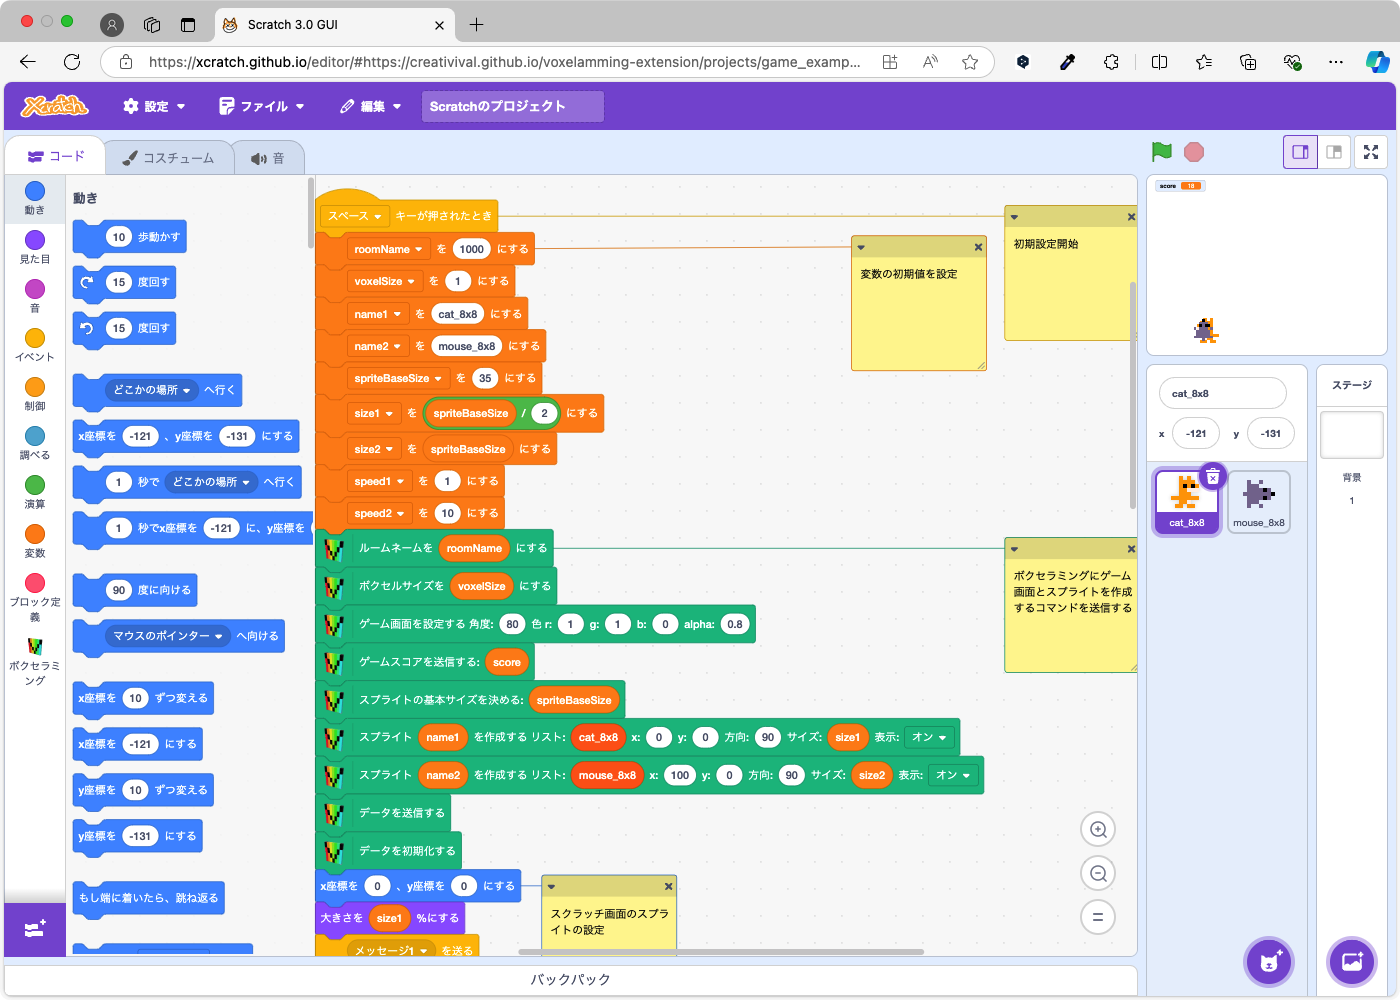
Scratch3 MOD(ゲームプログラミング)
Scratch3 MODのゲーム用のブロックを使って、ARゲームを作成できます。ゲームのロジックはSctatch3 MODのブロックで設定し、スプライトの位置情報をボクセラミングに送信することで、AR空間上にゲームを表示できます。
Python (3.6以上)
パッケージバージョン0.3.0以降をインストールします。
スクリプト
# Python
# voxelammingパッケージからVoxelammingクラスをインポートします
from voxelamming import Voxelamming
# from voxelamming_local import Voxelamming  # ローカルで開発している場合はこちらを使う

# Voxelammingアプリに表示されている部屋名を指定してください
room_name = "1000"
# Voxelammingクラスのインスタンスを生成します
vox = Voxelamming(room_name)

# ボクセルのサイズを設定します
vox.set_box_size(1)
# ボクセルの配置間隔を設定します
vox.set_build_interval(0.01)

# ボクセルを配置するため、位置と色を設定します
for i in range(100):
    vox.create_box(-1, i, 0, r=0, g=1, b=1, alpha=1)
    vox.create_box(0, i, 0, r=1, g=0, b=0, alpha=1)
    vox.create_box(1, i, 0, r=1, g=1, b=0, alpha=1)
    vox.create_box(2, i, 0, r=0, g=1, b=1, alpha=1)

# ボクセルを削除するため、位置を設定します
for i in range(50):
    vox.remove_box(0, i * 2 + 1, 0)
    vox.remove_box(1, i * 2, 0)

# ボクセルデータをアプリに送信します。
vox.send_data("main")
# vox.close_connection()
実行方法
$ pip install voxelamming
$ pip install --upgrade voxelamming
$ sample/python
$ python main.py

or

$ python3 main.py
ゲームスクリプト
# Python
import pyxel
import time
import random
# from voxelamming import Voxelamming
from voxelamming_local import Voxelamming  # ローカルで開発している場合はこちらを使う


class Player:
    name = 'spaceship_8x8'
    dot_data = (
        '-1 -1 -1 8 8 -1 -1 -1 -1 -1 3 7 7 3 -1 -1 -1 -1 -1 7 7 -1 -1 -1 -1 -1 7 7 7 7 -1 -1 -1 7 7 7 7 7 7 -1 3 7'
        ' 7 7 7 7 7 3 -1 8 8 7 7 8 8 -1 -1 -1 -1 8 8 -1 -1 -1'
    )

    def __init__(self, x, y, speed):
        self.direction = 0
        self.x = x
        self.y = y
        self.img = 0
        self.u = 0
        self.v = 0
        self.w = 8
        self.h = 8
        self.speed = speed

    def update(self):
        if pyxel.btn(pyxel.KEY_LEFT):
            self.x -= self.speed
        if pyxel.btn(pyxel.KEY_RIGHT):
            self.x += self.speed


class Enemy:
    name = 'enemy_8x8'
    dot_data = (
        '-1 -1 3 -1 -1 3 -1 -1 -1 3 -1 3 3 -1 3 -1 3 -1 3 3 3 3 -1 3 3 3 3 3 3 3 3 3 3 3 -1 3 3 -1 3 3 3 3 3 3 3 3'
        ' 3 3 -1 3 3 -1 -1 3 3 -1 3 -1 -1 -1 -1 -1 -1 3'
    )

    def __init__(self, x, y):
        self.direction = 0
        self.x = x
        self.y = y
        self.img = 0
        self.u = 0
        self.v = 8
        self.w = 8
        self.h = 8


class Missile:
    def __init__(self, x, y, color_id, direction=0, width=1, height=1):
        self.x = x
        self.y = y
        self.direction = direction
        self.color_id = color_id
        self.width = width
        self.height = height


class App:
    def __init__(self):
        # Pyxelの設定
        self.window_width = 160  # ARウインドウの横幅はself.dot_sizeを掛けた値になる(センチメートル)
        self.window_height = 120  # ARウインドウの縦幅はself.dot_sizeを掛けた値になる(センチメートル)
        self.score = 0
        self.game_over = False
        self.game_clear = False

        # プレイヤーの設定
        self.player = Player(self.window_width // 2, self.window_height - 10, 2)
        self.missiles = []
        self.player_missile_speed = 2

        # 敵の設定
        self.enemy_rows = 3
        self.enemy_cols = 6
        self.enemy_speed = 1
        self.enemy_direction = 1
        self.enemies = []
        self.enemy_missiles = []
        self.enemy_missile_speed = 2

        # 敵の初期化
        for row in range(self.enemy_rows):
            for col in range(self.enemy_cols):
                enemy_x = col * 16 + 20
                enemy_y = row * 12 + 20
                enemy = Enemy(enemy_x, enemy_y)
                self.enemies.append(enemy)

        # ボクセラミングの設定(Pyxelの初期化の前に実行)
        self.dot_size = 1  # AR空間で表示されるスプライトのドットのサイズ(センチメートル)
        self.window_angle = 80  # ARウインドウの傾き(度)
        self.vox = Voxelamming('1000')
        self.init_voxelamming()

        # Pyxelの初期化
        pyxel.init(self.window_width, self.window_height, title="Pyxel Invader Game", fps=30)
        pyxel.mouse(True)
        pyxel.load("invader_game.pyxres")
        pyxel.run(self.update, self.draw)

    def update(self):
        if self.game_over or self.game_clear:
            # カーソル表示
            pyxel.mouse(True)

            if pyxel.btnp(pyxel.MOUSE_BUTTON_LEFT):
                self.reset_game()
            return

        # カーソルの非表示
        pyxel.mouse(False)

        # プレイヤーの操作
        self.player.update()

        if pyxel.btnp(pyxel.KEY_SPACE):
            missile_x = self.player.x + self.player_missile_speed
            missile_y = self.player.y
            missile_clor_id = 10  # 青色
            missile_direction = 0
            missile_width = 2
            missile_height = 4
            self.missiles.append(
                Missile(missile_x, missile_y, missile_clor_id, missile_direction, missile_width, missile_height))

        # ミサイルの移動
        for missile in self.missiles[:]:
            missile.y -= 2
            if missile.y < 0:
                self.missiles.remove(missile)

        # 敵の移動
        move_down = False
        for enemy in self.enemies:
            enemy.x += self.enemy_speed * self.enemy_direction

        for enemy in self.enemies:
            if enemy.x > pyxel.width - 8 or enemy.x < 0:
                self.enemy_direction *= -1
                move_down = True
                break  # 端に到達したらすぐに方向を変える

        if move_down:
            for enemy in self.enemies:
                enemy.y += 8

                # 敵が画面下部に到達したらゲームオーバー
                if enemy.y > pyxel.height - 16:
                    self.game_over = True

        # 敵のミサイル発射
        if random.random() < 0.03 and self.enemies:
            shooting_enemy = random.choice(self.enemies)
            missile_x = shooting_enemy.x + 4
            missile_y = shooting_enemy.y + 8
            missile_clor_id = 8  # 赤色
            missile_direction = 0
            missile_width = 2
            missile_height = 4
            self.enemy_missiles.append(
                Missile(missile_x, missile_y, missile_clor_id, missile_direction, missile_width, missile_height))

        # 敵ミサイルの移動
        for missile in self.enemy_missiles[:]:
            missile.y += self.enemy_missile_speed
            if missile.y > pyxel.height * 2:
                self.enemy_missiles.remove(missile)

        # ミサイルと敵の衝突判定
        for missile in self.missiles[:]:
            for enemy in self.enemies[:]:
                if (enemy.x < missile.x < enemy.x + 16 and
                        enemy.y < missile.y < enemy.y + 12):
                    self.missiles.remove(missile)
                    self.enemies.remove(enemy)
                    self.score += 10
                    break

        # プレイヤーと敵ミサイルの衝突判定
        for missile in self.enemy_missiles[:]:
            if (self.player.x < missile.x < self.player.x + 8 and
                    self.player.y < missile.y < self.player.y + 8):
                self.game_over = True

        # プレイヤーと敵の衝突判定
        for enemy in self.enemies:
            if (self.player.x < enemy.x < self.player.x + 8 and
                    self.player.y < enemy.y < self.player.y + 8):
                self.game_over = True

        # ゲームクリア判定
        if not self.enemies:
            self.game_clear = True

        # ボクセラミングの更新
        self.update_voxelamming()

    def draw(self):
        pyxel.cls(0)
        pyxel.text(5, 4, f"Score: {self.score}", 7)

        if self.game_clear:
            pyxel.text(pyxel.width // 2 - 20, pyxel.height // 2, "GAME CLEAR!", pyxel.frame_count % 16)
            pyxel.text(self.window_width // 2 - 26, self.window_height // 2 + 8, "Click to start",
                       pyxel.frame_count % 16)
        elif self.game_over:
            pyxel.text(pyxel.width // 2 - 20, pyxel.height // 2, "GAME OVER", pyxel.frame_count % 16)
            pyxel.text(self.window_width // 2 - 26, self.window_height // 2 + 8, "Click to start",
                       pyxel.frame_count % 16)
        else:
            # プレイヤーの描画
            pyxel.blt(self.player.x, self.player.y, self.player.img, self.player.u, self.player.v, self.player.w,
                      self.player.h, 0)

            # 敵の描画
            for enemy in self.enemies:
                pyxel.blt(enemy.x, enemy.y, enemy.img, enemy.u, enemy.v, enemy.w, enemy.h, 0)

            # ミサイルの描画
            for missile in self.missiles:
                pyxel.rect(missile.x, missile.y, missile.width, missile.height, missile.color_id)

            # 敵ミサイルの描画
            for missile in self.enemy_missiles:
                pyxel.rect(missile.x, missile.y, missile.width, missile.height, missile.color_id)

    def reset_game(self):
        self.score = 0  # スコアをリセット
        self.game_over = False
        self.game_clear = False

        # プレイヤーの設定
        self.player = Player(self.window_width // 2, self.window_height - 10, 2)
        self.missiles = []

        # 敵の設定
        self.enemy_rows = 3
        self.enemy_cols = 6
        self.enemy_speed = 1
        self.enemy_direction = 1
        self.enemies = []
        self.enemy_missiles = []
        self.enemy_missile_speed = 2

        # 敵の初期化
        for row in range(self.enemy_rows):
            for col in range(self.enemy_cols):
                enemy_x = col * 16 + 20
                enemy_y = row * 12 + 20
                enemy = Enemy(enemy_x, enemy_y)
                self.enemies.append(enemy)

    def init_voxelamming(self):

        # ボクセラミングの初期化
        self.vox.set_box_size(self.dot_size)
        self.vox.set_game_screen(self.window_width, self.window_height, self.window_angle, red=1, green=1, blue=0,
                                 alpha=0.8)
        self.vox.set_game_score(self.score)

        # プレイヤーのスプライトを表示
        vox_x, vox_y = self.convert_sprite_position_to_voxelamming(self.player.x, self.player.y)
        self.vox.create_sprite(self.player.name, self.player.dot_data, vox_x, vox_y, self.player.direction, 1)

        # 敵は複数のため、テンプレートを作成して、それを複数箇所に表示する
        self.vox.create_sprite(Enemy.name, Enemy.dot_data)
        for enemy in self.enemies:
            vox_x, vox_y = self.convert_sprite_position_to_voxelamming(enemy.x, enemy.y)
            self.vox.move_sprite(enemy.name, vox_x, vox_y, enemy.direction, 1)

        self.vox.send_data()
        self.vox.clear_data()

    def update_voxelamming(self):
        # スプライトの情報を0.1秒ごとに送信
        if pyxel.frame_count % 3 == 0 or self.game_clear or self.game_over:  # PyxelのデフォルトFPSは30
            self.vox.set_box_size(self.dot_size)
            self.vox.set_game_screen(self.window_width, self.window_height, self.window_angle, red=1, green=1,
                                     blue=0, alpha=0.5)
            self.vox.set_game_score(self.score, -66, 57)

            # スプライトの移動
            vox_x, vox_y = self.convert_sprite_position_to_voxelamming(self.player.x, self.player.y)
            self.vox.move_sprite(self.player.name, vox_x, vox_y, self.player.direction, 1)

            # 敵の移動はテンプレートを複数箇所に表示する
            for enemy in self.enemies:
                vox_x, vox_y = self.convert_sprite_position_to_voxelamming(enemy.x, enemy.y)
                self.vox.move_sprite_clone(enemy.name, vox_x, vox_y, enemy.direction, 1)

            # ミサイルはdotとして表示
            for missile in self.missiles + self.enemy_missiles:
                vox_x, vox_y = self.convert_dot_position_to_voxelamming(missile.x, missile.y, missile.width, missile.height)
                self.vox.display_dot(vox_x, vox_y, missile.direction, missile.color_id, missile.width,
                                     missile.height)

            # ゲームクリアの表示と画面を青に変更
            if self.game_clear:
                self.vox.set_game_screen(self.window_width, self.window_height, self.window_angle, red=0, green=0,
                                         blue=1, alpha=0.8)
                self.vox.set_command('gameClear')

            # ゲームオーバーの表示と画面を赤に変更
            if self.game_over:
                self.vox.set_game_screen(self.window_width, self.window_height, self.window_angle, red=1, green=0,
                                         blue=0, alpha=0.8)
                self.vox.set_command('gameOver')

            self.vox.send_data()

            # ゲームクリア、ゲームオーバー時に1秒待ってから再度データを送信
            if self.game_clear or self.game_over:
                time.sleep(1)
                self.vox.send_data()

            self.vox.clear_data()

    def convert_sprite_position_to_voxelamming(self, x, y):
        return x - self.window_width // 2 + 4, self.window_height // 2 - (y + 4)

    def convert_dot_position_to_voxelamming(self, x, y, width=1, height=1):
        return x - self.window_width // 2 + width / 2, self.window_height // 2 - (y + height / 2)


if __name__ == "__main__":
    App()
実行方法
ボクセラミングでベースアンカーを設置してから、Pyxelゲームを起動してください。
$ pip install voxelamming pyxel
$ pip install --upgrade voxelamming
$ sample/python
$ python game_sample.py

or

$ python3 main.py
JavaScript (Node.js)
パッケージバージョン0.3.0以降をインストールします。
スクリプト
// JavaScript (Node.js)
import { Voxelamming } from 'voxelamming';

const roomName = '1000';
const vox = new Voxelamming(roomName);

vox.setBoxSize(0.5);
vox.setBuildInterval(0.01);

for (let i = 0; i < 100; i++) {
  vox.createBox(-1, i, 0, 0, 1, 1);
  vox.createBox(0, i, 0, 1, 0, 0);
  vox.createBox(1, i, 0, 1, 1, 0);
  vox.createBox(2, i, 0, 0, 1, 1);
}

for (let i = 0; i < 50; i++) {
  vox.removeBox(0, i * 2, 0);
  vox.removeBox(1, i * 2 + 1, 0);
}

await vox.sendData("main");
console.log('send data done')
実行方法
$ sample/javaScript
$ npm install voxelamming
$ node main.mjs
Ruby
スクリプト
パッケージバージョン0.3.0以降をインストールします。
# Ruby
require 'voxelamming'
# require_relative 'voxelamming'

room_name = '1000'
vox = Voxelamming::VoxelammingManager.new(room_name)
# vox = VoxelammingManager.new(room_name)

vox.set_box_size(0.5)
vox.set_build_interval(0.01)

for i in 0...100
  vox.create_box(-1, i, 0, r: 0, g: 1, b: 1)
  vox.create_box(0, i, 0, r: 1, g: 0, b: 0)
  vox.create_box(1, i, 0, r: 1, g: 1, b: 0)
  vox.create_box(2, i, 0, r: 0, g: 1, b: 1)
end

for i in 0...50
  vox.remove_box(0, i * 2, 0)
  vox.remove_box(1, i * 2 + 1, 0)
end

vox.send_data(name: 'main')
実行方法
$ sample/ruby
$ gem install voxelamming
$ ruby main.rb
Swift
スクリプト
// Swift
import Foundation

if #available(iOS 15.0, macOS 12.0, *) {
    let roomName = "1000"
    let vox = Voxelamming(roomName: roomName)
    vox.setBoxSize(0.5)
    vox.setBuildInterval(0.01)

    Task {
        do {
            for i in 0..<100 {
                vox.createBox(-1, Double(i), 0, r: 0, g: 1, b: 1)
                vox.createBox(0, Double(i), 0, r: 1, g: 0, b: 0)
                vox.createBox(1, Double(i), 0, r: 1, g: 1, b: 0)
                vox.createBox(2, Double(i), 0, r: 0, g: 1, b: 1)
            }

            for i in 0..<50 {
                vox.removeBox(0, Double(i * 2), 0)
                vox.removeBox(1, Double(i * 2 + 1), 0)
            }

            try await vox.sendData()
        } catch {
            print("An error occurred: \(error)")
        }
    }

    RunLoop.main.run(until: Date(timeIntervalSinceNow: 10)) // Or longer depending on your needs
} else {
    fatalError("This script requires iOS 15.0 / macOS 12.0 or later.")
}
実行方法
$ cd sample/swift/main
$ swift run
ショーケース
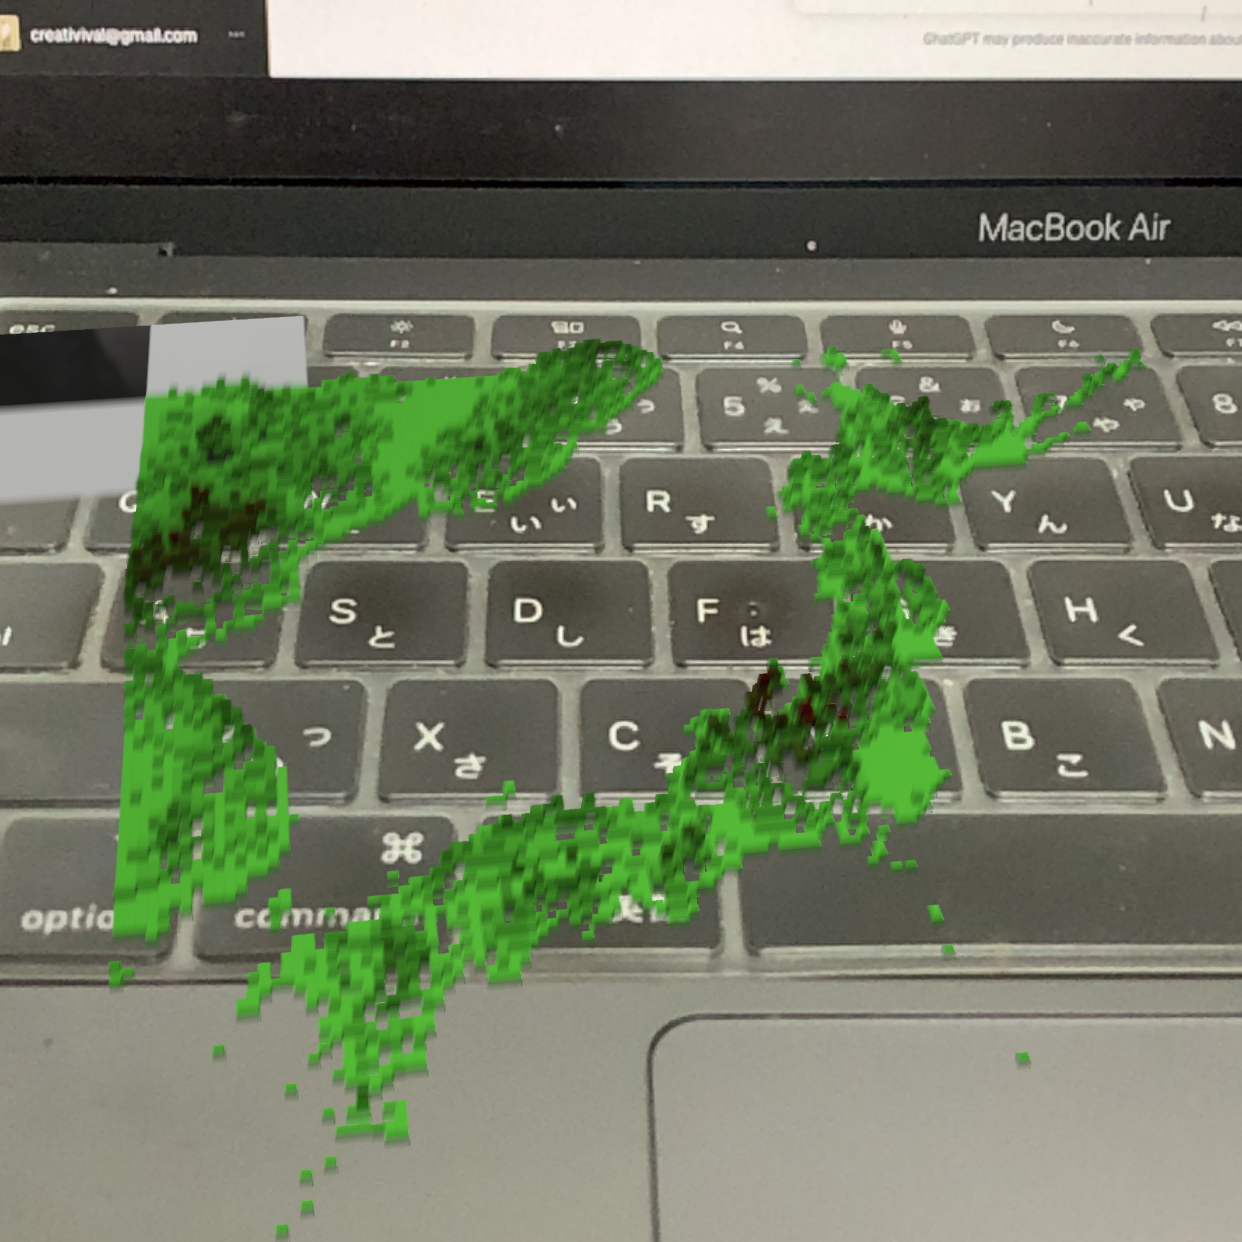
ボクセラミングで作成できる作品例を紹介します。
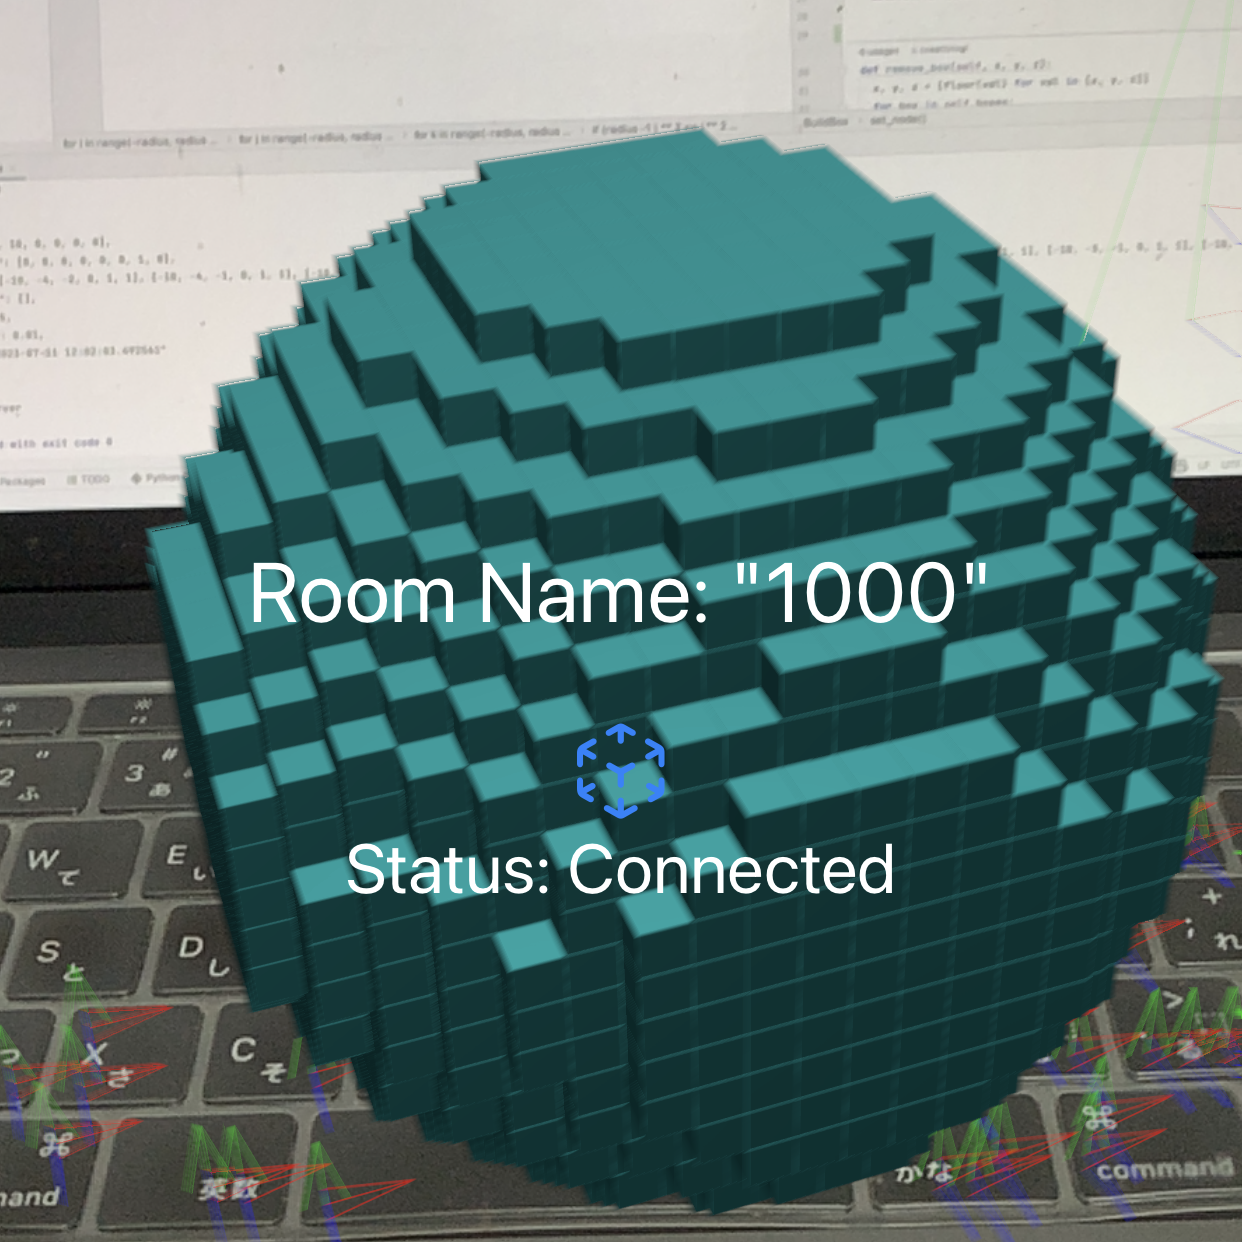
球体
ボクセルで球体を作成します。radius変数を変更することで、球体の大きさを調整できます。
# Python
# voxelammingパッケージからVoxelammingクラスをインポートします
from voxelamming import Voxelamming
# from voxelamming_local import Voxelamming  # ローカルで開発している場合はこちらを使う

# 球体の半径を設定する
radius = 11

# Voxelammingアプリに表示されている部屋名を指定してください
room_name = "1000"
# Voxelammingクラスのインスタンスを生成します
vox = Voxelamming(room_name)

# ボクセルの設定を行います
vox.set_box_size(2)
vox.set_build_interval(0.01)

# ボクセルを配置するため、位置と色を設定します
for i in range(-radius, radius + 1):
    for j in range(-radius, radius + 1):
        for k in range(-radius, radius + 1):
            if (radius - 1) ** 2 <= i ** 2 + j ** 2 + k ** 2 < radius ** 2:
                print(i, j, k)
                vox.create_box(i, j, k, 0, 1, 1)

# ボクセルデータをアプリに送信します。
vox.send_data("main_sphere_sample")
ノードの配置
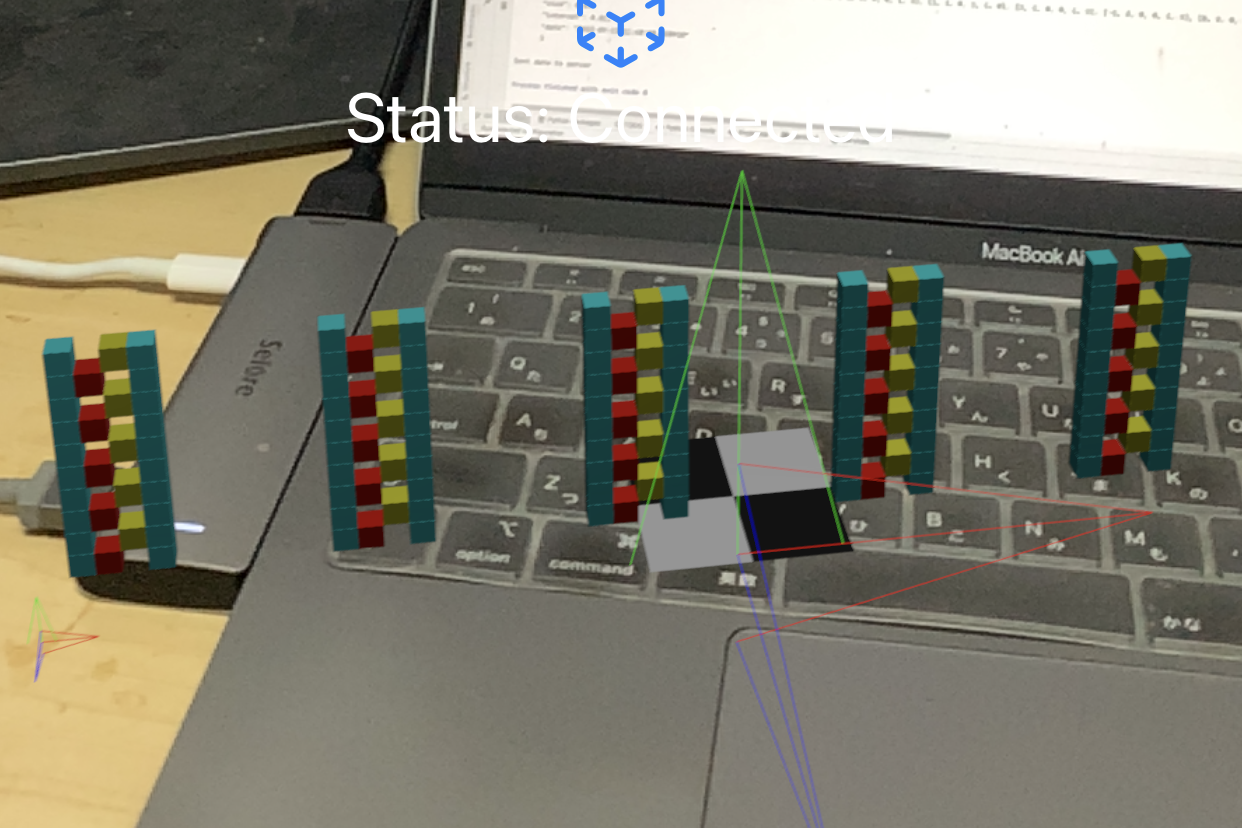
ボクセラミングは、ノードを配置することで、3D空間に構造を作成することができます。
ノードには、位置情報を指定することができます。
# Python
import time
from voxelamming import Voxelamming

room_name = "1000"
vox = Voxelamming(room_name)

vox.set_box_size(0.5)
vox.set_build_interval(0.01)

for i in range(10):
  vox.create_box(-1, i, 0, r=0, g=1, b=1)
  vox.create_box(0, i, 0, r=1, g=0, b=0)
  vox.create_box(1, i, 0, r=1, g=1, b=0)
  vox.create_box(2, i, 0, r=0, g=1, b=1)

for i in range(5):
  vox.remove_box(0, i * 2 + 1, 0)
  vox.remove_box(1, i * 2, 0)

for i in range(5):
  vox.transform(-25 + i * 10, 0, 0, pitch=0, yaw=0, roll=0)
  vox.send_data()
  time.sleep(1)
ノードの回転
ボクセラミングは、ノードを回転させることができます。pitch、yaw、rollの値を変更することで、X軸、Y軸、Z軸を中心に回転します。
# Python
import time
# voxelammingパッケージからVoxelammingクラスをインポートします
from voxelamming import Voxelamming
# from voxelamming_local import Voxelamming  # ローカルで開発している場合はこちらを使う

# 変数の設定
rotations = [
    [0, 0, 0],
    [30, 0, 0],
    [0, 30, 0],
    [0, 0, 30],
]

# Voxelammingアプリに表示されている部屋名を指定してください
room_name = "1000"
# Voxelammingクラスのインスタンスを生成します
vox = Voxelamming(room_name)

# ボクセルの設定を行います
vox.set_box_size(0.5)
vox.set_build_interval(0.01)

for i in range(10):
    vox.create_box(-1, i, 0, r=0, g=1, b=1)
    vox.create_box(0, i, 0, r=1, g=0, b=0)
    vox.create_box(1, i, 0, r=1, g=1, b=0)
    vox.create_box(2, i, 0, r=0, g=1, b=1)

for i in range(5):
    vox.remove_box(0, i * 2 + 1, 0)
    vox.remove_box(1, i * 2, 0)

for rotation in rotations:
    pitch, yaw, roll = rotation

    vox.transform(0, 0, 0, pitch=pitch, yaw=yaw, roll=roll)
    # ボクセルデータをアプリに送信します。
    vox.send_data()
    time.sleep(0.1)
ノードのアニメーション
ノードのアニメーションは、位置やサイズ、回転を実行できます。アニメーションの間隔(interval)を変更することで、アニメーションの速度を調整できます。
# Python
from time import sleep
# voxelammingパッケージからVoxelammingクラスをインポートします
from voxelamming_local import Voxelamming

# Voxelammingアプリに表示されている部屋名を指定してください
room_name = "1000"
# Voxelammingクラスのインスタンスを生成します
vox = Voxelamming(room_name)
# ボクセルの設定を行います
vox.set_box_size(0.5)
vox.set_build_interval(0.01)

for i in range(10):
    vox.create_box(-1, i, 0, r=0, g=1, b=1)
    vox.create_box(0, i, 0, r=1, g=0, b=0)
    vox.create_box(1, i, 0, r=1, g=1, b=0)
    vox.create_box(2, i, 0, r=0, g=1, b=1)

for i in range(5):
    vox.remove_box(0, i * 2 + 1, 0)
    vox.remove_box(1, i * 2, 0)

# ボクセルデータをアプリに送信します。(1回目)
vox.send_data()

# 1秒待機します
sleep(0.1)

vox.animate(10, 0, 0, pitch=0, yaw=30, roll=0, scale=2, interval=10)

# ボクセルデータをアプリに送信します。(2回目)
vox.send_data()
グローバルアニメーション
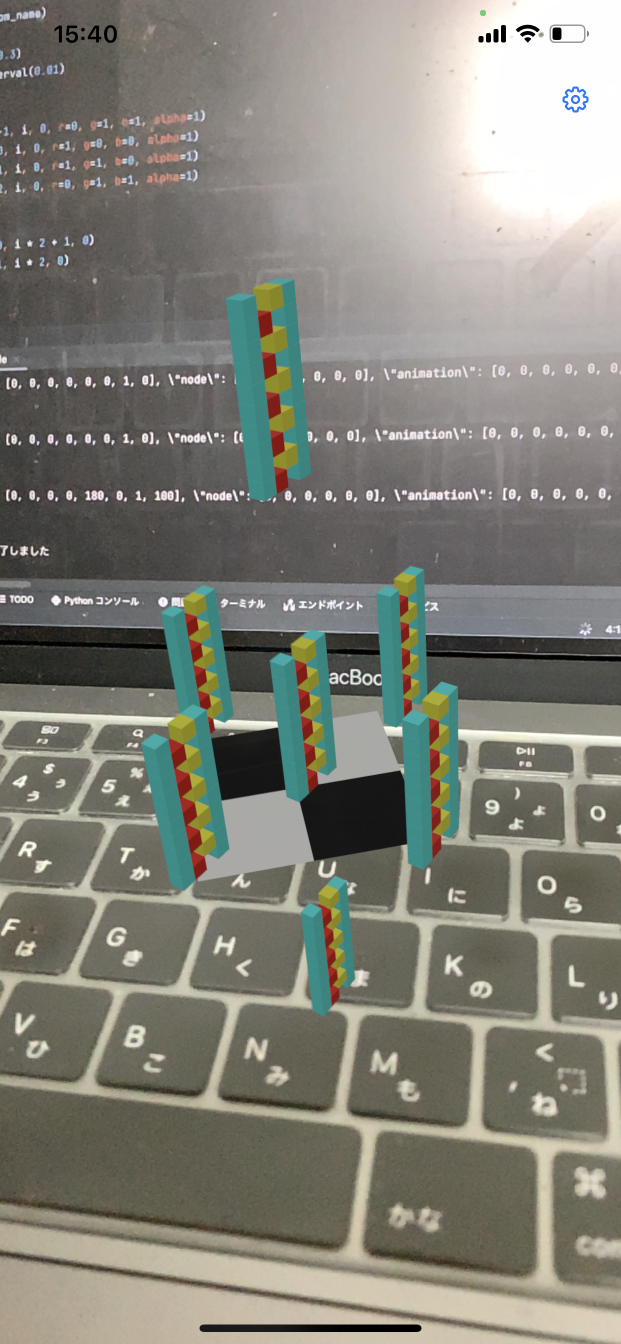
グローバルアニメーションは、全てのノードをアニメーションさせます。位置、回転、スケール、アニメーションの間隔(interval)を指定することができます。
# Python
from time import sleep
# voxelammingパッケージからVoxelammingクラスをインポートします
from voxelamming import Voxelamming
# from voxelamming_local import Voxelamming  # ローカルで開発している場合はこちらを使う

# Voxelammingアプリに表示されている部屋名を指定してください
room_name = "1000"
# Voxelammingクラスのインスタンスを生成します
vox = Voxelamming(room_name)
# ボクセルの設定を行います
vox.set_box_size(0.3)
vox.set_build_interval(0.01)

# ボクセルを配置するため、位置と色を設定します
for i in range(10):
    vox.create_box(-1, i, 0, r=0, g=1, b=1, alpha=1)
    vox.create_box(0, i, 0, r=1, g=0, b=0, alpha=1)
    vox.create_box(1, i, 0, r=1, g=1, b=0, alpha=1)
    vox.create_box(2, i, 0, r=0, g=1, b=1, alpha=1)

for i in range(5):
    vox.remove_box(0, i * 2 + 1, 0)
    vox.remove_box(1, i * 2, 0)

# ボクセルを配置する位置を設定します
node_positions = [
    [0, 0, 0],
    [-10, 0, 0],
    [10, 0, 0],
    [0, -20, 0],
    [0, 20, 0],
    [0, 0, -10],
    [0, 0, 10]

]

for x, y, z in node_positions:
    # ボクセルを配置するため、位置を設定します
    vox.transform(x, y, z, pitch=0, yaw=0, roll=0)
    # ボクセルデータをアプリに送信します。(位置を変えて、複数回送信)
    vox.send_data()
    # 1秒待機します
    sleep(0.1)

vox.animate_global(0, 0, 0, pitch=0, yaw=180, roll=0, scale=1, interval=100)

# ボクセルデータをアプリに送信します。(グローバルアニメーション)
vox.send_data()
文字表示
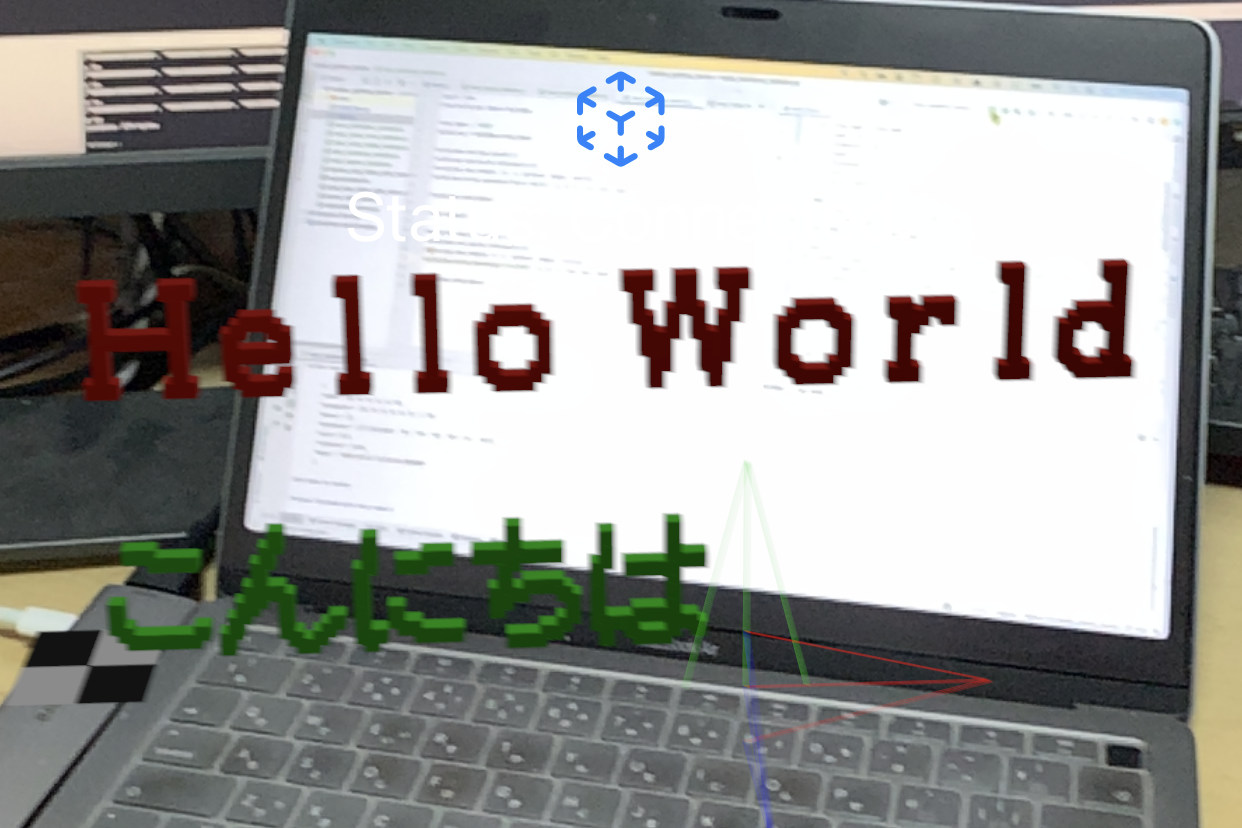
ボクセルで文字を表示します。文字列、位置、色、透明度を指定することができます。フォントは、日本語、英語、数字に対応しています。
# Python
# voxelammingパッケージからVoxelammingクラスをインポートします
from voxelamming import Voxelamming
# from voxelamming_local import Voxelamming  # ローカルで開発している場合はこちらを使う


# Voxelammingアプリに表示されている部屋名を指定してください
room_name = "1000"
# Voxelammingクラスのインスタンスを生成します
vox = Voxelamming(room_name)
# ボクセルの設定を行います
vox.set_box_size(0.5)
vox.set_build_interval(0.01)

# ボクセルを配置するため、位置と色を設定します
# フォントサイズは、8, 12, 16, 24から選びます
# is_fixed_widthをTrueにすると、文字間隔が固定されます
vox.write_sentence("Voxel", 0, 130, 0, r=1, g=0, b=1, alpha=1, font_size=24)
vox.write_sentence("Voxel", 0, 106, 0, r=1, g=0, b=1, alpha=1, font_size=24, is_fixed_width=True)
vox.write_sentence("Hello World", 0, 90, 0, r=1, g=0, b=0, alpha=1, font_size=16)
vox.write_sentence("Hello World", 0, 64, 0, r=1, g=0, b=0, alpha=1, font_size=16, is_fixed_width=True)
vox.write_sentence("こんにちは", 0, 48, 0, r=0, g=1, b=0, alpha=1, font_size=12)
vox.write_sentence("こんにちは", 0, 32, 0, r=0, g=1, b=0, alpha=1, font_size=12, is_fixed_width=True)
vox.write_sentence("今日は", 0, 16, 0, r=0, g=0, b=1, alpha=1, font_size=8)
vox.write_sentence("今日は", 0, 0, 0, r=0, g=0, b=1, alpha=1, font_size=8, is_fixed_width=True)
# ボクセルデータをアプリに送信します。
vox.send_data("write_sentence")
地図
ボクセルで地図を作成します。地図データは、地理院地図の標高データを使用しています。地図データは、CSVファイルから読み込んで、ボクセルに変換します。
# voxelammingパッケージからVoxelammingクラスをインポートします
from voxelamming import Voxelamming, get_map_data_from_csv, get_box_color
# from voxelamming_local import Voxelamming, get_map_data_from_csv, get_box_color

# 変数の設定
column_num, row_num = 257, 257
csv_file = '../map_file/map_38_138_100km.csv'
height_scale = 100
high_color = (0.5, 0, 0)
low_color = (0, 1, 0)

# Voxelammingアプリに表示されている部屋名を指定してください
room_name = "1000"
# Voxelammingクラスのインスタンスを生成します
vox = Voxelamming(room_name)

# ボクセルの設定を行います
vox.set_box_size(1)
vox.set_build_interval(0.001)
vox.set_command('liteRender')  # 描画を軽くするためのコマンド

# ボクセルを配置するため、位置と色を設定します
map_data = get_map_data_from_csv(csv_file, height_scale)
boxes = map_data['boxes']
max_height = map_data['maxHeight']
# skip = 1  # high power device
skip = 2  # normal
# skip = 4  # low power device

for j in range(row_num // skip):
    for i in range(column_num // skip):
        print(i, j)
        x = i - column_num // (skip * 2)
        z = j - row_num // (skip * 2)
        y = boxes[j * skip][i * skip]
        r, g, b = get_box_color(y, max_height, high_color, low_color)

        if y > 0:
            vox.create_box(x, y, z, r, g, b, 1)

# ボクセルデータをアプリに送信します。
vox.send_data("main_map_sample")
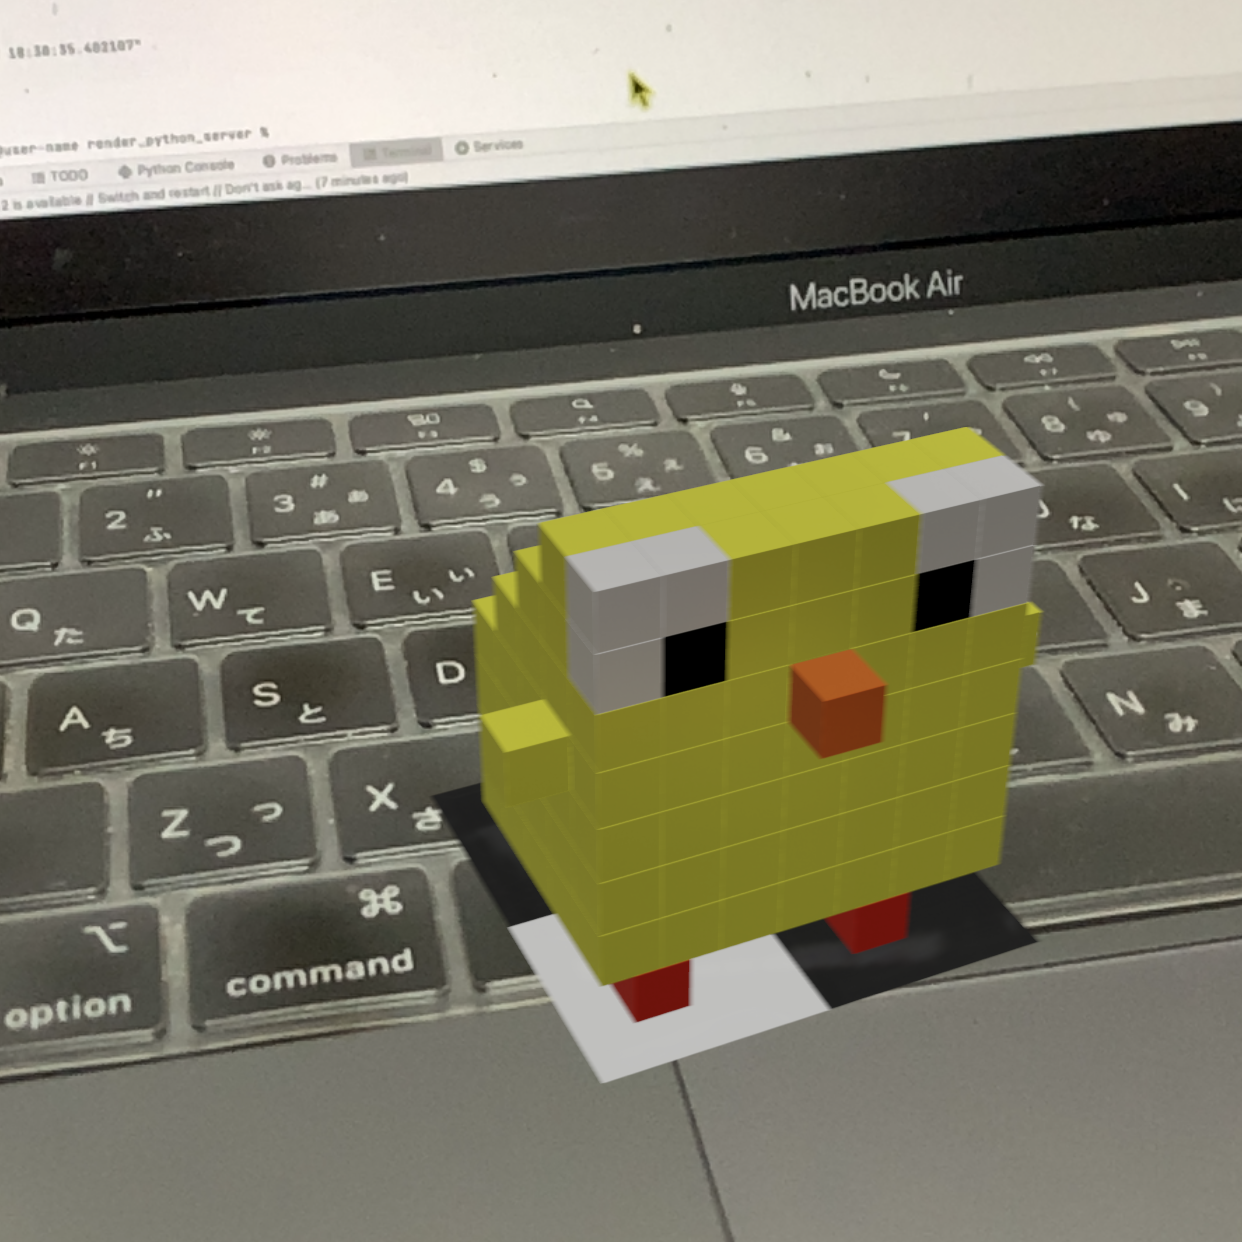
MagicaVoxelで作成したモデルの表示
MagicaVoxelで作成したボクセルアートをインポートできます。PLY形式でMagicaVoxelのボクセルアートをエクスポートし、ボクセラミングにインポートします。
# Python
# voxelammingパッケージからVoxelammingクラスをインポートします
from voxelamming import Voxelamming, get_boxes_from_ply
# from voxelamming_local import Voxelamming, get_boxes_from_ply

ply_file_name = '../ply_file/piyo.ply'

# Voxelammingアプリに表示されている部屋名を指定してください
room_name = "1000"
# Voxelammingクラスのインスタンスを生成します
vox = Voxelamming(room_name)

# ボクセルの設定を行います
vox.set_box_size(1)
vox.set_build_interval(0.01)

# ボクセルを配置するため、位置と色を設定します
boxes = get_boxes_from_ply(ply_file_name)

for box in boxes:
    vox.create_box(*box)

# ボクセルデータをアプリに送信します。
vox.send_data("main_make_model_sample")
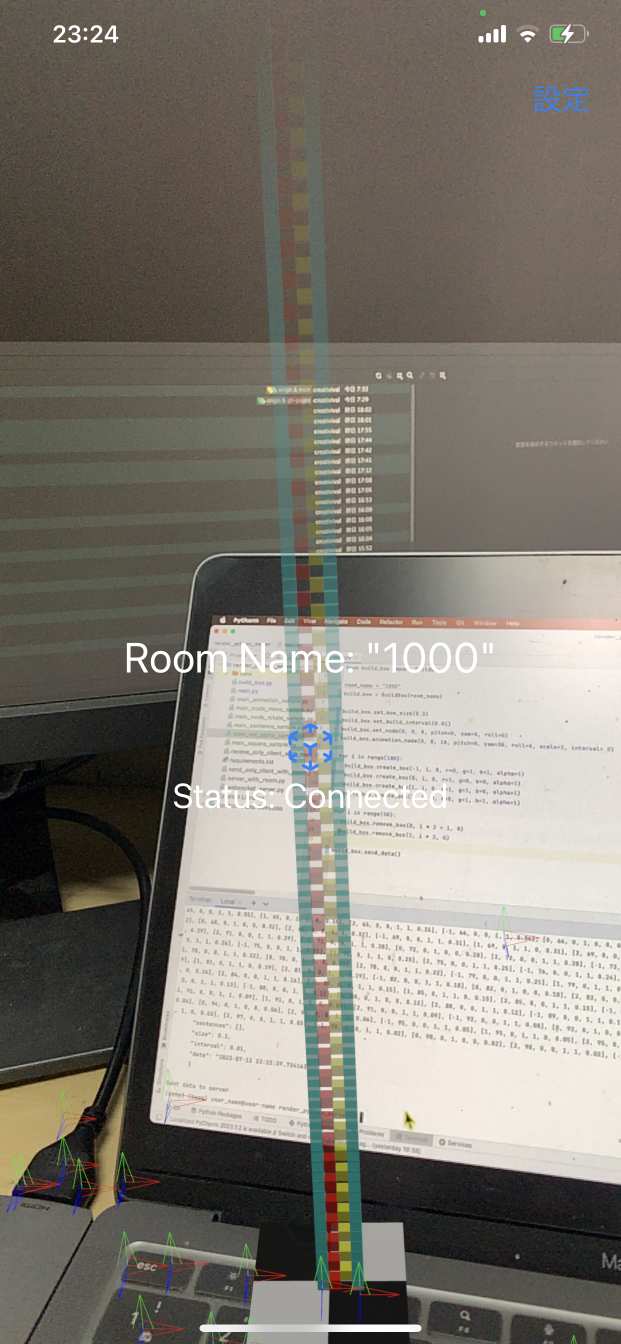
透明ボクセル
ボクセルの透明度を設定することができます。透明度は、0から1までの値で指定します。
# Python
# voxelammingパッケージからVoxelammingクラスをインポートします
from voxelamming import Voxelamming
# from voxelamming_local import Voxelamming  # ローカルで開発している場合はこちらを使う

# Voxelammingアプリに表示されている部屋名を指定してください
room_name = "1000"
# Voxelammingクラスのインスタンスを生成します
vox = Voxelamming(room_name)

# ボクセルの設定を行います
vox.set_box_size(0.3)
vox.set_build_interval(0.01)
vox.transform(0, 0, 0, pitch=0, yaw=0, roll=0)
vox.animate(0, 0, 10, pitch=0, yaw=30, roll=0, scale=2, interval=0)

# ボクセルを配置するため、位置と色を設定します
for i in range(100):
    alpha = (100 - i) / 100
    vox.create_box(-1, i, 0, r=0, g=1, b=1, alpha=alpha)
    vox.create_box(0, i, 0, r=1, g=0, b=0, alpha=alpha)
    vox.create_box(1, i, 0, r=1, g=1, b=0, alpha=alpha)
    vox.create_box(2, i, 0, r=0, g=1, b=1, alpha=alpha)

for i in range(50):
    vox.remove_box(0, i * 2 + 1, 0)
    vox.remove_box(1, i * 2, 0)

# ボクセルデータをアプリに送信します。
vox.send_data("main_set_alpha_sample")
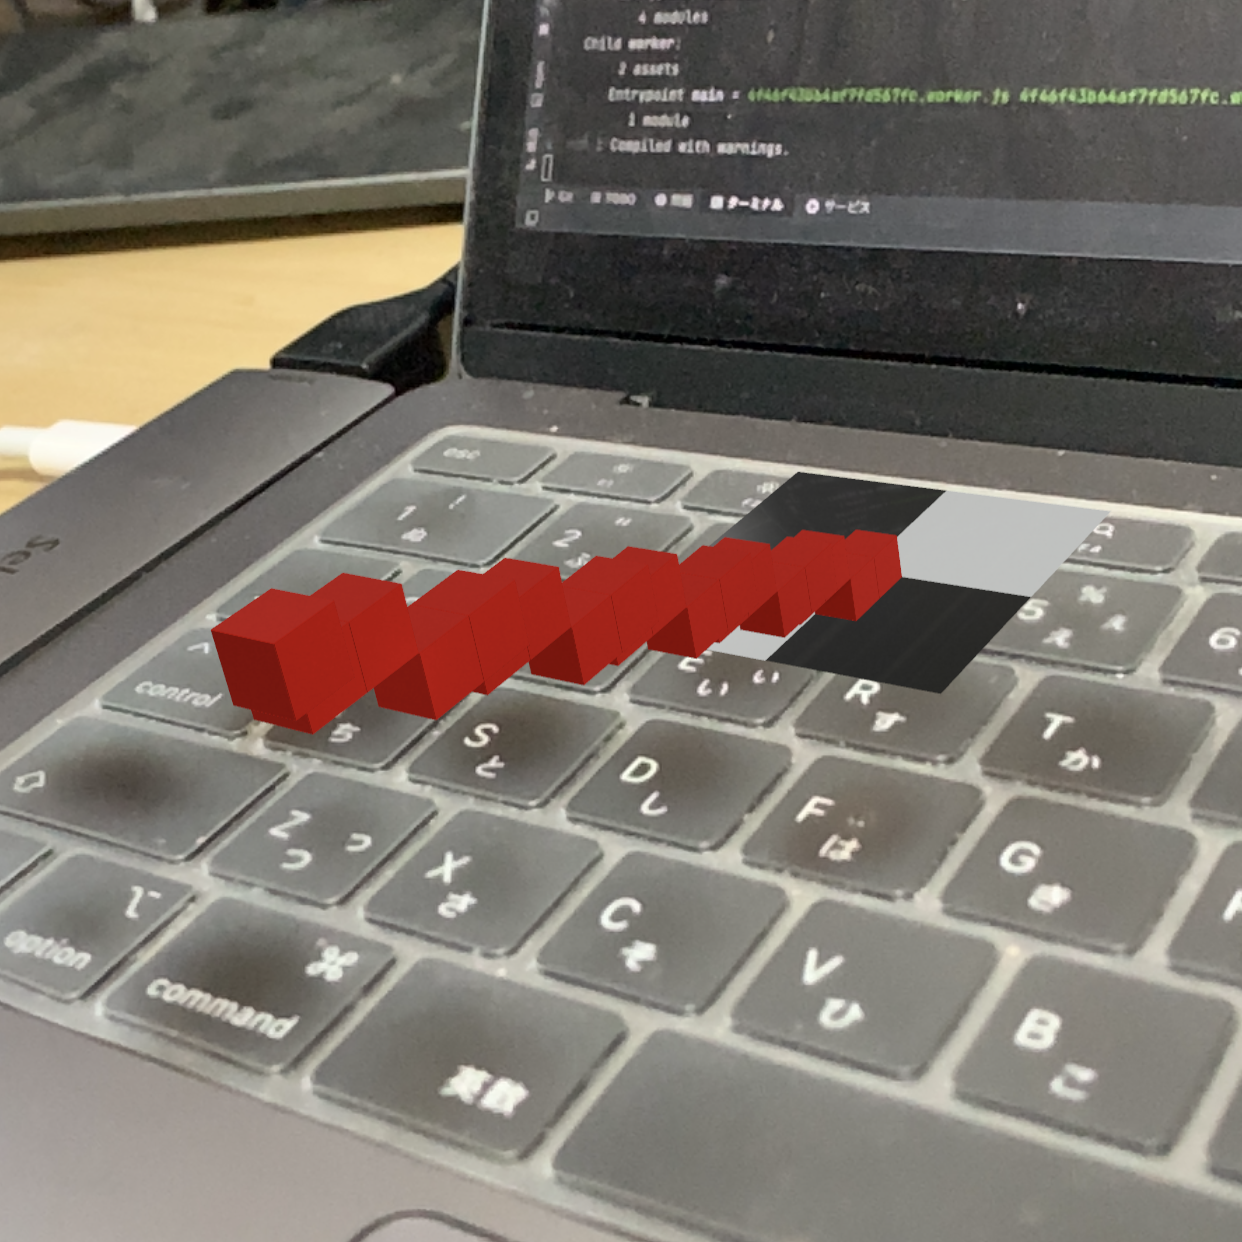
線を引く
2つの点を指定することで、線分を引きます。線の色を指定できます。floatコマンドを使用することで、滑らかな線を引くことができます。
# Python
import time
# voxelammingパッケージからVoxelammingクラスをインポートします
from voxelamming import Voxelamming
# from voxelamming_local import Voxelamming  # ローカルで開発している場合はこちらを使う

# Voxelammingアプリに表示されている部屋名を指定してください
room_name = "1000"
# Voxelammingクラスのインスタンスを生成します
vox = Voxelamming(room_name)
# ボクセルの設定を行います
vox.set_box_size(0.5)
vox.set_build_interval(0.01)
# vox.set_command('float')

# draw_lineメソッドを使って直線を描画します
vox.draw_line(0, 0, 0, 5, 10, 20, r=1, g=0, b=0, alpha=1)
vox.send_data()

# ボクセルデータをアプリに送信します。
vox.send_data("main_draw_line_sample")
形状を変更(立方体、球体、平面)
ボクセルの形状を変更することができます。形状は、立方体、球体、平面に対応しています。
# Python
import time
# voxelammingパッケージからVoxelammingクラスをインポートします
from voxelamming import Voxelamming
# from voxelamming_local import Voxelamming  # ローカルで開発している場合はこちらを使う

# Voxelammingアプリに表示されている部屋名を指定してください
room_name = "1000"
# Voxelammingクラスのインスタンスを生成します
vox = Voxelamming(room_name)
# ボクセルの設定を行います
vox.set_box_size(0.5)
vox.set_build_interval(0.01)

# ボクセルを配置するため、位置と色を設定します
for i in range(10):
    vox.create_box(-1, i, 0, r=0, g=1, b=1, alpha=1)
    vox.create_box(0, i, 0, r=1, g=0, b=0, alpha=1)
    vox.create_box(1, i, 0, r=1, g=1, b=0, alpha=1)
    vox.create_box(2, i, 0, r=0, g=1, b=1, alpha=1)

for i in range(5):
    vox.remove_box(0, i * 2 + 1, 0)
    vox.remove_box(1, i * 2, 0)

vox.send_data('box')  # ボクセルデータをアプリに送信します。

time.sleep(0.1)

vox.transform(10, 0, 0, pitch=0, yaw=0, roll=0)
vox.change_shape('sphere')
vox.send_data('sphere')  # sphereのボクセルデータをアプリに送信します。

time.sleep(0.1)

vox.transform(20, 0, 0, pitch=0, yaw=0, roll=0)
vox.change_shape('plane')
# ボクセルデータをアプリに送信します。
vox.send_data('plane')  # planeのボクセルデータをアプリに送信します。
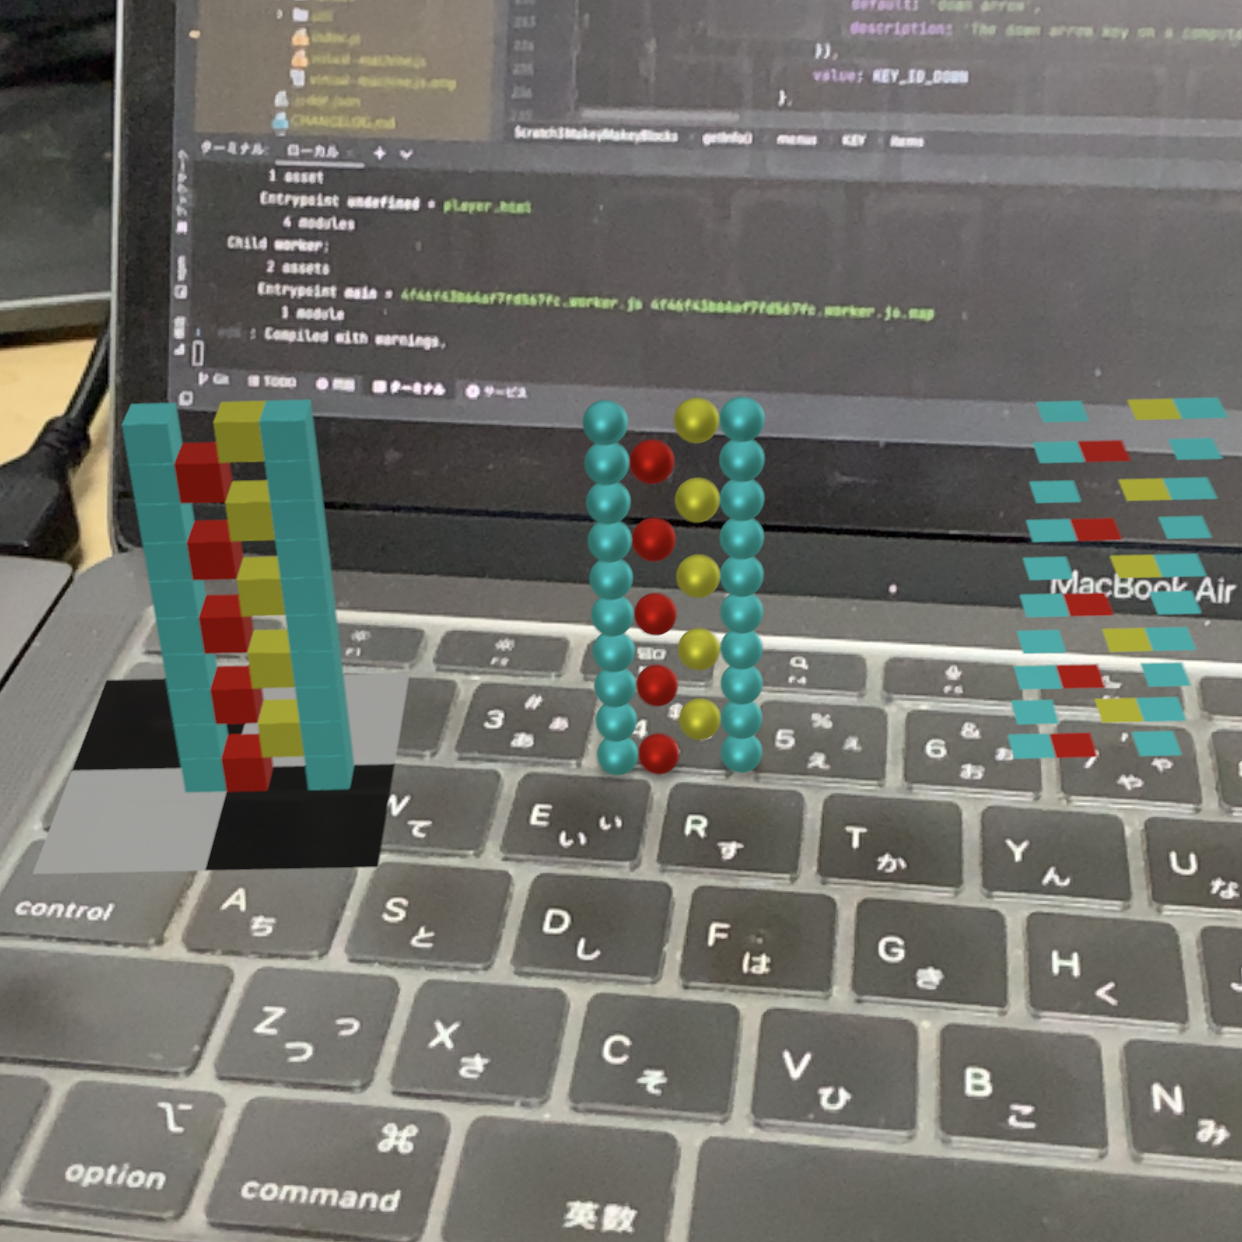
マテリアル(材質)を変更
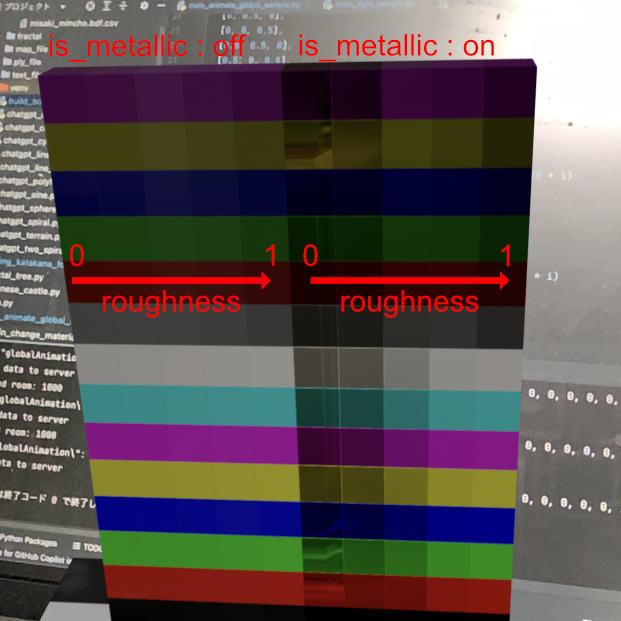
マテリアルは、金属のような光沢感や、粗さを設定することができます。金属感(is_metallic)をtrueにすると、鏡のように環境を反射します。粗さ(roughness)は、表面の粗さを0から1で設定します。
# Python
from time import sleep
# voxelammingパッケージからVoxelammingクラスをインポートします
from voxelamming import Voxelamming
# from voxelamming_local import Voxelamming  # ローカルで開発している場合はこちらを使う

# Voxelammingアプリに表示されている部屋名を指定してください
room_name = "1000"
# Voxelammingクラスのインスタンスを生成します
vox = Voxelamming(room_name)
# ボクセルの設定を行います
vox.set_box_size(1)
vox.set_build_interval(0.01)

# ボクセルを配置するため、位置と色を設定します
colors = [
    [0, 0, 0],
    [1, 0, 0],
    [0, 1, 0],
    [0, 0, 1],
    [1, 1, 0],
    [1, 0, 1],
    [0, 1, 1],
    [1, 1, 1],
    [0.5, 0.5, 0.5],
    [0.5, 0, 0],
    [0, 0.5, 0],
    [0, 0, 0.5],
    [0.5, 0.5, 0],
    [0.5, 0, 0.5],
]

for i, color in enumerate(colors):
    vox.create_box(0, i, 0, *color, alpha=1)

for i in range(5):
    vox.change_material(is_metallic=False, roughness=0.25 * i)
    vox.transform(i, 0, 0, pitch=0, yaw=0, roll=0)
    # ボクセルデータをアプリに送信します。
    vox.send_data()
    sleep(0.1)

for i in range(5):
    vox.change_material(is_metallic=True, roughness=0.25 * i)
    vox.transform(5 + i, 0, 0, pitch=0, yaw=0, roll=0)
    # ボクセルデータをアプリに送信します。
    vox.send_data()
    sleep(0.1)
ライト (iOSのみ)
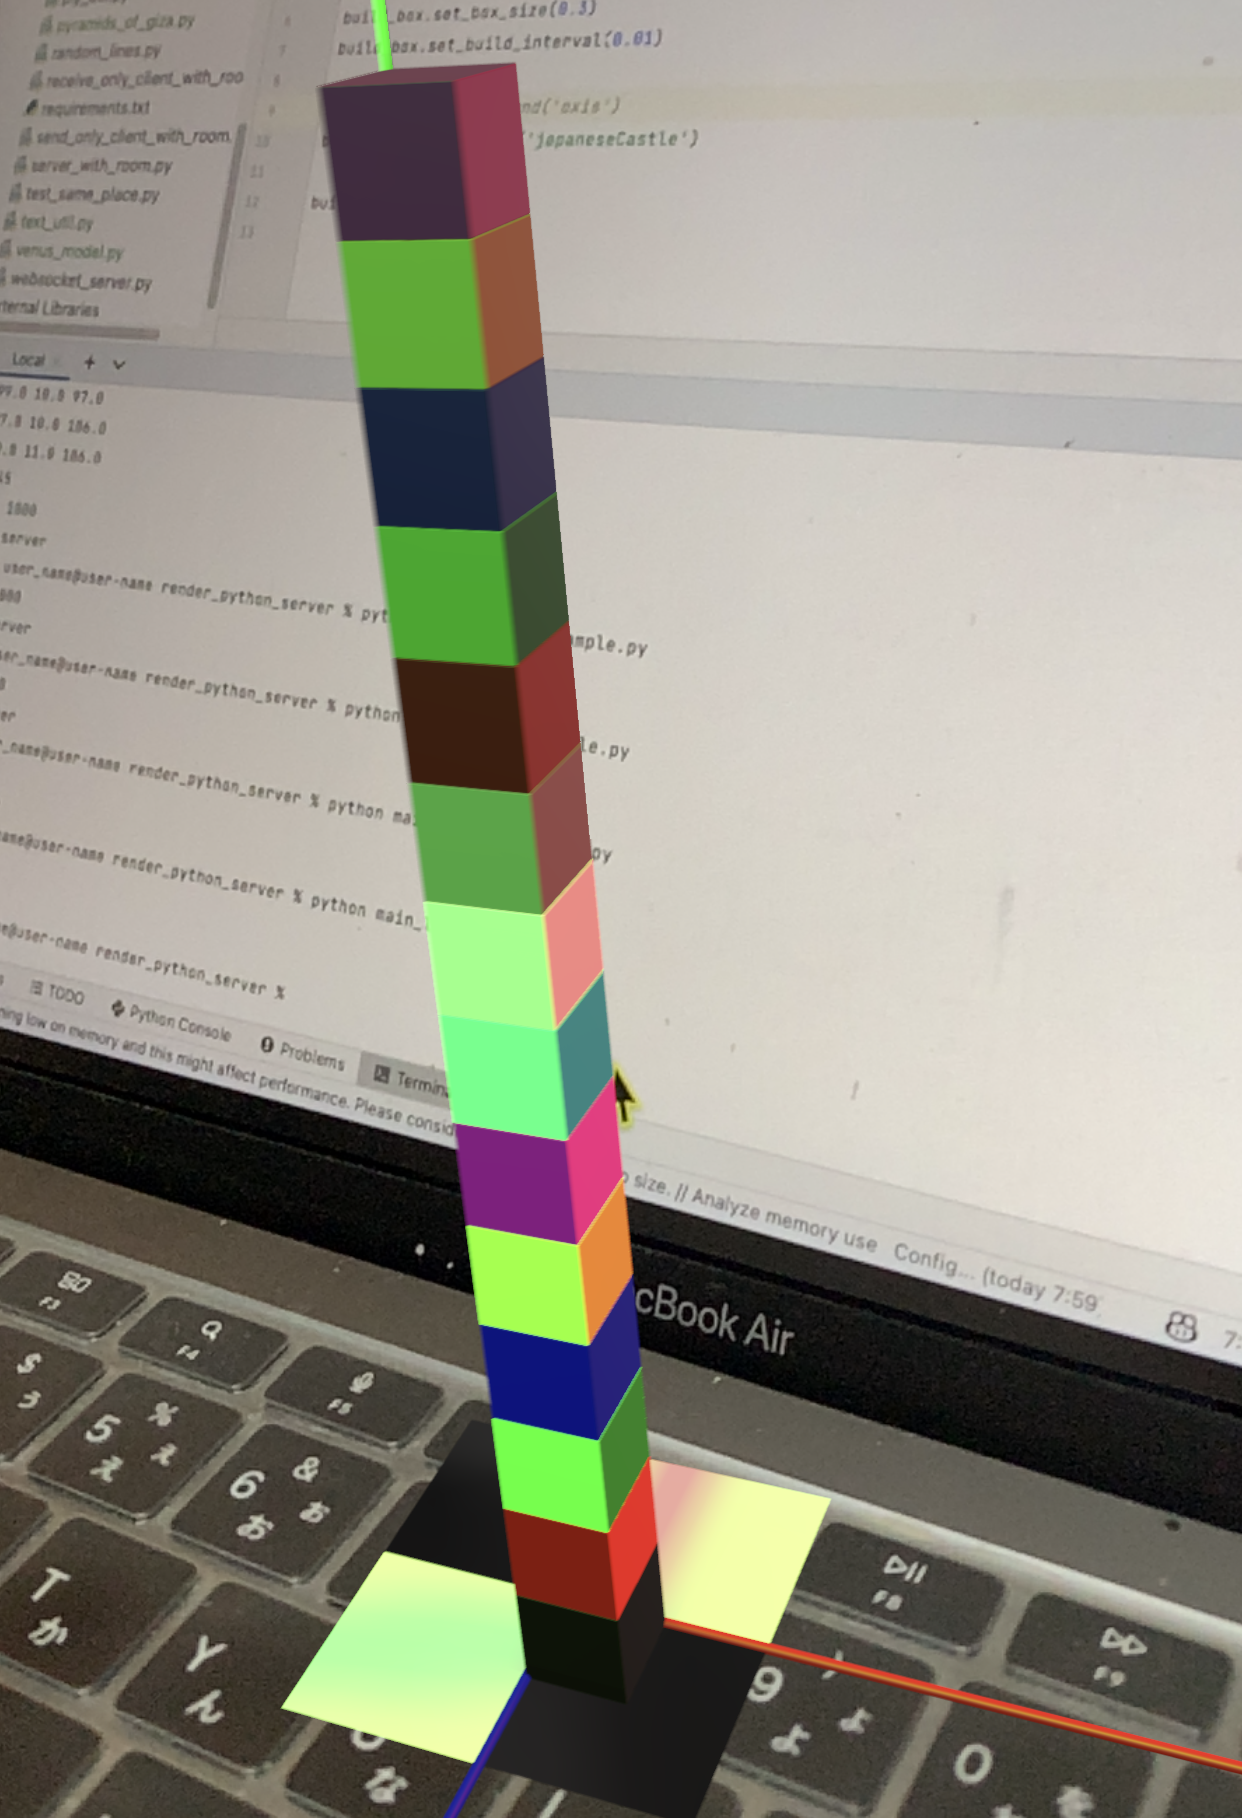
光源(ライト)を配置できます。ライトの位置、色、強度、光の種類(directional, spot, point)を設定できます。
# Python
# voxelammingパッケージからVoxelammingクラスをインポートします
from voxelamming import Voxelamming
# from voxelamming_local import Voxelamming  # ローカルで開発している場合はこちらを使う

# Voxelammingアプリに表示されている部屋名を指定してください
room_name = "1000"
# Voxelammingクラスのインスタンスを生成します
vox = Voxelamming(room_name)
# ボクセルの設定を行います
vox.set_box_size(1)
vox.set_build_interval(0.01)

# ボクセルを配置するため、位置と色を設定します
colors = [
    [0, 0, 0],
    [1, 0, 0],
    [0, 1, 0],
    [0, 0, 1],
    [1, 1, 0],
    [1, 0, 1],
    [0, 1, 1],
    [1, 1, 1],
    [0.5, 0.5, 0.5],
    [0.5, 0, 0],
    [0, 0.5, 0],
    [0, 0, 0.5],
    [0.5, 0.5, 0],
    [0.5, 0, 0.5],
]

for i, color in enumerate(colors):
    vox.create_box(0, i, 0, *color, alpha=1)

# ライトを設定します
vox.set_light(1, 1, 0, r=1, g=0, b=0, alpha=1, intensity=20000, interval=2, light_type='directional')
vox.set_light(0, 1, 1, r=0, g=1, b=0, alpha=1, intensity=20000, interval=3, light_type='spot')
vox.set_light(-1, 1, 0, r=0, g=0, b=1, alpha=1, intensity=20000, interval=5, light_type='point')

# axisコマンドを追加する
vox.set_command('axis')

# ボクセルデータをアプリに送信します。
vox.send_data("main_light_sample")
コマンド
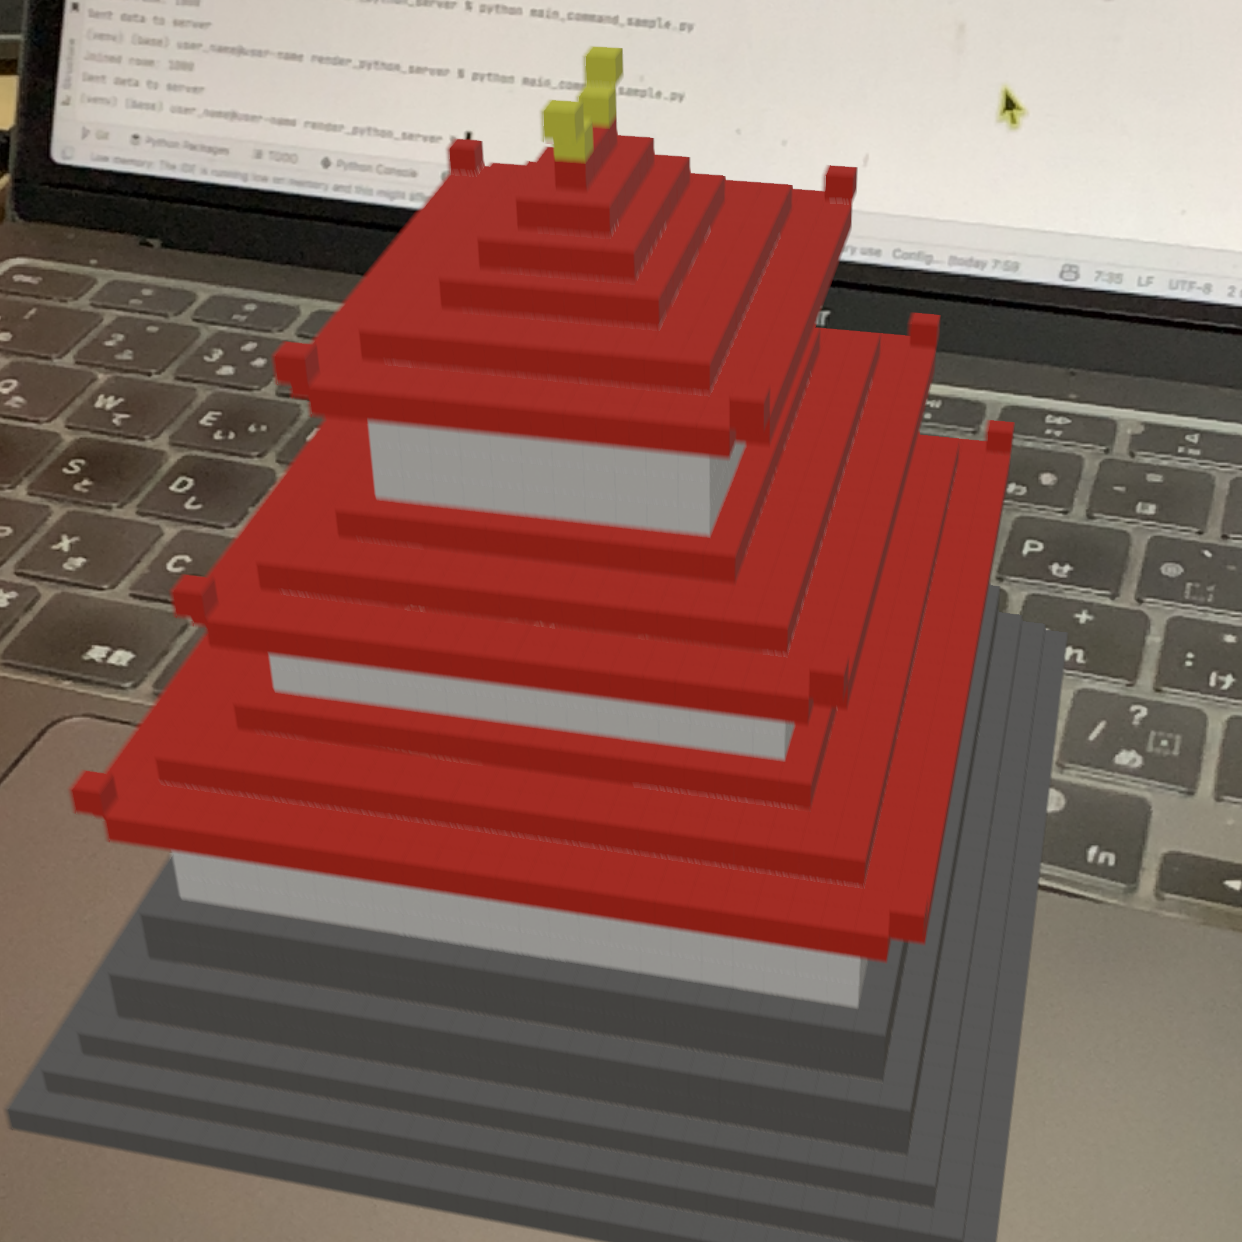
コマンドは、特定のアクションを実行するための指示です。コマンドを使用することで、特定のアクションを実行できます。japaneseCastleコマンドは、日本の城を建築できます。
# Python
# voxelammingパッケージからVoxelammingクラスをインポートします
from voxelamming import Voxelamming
# from voxelamming_local import Voxelamming  # ローカルで開発している場合はこちらを使う

# Voxelammingアプリに表示されている部屋名を指定してください
room_name = "1000"
# Voxelammingクラスのインスタンスを生成します
vox = Voxelamming(room_name)
# シークレットコマンドで一気に日本の城を作成します
vox.set_command('japaneseCastle')
# ボクセルデータをアプリに送信します。
vox.send_data("castle_command")
リセットコマンド
リセットコマンドは、ボクセルをすべて削除します。モデルの作成とリセットを交互に繰り返すことで、モデルのアニメーションを作成できます。
# Python
from time import sleep
# voxelammingパッケージからVoxelammingクラスをインポートします
from voxelamming import Voxelamming, get_boxes_from_ply
# from voxelamming_local import Voxelamming, get_boxes_from_ply

# 変数の設定
animation_settings = [
    {
        'model': 'frog1.ply',
        'position': [0, 0, 0, 0, 0, 0],
    },
    {
        'model': 'frog2.ply',
        'position': [0, 0, 0, 0, 0, 0],
    },
    {
        'model': 'frog3.ply',
        'position': [0, 0, 0, 0, 0, 0],
    },
    {
        'model': 'frog4.ply',
        'position': [0, 5, 0, 0, 0, 0],
    },
    {
        'model': 'frog5.ply',
        'position': [0, 10, 0, 0, 0, 0],
    },
    {
        'model': 'frog4.ply',
        'position': [0, 5, 0, 0, 0, 0],
    },
    {
        'model': 'frog3.ply',
        'position': [0, 0, 0, 0, 0, 0],
    },
    {
        'model': 'frog2.ply',
        'position': [0, 0, 0, 0, 0, 0],
    },
]

# Voxelammingアプリに表示されている部屋名を指定してください
room_name = "1000"
# Voxelammingクラスのインスタンスを生成します
vox = Voxelamming(room_name)

for _ in range(3):
    for i in range(len(animation_settings)):
        model = animation_settings[i]['model']
        position = animation_settings[i]['position']

        for box in get_boxes_from_ply(model):
            vox.create_box(*box)

        vox.set_box_size(0.5)
        vox.set_build_interval(0)
        vox.transform(*position)
        vox.send_data()
        sleep(0.1)

        vox.clear_data()
        vox.set_command('reset')
        vox.send_data()
        vox.clear_data()
        sleep(0.1)
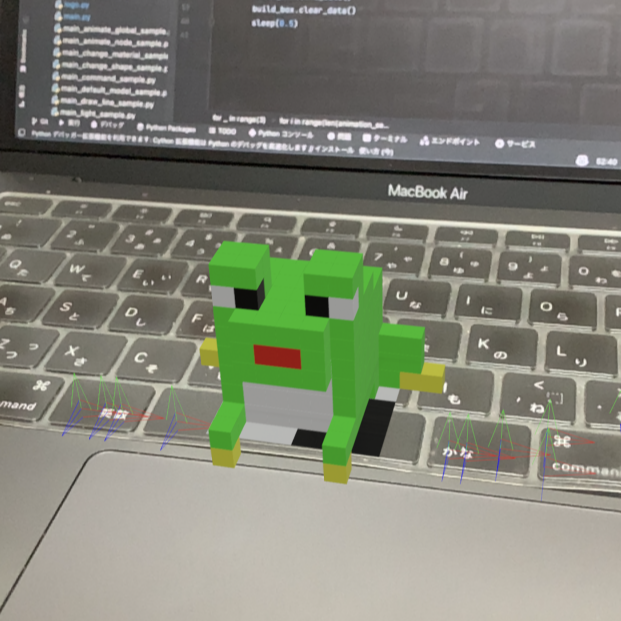
フロートコマンド
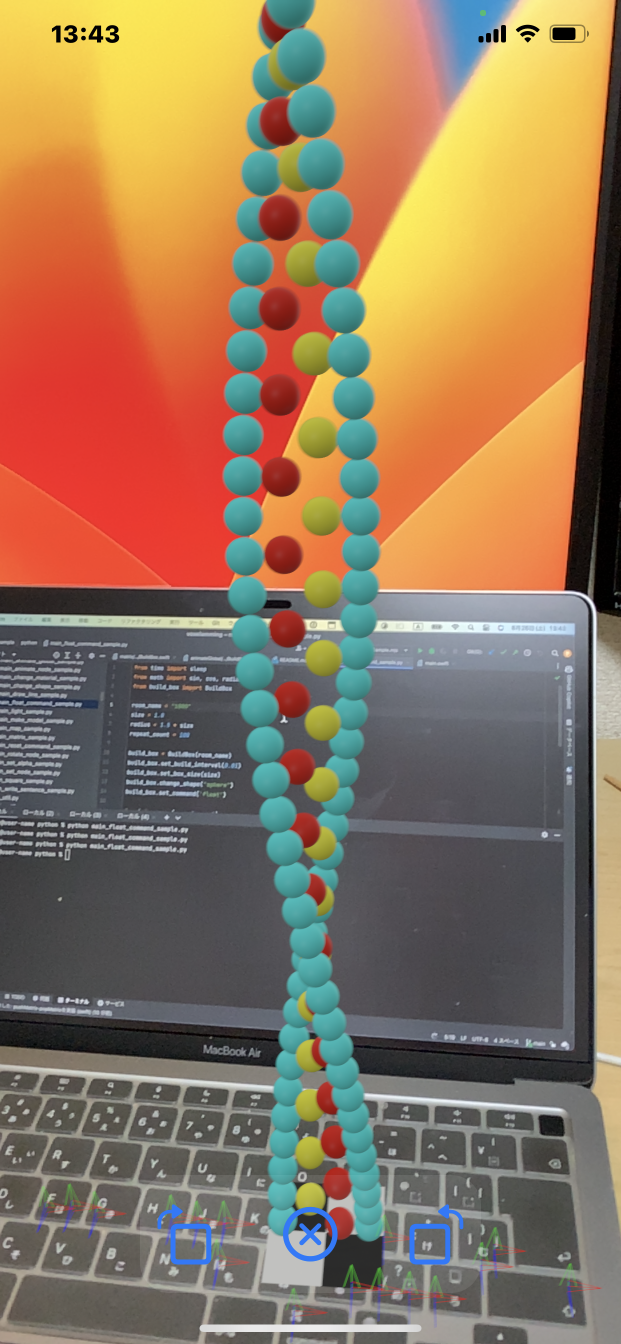
フロートコマンドは、、ボクセルの配置位置を0.01単位で精密に配置できるようになります(通常は1単位)。
# Python
from time import sleep
from math import sin, cos, radians, pi, sqrt
# voxelammingパッケージからVoxelammingクラスをインポートします
from voxelamming import Voxelamming
# from voxelamming_local import Voxelamming  # ローカルで開発している場合はこちらを使う

# Voxelammingアプリに表示されている部屋名を指定してください
room_name = "1000"
size = 1
radius = 1.5
repeat_count = 100

# Voxelammingクラスのインスタンスを生成します
vox = Voxelamming(room_name)
# ボクセルの設定を行います
vox.set_build_interval(0.01)
vox.set_box_size(size)
vox.change_shape("sphere")
vox.set_command('float')

# ボクセルを配置するため、位置と色を設定します
for i in range(repeat_count):
    angle = radians(i * 720 / repeat_count)
    x = radius * cos(angle)
    y = i
    z = radius * sin(angle)

    vox.create_box(x, y, z, r=0, g=1, b=1, alpha=1)
    vox.create_box(-x, y, -z, r=0, g=1, b=1, alpha=1)
    if i % 2 == 0:
        vox.create_box(x / 3, y, z / 3, r=1, g=0, b=0, alpha=1)
    else:
        vox.create_box(-x / 3, y, -z / 3, r=1, g=1, b=0, alpha=1)

# ボクセルデータをアプリに送信します。
vox.send_data("main_float_command_sample")
座標系の保存と復元
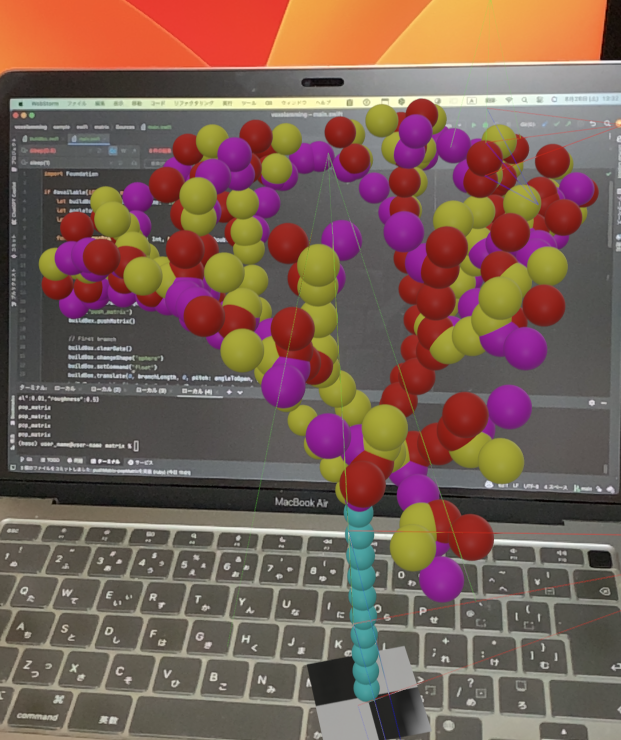
座標系(マトリックス)を保存し、復元することができます。push_matrixコマンドで座標系を保存し、pop_matrixコマンドで座標系を復元します。この例は、マトリックスを使って、再起的にフラクタルツリーを作成しています。
# Python
# voxelammingパッケージからVoxelammingクラスをインポートします
from voxelamming import Voxelamming
# from voxelamming_local import Voxelamming  # ローカルで開発している場合はこちらを使う


# 三分木を描画する関数
def draw_three_branches(count, branch_length):
    count -= 1
    if count < 0:
        return

    # draw branches
    shorted_branch_length = branch_length * length_ratio
    print('push_matrix')
    vox.push_matrix()

    # first branch
    vox.transform(0, branch_length, 0, pitch=angle_to_open, yaw=0, roll=0)
    vox.draw_line(0, 0, 0, 0, shorted_branch_length, 0, r=1, g=0, b=1)
    draw_three_branches(count, shorted_branch_length)

    # second branch
    vox.transform(0, branch_length, 0, pitch=angle_to_open, yaw=120, roll=0)
    vox.draw_line(0, 0, 0, 0, shorted_branch_length, 0, r=1, g=0, b=0)
    draw_three_branches(count, shorted_branch_length)

    # third branch
    vox.transform(0, branch_length, 0, pitch=angle_to_open, yaw=240, roll=0)
    vox.draw_line(0, 0, 0, 0, shorted_branch_length, 0, r=1, g=1, b=0)
    draw_three_branches(count, shorted_branch_length)

    print('pop_matrix')
    vox.pop_matrix()

# 変数の設定
initial_length = 10
repeat_count = 5
angle_to_open = 30
length_ratio = 0.8

# Voxelammingアプリに表示されている部屋名を指定してください
room_name = "1000"
# Voxelammingクラスのインスタンスを生成します
vox = Voxelamming(room_name)

vox.change_shape('sphere')
vox.set_command('float')
vox.draw_line(0, 0, 0, 0, initial_length, 0, r=0, g=1, b=1)

draw_three_branches(repeat_count, initial_length)
vox.send_data("main_matrix_sample")
テクスチャー
ボクセルのテクスチャーを設定できます、テクスチャーは、画像を指定することで、ボクセルに貼り付けることができます。"grass", "stone", "dirt", "planks", "bricks"のテクスチャーが用意されています。
# Python
from time import sleep
# voxelammingパッケージからVoxelammingクラスをインポートします
from voxelamming import Voxelamming
# from voxelamming_local import Voxelamming  # ローカルで開発している場合はこちらを使う

texture_names = ["grass", "stone", "dirt", "planks", "bricks"]
# Voxelammingアプリに表示されている部屋名を指定してください
room_name = "1000"
# Voxelammingクラスのインスタンスを生成します
vox = Voxelamming(room_name)

# ボクセルの設定を行います
vox.set_box_size(1)
vox.set_build_interval(0.01)

# ボクセルを配置するため、位置と色を設定します
for i, texture in enumerate(texture_names):
    vox.create_box(0, len(texture_names) - i - 1, 0, texture=texture)

# ボクセルデータをアプリに送信します。
vox.send_data()
# ボクセルデータをクリアします。
vox.clear_data()
sleep(0.1)

# ボクセルの設定を行います
vox.set_box_size(1)
vox.set_build_interval(0.01)
vox.change_shape('sphere')

# ボクセルを配置するため、位置と色を設定します
for i, texture in enumerate(texture_names):
    vox.create_box(1, len(texture_names) - i - 1, 0, texture=texture)

# ボクセルデータをアプリに送信します。
vox.send_data()
# ボクセルデータをクリアします。
vox.clear_data()
sleep(0.1)

# ボクセルの設定を行います
vox.set_box_size(1)
vox.set_build_interval(0.01)
vox.change_shape('plane')

# ボクセルを配置するため、位置と色を設定します
for i, texture in enumerate(texture_names):
    vox.create_box(2, len(texture_names) - i - 1, 0, texture=texture)

# ボクセルデータをアプリに送信します。
vox.send_data()

フレームアニメーション
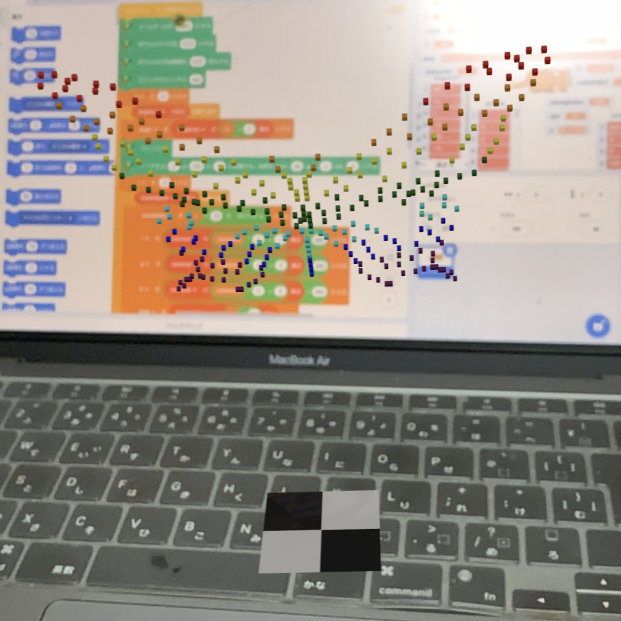
複数のフレームを記録して、アニメーションを実行できます。アニメーションのFPSと繰り返し回数を指定できます。
# Python
from math import sin, cos, radians
# voxelammingパッケージからVoxelammingクラスをインポートします
from voxelamming import Voxelamming
# from voxelamming_local import Voxelamming  # ローカルで開発している場合はこちらを使う

rainbow_colors = [
    [255, 0, 0],  # 赤
    [255, 165, 0],  # オレンジ
    [255, 255, 0],  # 黄色
    [0, 128, 0],  # 緑
    [0, 255, 255],  # 水色
    [0, 0, 255],  # 青
    [128, 0, 128],  # 紫
    [128, 0, 128]  # 紫
]
butterfly_list = [
    [0, 0, 0, 0, 0, 0, 0, 0, 0, 0, 0, 0, 0, 0, 0, 0, 0, 0, 0, 0, 0, 0, 0, 0, 0, 0, 0, 0, 0, 0, 0, 0, 0, 0, 0, 0, 0, 0,
     0, 0, 0, 0, 0, 0, 0, 0, 0, 0, 0, 0, 0, 0],
    [0, 0, 0, 0, 0, 0, 0, 0, 0, 0, 0, 0, 0, 0, 0, 0, 0, 0, 0, 0, 0, 0, 0, 0, 0, 0, 0, 0, 0, 0, 0, 0, 0, 0, 0, 0, 0, 0,
     0, 0, 0, 0, 1, 0, 0, 0, 1, 0, 0, 0, 0, 0],
    [0, 0, 0, 0, 0, 0, 0, 0, 0, 0, 0, 0, 0, 0, 0, 0, 0, 0, 0, 0, 0, 0, 0, 0, 0, 0, 0, 0, 0, 0, 0, 0, 0, 0, 0, 0, 0, 0,
     1, 0, 0, 0, 0, 0, 0, 0, 0, 0, 0, 1, 0, 0],
    [0, 0, 0, 0, 0, 0, 0, 0, 0, 0, 0, 0, 0, 0, 0, 0, 0, 0, 0, 0, 0, 0, 0, 0, 0, 0, 0, 0, 0, 0, 0, 0, 0, 0, 0, 1, 0, 0,
     0, 0, 0, 0, 0, 0, 1, 0, 0, 0, 0, 0, 0, 0],
    [0, 0, 0, 0, 0, 0, 0, 0, 0, 0, 0, 0, 0, 0, 0, 0, 0, 0, 0, 0, 0, 0, 0, 0, 0, 0, 0, 0, 0, 0, 0, 0, 0, 0, 0, 0, 0, 0,
     0, 0, 0, 0, 0, 0, 0, 0, 0, 0, 0, 0, 0, 0],
    [0, 0, 0, 0, 0, 0, 0, 0, 0, 0, 0, 0, 0, 0, 0, 0, 0, 0, 0, 0, 0, 0, 0, 0, 0, 0, 0, 0, 0, 0, 0, 1, 0, 0, 0, 0, 0, 0,
     0, 1, 0, 0, 0, 0, 0, 1, 0, 0, 0, 0, 1, 0],
    [0, 0, 0, 0, 0, 0, 0, 0, 0, 0, 0, 0, 0, 0, 0, 0, 0, 0, 0, 0, 0, 0, 0, 0, 0, 0, 0, 0, 0, 0, 0, 0, 0, 0, 0, 0, 0, 0,
     0, 0, 0, 0, 0, 0, 0, 0, 0, 0, 0, 0, 0, 0],
    [0, 0, 0, 0, 0, 0, 0, 0, 0, 0, 0, 0, 0, 0, 0, 0, 0, 0, 0, 0, 0, 0, 0, 0, 0, 0, 0, 0, 0, 0, 0, 0, 0, 0, 0, 0, 0, 0,
     0, 0, 0, 0, 0, 0, 0, 0, 0, 0, 0, 0, 0, 0],
    [0, 0, 0, 0, 0, 0, 0, 0, 0, 0, 0, 0, 0, 0, 0, 0, 0, 0, 0, 0, 0, 0, 0, 0, 0, 0, 1, 0, 0, 0, 0, 0, 0, 0, 0, 1, 0, 0,
     0, 0, 0, 0, 0, 1, 0, 0, 0, 0, 1, 0, 0, 0],
    [0, 0, 0, 0, 0, 0, 0, 0, 0, 0, 0, 0, 0, 0, 0, 0, 0, 0, 0, 0, 0, 0, 0, 0, 0, 0, 0, 0, 0, 0, 0, 0, 0, 0, 0, 0, 0, 0,
     0, 0, 0, 0, 0, 0, 0, 0, 0, 0, 0, 0, 0, 0],
    [0, 0, 0, 0, 0, 0, 0, 0, 0, 0, 0, 0, 0, 0, 0, 0, 0, 0, 0, 0, 0, 0, 0, 0, 0, 0, 0, 0, 0, 0, 0, 0, 0, 0, 0, 0, 0, 0,
     0, 0, 0, 0, 0, 0, 0, 0, 0, 0, 0, 0, 0, 0],
    [0, 0, 0, 0, 0, 0, 0, 0, 0, 0, 0, 0, 0, 0, 0, 0, 0, 0, 0, 0, 0, 0, 1, 0, 0, 0, 0, 0, 0, 0, 0, 1, 0, 0, 0, 0, 0, 1,
     0, 0, 0, 0, 0, 1, 0, 0, 0, 0, 1, 0, 0, 0],
    [0, 0, 0, 0, 0, 0, 0, 0, 0, 0, 0, 0, 0, 0, 0, 0, 0, 0, 0, 0, 0, 0, 0, 0, 0, 0, 0, 0, 0, 0, 0, 0, 0, 0, 0, 0, 0, 0,
     0, 0, 0, 0, 0, 0, 0, 0, 0, 0, 0, 0, 0, 0],
    [0, 0, 0, 0, 0, 0, 0, 0, 0, 0, 0, 0, 0, 0, 0, 0, 0, 0, 0, 0, 0, 0, 0, 0, 0, 0, 0, 0, 0, 0, 0, 0, 0, 0, 0, 0, 0, 0,
     0, 0, 0, 0, 0, 0, 0, 0, 0, 0, 0, 0, 0, 0],
    [0, 0, 0, 0, 0, 0, 0, 0, 0, 0, 0, 0, 0, 0, 0, 0, 0, 0, 0, 1, 0, 0, 0, 0, 0, 0, 0, 1, 0, 0, 0, 0, 0, 0, 1, 0, 0, 0,
     0, 0, 0, 1, 0, 0, 0, 0, 1, 0, 0, 0, 0, 0],
    [0, 0, 0, 0, 0, 0, 0, 0, 0, 0, 0, 0, 0, 0, 0, 0, 0, 0, 0, 0, 0, 0, 0, 0, 0, 0, 0, 0, 0, 0, 0, 0, 0, 0, 0, 0, 0, 0,
     0, 0, 0, 0, 0, 0, 0, 0, 0, 0, 0, 0, 0, 0],
    [0, 0, 0, 0, 0, 0, 0, 0, 0, 0, 0, 0, 0, 0, 0, 0, 0, 0, 0, 0, 0, 0, 0, 0, 0, 0, 0, 0, 0, 0, 0, 0, 0, 0, 0, 0, 0, 0,
     0, 0, 0, 0, 0, 0, 0, 0, 0, 0, 0, 0, 0, 0],
    [0, 0, 0, 0, 0, 1, 0, 0, 0, 0, 0, 0, 0, 0, 0, 0, 1, 0, 0, 0, 0, 0, 0, 1, 0, 0, 0, 0, 0, 0, 0, 1, 0, 0, 0, 0, 0, 0,
     0, 1, 0, 0, 0, 0, 1, 0, 0, 0, 0, 0, 0, 0],
    [0, 0, 0, 0, 0, 0, 0, 0, 0, 0, 0, 0, 0, 0, 0, 0, 0, 0, 0, 0, 0, 0, 0, 0, 0, 0, 0, 0, 0, 0, 0, 0, 0, 0, 0, 0, 0, 0,
     0, 0, 0, 0, 0, 0, 0, 0, 0, 0, 0, 0, 0, 0],
    [0, 0, 0, 0, 1, 0, 0, 0, 0, 0, 0, 0, 0, 0, 0, 0, 0, 0, 0, 0, 0, 0, 0, 0, 0, 0, 0, 0, 0, 0, 0, 0, 0, 0, 0, 0, 0, 0,
     0, 0, 0, 0, 0, 0, 0, 0, 0, 0, 0, 0, 0, 0],
    [0, 0, 0, 0, 0, 0, 0, 0, 0, 0, 0, 0, 0, 1, 0, 0, 0, 0, 0, 1, 0, 0, 0, 0, 0, 0, 0, 0, 1, 0, 0, 0, 0, 0, 0, 0, 0, 1,
     0, 0, 0, 0, 0, 1, 0, 0, 0, 0, 0, 0, 0, 0],
    [0, 0, 0, 1, 0, 0, 0, 0, 0, 0, 0, 0, 0, 0, 0, 0, 0, 0, 0, 0, 0, 0, 0, 0, 0, 0, 0, 0, 0, 0, 0, 0, 0, 0, 0, 0, 0, 0,
     0, 0, 0, 0, 0, 0, 0, 0, 0, 0, 0, 0, 0, 0],
    [0, 0, 0, 0, 0, 0, 0, 0, 0, 0, 0, 0, 0, 0, 0, 0, 0, 0, 0, 0, 0, 0, 0, 0, 0, 0, 0, 0, 0, 0, 0, 0, 0, 0, 0, 0, 0, 0,
     0, 0, 0, 0, 0, 0, 0, 0, 0, 0, 0, 0, 0, 0],
    [0, 0, 1, 0, 0, 0, 0, 0, 0, 0, 0, 1, 0, 0, 0, 0, 1, 0, 0, 0, 0, 0, 0, 0, 0, 1, 0, 0, 0, 0, 0, 0, 0, 0, 0, 0, 1, 0,
     0, 0, 0, 0, 0, 1, 0, 0, 0, 0, 0, 0, 0, 0],
    [0, 0, 0, 0, 0, 0, 0, 0, 0, 0, 0, 0, 0, 0, 0, 0, 0, 0, 0, 0, 0, 0, 0, 0, 0, 0, 0, 0, 0, 0, 0, 0, 0, 0, 0, 0, 0, 0,
     0, 0, 0, 0, 0, 0, 0, 0, 0, 0, 0, 0, 0, 0],
    [0, 0, 1, 0, 0, 0, 0, 0, 0, 0, 0, 0, 0, 0, 0, 0, 0, 0, 0, 0, 0, 0, 0, 0, 0, 0, 0, 0, 0, 0, 0, 0, 0, 0, 0, 0, 0, 0,
     0, 0, 0, 0, 0, 0, 0, 0, 0, 0, 0, 0, 0, 0],
    [0, 0, 0, 0, 0, 0, 0, 0, 1, 0, 0, 0, 0, 1, 0, 0, 0, 0, 0, 0, 0, 0, 1, 0, 0, 0, 0, 0, 0, 0, 0, 0, 0, 0, 0, 1, 0, 0,
     0, 0, 0, 0, 1, 0, 0, 0, 0, 0, 0, 0, 0, 0],
    [0, 1, 0, 0, 0, 0, 0, 0, 0, 0, 0, 0, 0, 0, 0, 0, 0, 0, 0, 0, 0, 0, 0, 0, 0, 0, 0, 0, 0, 0, 0, 0, 0, 0, 0, 0, 0, 0,
     0, 0, 0, 0, 0, 0, 0, 0, 0, 0, 0, 0, 0, 0],
    [0, 0, 0, 0, 0, 0, 0, 0, 0, 0, 0, 0, 0, 0, 0, 0, 0, 0, 0, 0, 0, 0, 0, 0, 0, 0, 0, 0, 0, 0, 0, 0, 0, 0, 0, 0, 0, 0,
     0, 0, 0, 0, 0, 0, 0, 0, 0, 0, 0, 0, 0, 0],
    [0, 1, 0, 0, 0, 0, 1, 0, 0, 0, 1, 0, 0, 0, 0, 0, 0, 0, 1, 0, 0, 0, 0, 0, 0, 0, 0, 0, 0, 0, 0, 0, 0, 1, 0, 0, 0, 0,
     0, 0, 0, 1, 0, 0, 0, 0, 0, 0, 0, 0, 0, 0],
    [0, 0, 0, 0, 0, 0, 0, 0, 0, 0, 0, 0, 0, 0, 0, 0, 0, 0, 0, 0, 0, 0, 0, 0, 0, 0, 0, 0, 0, 0, 0, 0, 0, 0, 0, 0, 0, 0,
     0, 0, 0, 0, 0, 0, 0, 0, 0, 0, 0, 0, 0, 0],
    [1, 0, 0, 0, 0, 0, 0, 0, 0, 0, 0, 0, 0, 0, 0, 0, 0, 0, 0, 0, 0, 0, 0, 0, 0, 0, 0, 0, 0, 0, 0, 0, 0, 0, 0, 0, 0, 0,
     0, 0, 0, 0, 0, 0, 0, 0, 0, 0, 0, 0, 0, 0],
    [0, 0, 0, 0, 1, 0, 0, 0, 1, 0, 0, 0, 0, 0, 0, 0, 0, 0, 0, 0, 0, 0, 0, 0, 0, 0, 0, 0, 0, 1, 0, 0, 0, 0, 0, 0, 0, 0,
     0, 0, 1, 0, 0, 0, 0, 0, 0, 0, 0, 0, 0, 0],
    [1, 0, 0, 0, 0, 0, 0, 0, 0, 0, 0, 0, 0, 0, 0, 0, 0, 1, 0, 0, 0, 1, 0, 0, 0, 1, 0, 0, 0, 0, 0, 0, 0, 0, 0, 0, 0, 0,
     0, 0, 0, 0, 0, 0, 0, 0, 0, 0, 0, 0, 0, 0],
    [0, 0, 0, 0, 0, 0, 0, 0, 0, 0, 0, 0, 0, 1, 0, 0, 0, 0, 0, 0, 0, 0, 0, 0, 0, 0, 0, 0, 0, 0, 0, 0, 0, 0, 0, 0, 0, 0,
     0, 0, 0, 0, 0, 0, 0, 0, 0, 0, 0, 0, 0, 0],
    [1, 0, 1, 0, 0, 0, 0, 0, 0, 0, 0, 0, 0, 0, 0, 0, 0, 0, 0, 0, 0, 0, 0, 0, 0, 0, 0, 0, 0, 0, 0, 0, 0, 0, 0, 0, 0, 0,
     1, 0, 0, 0, 0, 0, 0, 0, 0, 0, 0, 0, 0, 0],
    [0, 0, 0, 0, 0, 1, 0, 0, 1, 0, 0, 1, 0, 0, 1, 0, 0, 1, 0, 0, 1, 0, 0, 1, 0, 0, 1, 0, 0, 1, 0, 0, 1, 0, 0, 1, 0, 0,
     0, 0, 0, 0, 0, 0, 0, 0, 0, 0, 0, 0, 0, 0],
    [0, 1, 0, 0, 0, 0, 0, 0, 0, 0, 0, 0, 0, 0, 0, 0, 0, 0, 0, 0, 0, 0, 0, 0, 1, 0, 0, 0, 0, 0, 0, 0, 0, 0, 0, 0, 0, 0,
     0, 0, 0, 0, 0, 0, 0, 0, 0, 0, 0, 0, 0, 0],
    [0, 0, 0, 0, 0, 0, 0, 0, 0, 0, 0, 0, 0, 0, 0, 0, 0, 0, 0, 0, 0, 0, 0, 0, 0, 0, 0, 0, 0, 0, 0, 0, 0, 0, 0, 0, 0, 0,
     0, 0, 0, 0, 0, 0, 0, 0, 0, 0, 0, 0, 0, 0],
    [0, 0, 1, 0, 0, 1, 0, 0, 1, 0, 0, 0, 0, 0, 0, 0, 0, 0, 0, 0, 0, 0, 1, 0, 0, 0, 0, 0, 1, 0, 0, 0, 0, 0, 0, 0, 0, 0,
     0, 0, 0, 0, 0, 0, 0, 0, 0, 0, 0, 0, 0, 0],
    [0, 0, 0, 0, 0, 0, 0, 0, 0, 0, 0, 0, 0, 0, 0, 0, 0, 0, 0, 0, 0, 0, 0, 0, 0, 0, 0, 0, 0, 0, 0, 0, 0, 0, 0, 0, 0, 0,
     0, 0, 0, 0, 0, 0, 0, 0, 0, 0, 0, 0, 0, 0],
    [0, 1, 0, 0, 0, 0, 0, 0, 0, 0, 0, 0, 0, 0, 0, 0, 0, 0, 0, 0, 0, 0, 0, 0, 0, 0, 0, 0, 0, 0, 0, 0, 0, 0, 0, 0, 0, 0,
     0, 0, 0, 0, 0, 0, 0, 0, 0, 0, 0, 0, 0, 0],
    [0, 0, 0, 0, 1, 0, 0, 1, 0, 0, 0, 1, 0, 0, 0, 0, 0, 0, 0, 0, 0, 0, 0, 0, 0, 0, 1, 0, 0, 0, 0, 0, 1, 0, 0, 0, 0, 0,
     0, 0, 0, 0, 0, 0, 0, 0, 0, 0, 0, 0, 0, 0],
    [1, 0, 0, 0, 0, 0, 0, 0, 0, 0, 0, 0, 0, 0, 0, 0, 0, 0, 0, 0, 0, 0, 0, 0, 0, 0, 0, 0, 0, 0, 0, 0, 0, 0, 0, 0, 0, 0,
     0, 0, 0, 0, 0, 0, 0, 0, 0, 0, 0, 0, 0, 0],
    [0, 0, 0, 0, 0, 0, 0, 0, 0, 0, 0, 0, 0, 0, 0, 0, 0, 0, 0, 0, 0, 0, 0, 0, 0, 0, 0, 0, 0, 0, 0, 0, 0, 0, 0, 0, 0, 0,
     0, 0, 0, 0, 0, 0, 0, 0, 0, 0, 0, 0, 0, 0],
    [1, 0, 0, 0, 0, 1, 0, 0, 0, 1, 0, 0, 0, 0, 1, 0, 0, 0, 0, 0, 0, 0, 0, 0, 0, 0, 1, 0, 0, 0, 0, 0, 1, 0, 0, 0, 0, 0,
     0, 0, 0, 0, 0, 0, 0, 0, 0, 0, 0, 0, 0, 0],
    [0, 0, 0, 0, 0, 0, 0, 0, 0, 0, 0, 0, 0, 0, 0, 0, 0, 0, 0, 0, 0, 0, 0, 0, 0, 0, 0, 0, 0, 0, 0, 0, 0, 0, 0, 0, 0, 0,
     0, 0, 0, 0, 0, 0, 0, 0, 0, 0, 0, 0, 0, 0],
    [1, 0, 0, 0, 0, 0, 0, 0, 0, 0, 0, 0, 0, 0, 0, 0, 0, 0, 0, 0, 0, 0, 0, 0, 0, 0, 0, 0, 0, 0, 0, 0, 0, 0, 0, 0, 0, 0,
     0, 0, 0, 0, 0, 0, 0, 0, 0, 0, 0, 0, 0, 0],
    [0, 0, 0, 0, 0, 0, 0, 1, 0, 0, 0, 1, 0, 0, 0, 0, 1, 0, 0, 0, 0, 0, 0, 0, 0, 0, 0, 0, 1, 0, 0, 0, 0, 0, 0, 1, 0, 0,
     0, 0, 0, 0, 0, 0, 0, 0, 0, 0, 0, 0, 0, 0],
    [1, 0, 0, 0, 0, 0, 0, 0, 0, 0, 0, 0, 0, 0, 0, 0, 0, 0, 0, 0, 0, 0, 0, 0, 0, 0, 0, 0, 0, 0, 0, 0, 0, 0, 0, 0, 0, 0,
     0, 0, 0, 0, 0, 0, 0, 0, 0, 0, 0, 0, 0, 0],
    [0, 0, 0, 0, 0, 0, 0, 0, 0, 0, 0, 0, 0, 0, 0, 0, 0, 0, 0, 0, 0, 0, 0, 0, 0, 0, 0, 0, 0, 0, 0, 0, 0, 0, 0, 0, 0, 0,
     0, 0, 0, 0, 0, 0, 0, 0, 0, 0, 0, 0, 0, 0],
    [1, 0, 0, 0, 0, 0, 0, 0, 0, 1, 0, 0, 0, 1, 0, 0, 0, 0, 1, 0, 0, 0, 0, 0, 0, 0, 1, 0, 0, 0, 0, 0, 1, 0, 0, 0, 0, 0,
     0, 0, 0, 0, 0, 0, 0, 0, 0, 0, 0, 0, 0, 0],
    [0, 0, 0, 0, 0, 0, 0, 0, 0, 0, 0, 0, 0, 0, 0, 0, 0, 0, 0, 0, 0, 0, 0, 0, 0, 0, 0, 0, 0, 0, 0, 0, 0, 0, 0, 0, 0, 0,
     0, 0, 0, 0, 0, 0, 0, 0, 0, 0, 0, 0, 0, 0],
    [1, 0, 0, 0, 0, 0, 0, 0, 0, 0, 0, 0, 0, 0, 0, 0, 0, 0, 0, 0, 0, 0, 0, 0, 0, 0, 0, 0, 0, 0, 0, 0, 0, 0, 0, 0, 0, 0,
     0, 0, 0, 0, 0, 0, 0, 0, 0, 0, 0, 0, 0, 0],
    [0, 0, 0, 0, 0, 0, 0, 0, 0, 0, 1, 0, 0, 0, 1, 0, 0, 0, 0, 0, 1, 0, 0, 0, 0, 0, 0, 0, 1, 0, 0, 0, 0, 0, 1, 0, 0, 0,
     0, 0, 0, 0, 0, 0, 0, 0, 0, 0, 0, 0, 0, 0],
    [1, 0, 0, 0, 0, 0, 0, 0, 0, 0, 0, 0, 0, 0, 0, 0, 0, 0, 0, 0, 0, 0, 0, 0, 0, 0, 0, 0, 0, 0, 0, 0, 0, 0, 0, 0, 0, 0,
     0, 0, 0, 0, 0, 0, 0, 0, 0, 0, 0, 0, 0, 0],
    [0, 0, 0, 0, 0, 0, 0, 0, 0, 0, 0, 0, 0, 0, 0, 0, 0, 0, 0, 0, 0, 0, 0, 0, 0, 0, 0, 0, 0, 0, 0, 0, 0, 0, 0, 0, 0, 0,
     0, 0, 0, 0, 0, 0, 0, 0, 0, 0, 0, 0, 0, 0],
    [1, 0, 0, 0, 0, 0, 0, 0, 0, 0, 0, 1, 0, 0, 0, 1, 0, 0, 0, 0, 0, 1, 0, 0, 0, 1, 0, 0, 0, 0, 0, 1, 0, 0, 0, 0, 0, 0,
     0, 0, 0, 0, 0, 0, 0, 0, 0, 0, 0, 0, 0, 0],
    [0, 0, 0, 0, 0, 0, 0, 0, 0, 0, 0, 0, 0, 0, 0, 0, 0, 0, 0, 0, 0, 0, 0, 0, 0, 0, 0, 0, 0, 0, 0, 0, 0, 0, 0, 0, 0, 0,
     0, 0, 0, 0, 0, 0, 0, 0, 0, 0, 0, 0, 0, 0],
    [0, 0, 0, 0, 0, 0, 0, 0, 0, 0, 0, 0, 0, 0, 0, 0, 0, 0, 0, 0, 0, 0, 0, 0, 0, 0, 0, 0, 0, 0, 0, 0, 0, 0, 0, 0, 0, 0,
     0, 0, 0, 0, 0, 0, 0, 0, 0, 0, 0, 0, 0, 0],
    [0, 0, 0, 0, 0, 0, 0, 0, 0, 0, 0, 0, 1, 0, 0, 0, 0, 1, 0, 0, 0, 1, 0, 0, 0, 0, 1, 0, 0, 0, 0, 0, 1, 0, 0, 0, 0, 0,
     0, 0, 0, 0, 0, 0, 0, 0, 0, 0, 0, 0, 0, 0],
    [0, 0, 0, 0, 0, 0, 0, 0, 0, 0, 0, 0, 0, 0, 0, 0, 0, 0, 0, 0, 0, 0, 0, 0, 0, 0, 0, 0, 0, 0, 0, 0, 0, 0, 0, 0, 0, 0,
     0, 0, 0, 0, 0, 0, 0, 0, 0, 0, 0, 0, 0, 0],
    [0, 0, 0, 0, 0, 0, 0, 0, 0, 0, 0, 0, 0, 0, 0, 0, 0, 0, 0, 0, 0, 0, 0, 0, 0, 0, 0, 0, 0, 0, 0, 0, 0, 0, 0, 0, 0, 0,
     0, 0, 0, 0, 0, 0, 0, 0, 0, 0, 0, 0, 0, 0],
    [0, 0, 0, 0, 0, 0, 0, 0, 0, 0, 0, 0, 1, 0, 0, 0, 0, 0, 1, 0, 0, 0, 0, 0, 1, 0, 0, 0, 0, 1, 0, 0, 0, 0, 0, 0, 0, 0,
     0, 0, 0, 0, 0, 0, 0, 0, 0, 0, 0, 0, 0, 0],
    [0, 0, 0, 0, 0, 0, 0, 0, 0, 0, 0, 0, 0, 0, 0, 0, 0, 0, 0, 0, 0, 1, 0, 0, 0, 0, 0, 0, 0, 0, 0, 0, 0, 0, 0, 0, 0, 0,
     0, 0, 0, 0, 0, 0, 0, 0, 0, 0, 0, 0, 0, 0],
    [0, 0, 0, 0, 0, 0, 0, 0, 0, 0, 0, 0, 0, 0, 0, 0, 0, 0, 0, 0, 0, 0, 0, 0, 0, 0, 0, 0, 0, 0, 0, 0, 0, 0, 0, 0, 0, 0,
     0, 0, 0, 0, 0, 0, 0, 0, 0, 0, 0, 0, 0, 0],
    [0, 0, 0, 0, 0, 0, 0, 0, 0, 0, 0, 0, 0, 0, 1, 0, 0, 0, 0, 0, 0, 0, 0, 0, 0, 0, 0, 0, 0, 1, 0, 0, 0, 0, 0, 0, 0, 0,
     0, 0, 0, 0, 0, 0, 0, 0, 0, 0, 0, 0, 0, 0],
    [0, 0, 0, 0, 0, 0, 0, 0, 0, 0, 0, 0, 0, 0, 0, 0, 0, 0, 0, 0, 0, 0, 0, 0, 0, 0, 0, 0, 0, 0, 0, 0, 0, 0, 0, 0, 0, 0,
     0, 0, 0, 0, 0, 0, 0, 0, 0, 0, 0, 0, 0, 0],
    [0, 0, 0, 0, 0, 0, 0, 0, 0, 0, 0, 0, 0, 0, 0, 0, 0, 0, 0, 0, 0, 0, 1, 0, 0, 0, 0, 1, 0, 0, 0, 0, 0, 0, 0, 0, 0, 0,
     0, 0, 0, 0, 0, 0, 0, 0, 0, 0, 0, 0, 0, 0],
    [0, 0, 0, 0, 0, 0, 0, 0, 0, 0, 0, 0, 0, 0, 0, 0, 1, 0, 0, 0, 0, 0, 0, 0, 0, 1, 0, 0, 0, 1, 0, 1, 0, 0, 0, 0, 0, 0,
     0, 0, 0, 0, 0, 0, 0, 0, 0, 0, 0, 0, 0, 0],
    [0, 0, 0, 0, 0, 0, 0, 0, 0, 0, 0, 0, 0, 0, 0, 0, 0, 0, 0, 0, 0, 0, 0, 0, 0, 0, 0, 0, 0, 0, 0, 0, 0, 0, 0, 0, 0, 0,
     0, 0, 0, 0, 0, 0, 0, 0, 0, 0, 0, 0, 0, 0],
    [0, 0, 0, 0, 0, 0, 0, 0, 0, 0, 0, 0, 0, 0, 0, 0, 0, 0, 1, 1, 0, 0, 0, 0, 0, 0, 0, 0, 0, 0, 0, 0, 0, 0, 0, 0, 0, 0,
     0, 0, 0, 0, 0, 0, 0, 0, 0, 0, 0, 0, 0, 0],
    [0, 0, 0, 0, 0, 0, 0, 0, 0, 0, 0, 0, 0, 0, 0, 0, 0, 0, 0, 0, 0, 0, 0, 0, 0, 0, 0, 0, 0, 0, 0, 0, 1, 1, 0, 0, 0, 0,
     0, 0, 0, 0, 0, 0, 0, 0, 0, 0, 0, 0, 0, 0],
    [0, 0, 0, 0, 0, 0, 0, 0, 0, 0, 0, 0, 0, 0, 0, 0, 0, 0, 0, 0, 0, 0, 0, 0, 0, 0, 0, 0, 0, 0, 0, 0, 0, 0, 0, 0, 0, 0,
     0, 0, 0, 0, 0, 0, 0, 0, 0, 0, 0, 0, 0, 0],
    [0, 0, 0, 0, 0, 0, 0, 0, 0, 0, 0, 0, 0, 0, 0, 0, 0, 0, 0, 0, 0, 0, 0, 0, 0, 0, 0, 0, 0, 0, 0, 0, 0, 0, 0, 0, 0, 0,
     0, 0, 0, 0, 0, 0, 0, 0, 0, 0, 0, 0, 0, 0],
    [0, 0, 0, 0, 0, 0, 0, 0, 0, 0, 0, 0, 0, 0, 0, 0, 0, 0, 0, 0, 0, 0, 0, 0, 0, 0, 0, 0, 0, 0, 0, 0, 0, 0, 1, 1, 0, 0,
     0, 0, 0, 0, 0, 0, 0, 0, 0, 0, 0, 0, 0, 0],
    [0, 0, 0, 0, 0, 0, 0, 0, 0, 0, 0, 0, 0, 0, 0, 0, 0, 0, 0, 0, 0, 0, 0, 0, 0, 0, 0, 0, 0, 0, 0, 0, 0, 0, 0, 0, 0, 0,
     0, 0, 0, 0, 0, 0, 0, 0, 0, 0, 0, 0, 0, 0],
    [0, 0, 0, 0, 0, 0, 0, 0, 0, 0, 0, 0, 0, 0, 0, 0, 0, 0, 0, 0, 0, 0, 0, 0, 0, 0, 0, 0, 0, 0, 0, 0, 0, 0, 0, 0, 0, 0,
     0, 0, 0, 0, 0, 0, 0, 0, 0, 0, 0, 0, 0, 0],
    [0, 0, 0, 0, 0, 0, 0, 0, 0, 0, 0, 0, 0, 0, 0, 0, 0, 0, 0, 0, 0, 0, 0, 0, 0, 0, 0, 0, 0, 0, 0, 0, 0, 0, 0, 0, 1, 0,
     0, 0, 0, 0, 0, 0, 0, 0, 0, 0, 0, 0, 0, 0],
    [0, 0, 0, 0, 0, 0, 0, 0, 0, 0, 0, 0, 0, 0, 0, 0, 0, 0, 0, 0, 0, 0, 0, 0, 0, 0, 0, 0, 0, 0, 0, 0, 0, 0, 0, 0, 0, 0,
     0, 0, 0, 0, 0, 0, 0, 0, 0, 0, 0, 0, 0, 0],
]

# Voxelammingアプリに表示されている部屋名を指定してください
room_name = "1000"
# Voxelammingクラスのインスタンスを生成します
vox = Voxelamming(room_name)
# ボクセルの設定を行います
vox.set_box_size(0.15)
# vox.set_build_interval(0.01)
vox.set_command('float')
vox.set_frame_fps(2)
vox.set_frame_repeats(10)

# ボクセルを配置するため、位置と色を設定します
for angle in [30, 15, 0, -15, -30, -15, 0, 15]:
    vox.frame_in()
    vox.transform(0, 100, 0, 30, 0, 0)

    for j, row in enumerate(butterfly_list):
        color = rainbow_colors[j // 10]

        for i, dot in enumerate(row):
            if dot != 0:
                x = i * cos(radians(angle))
                y = -j
                z = i * sin(radians(angle))
                r = color[0] / 255
                g = color[1] / 255
                b = color[2] / 255
                vox.create_box(x, y, z, r, g, b)
                vox.create_box(-x, y, z, r, g, b)
    vox.frame_out()

# ボクセルデータをアプリに送信します。
vox.send_data('main_frame_sample')
デフォルトモデルの表示
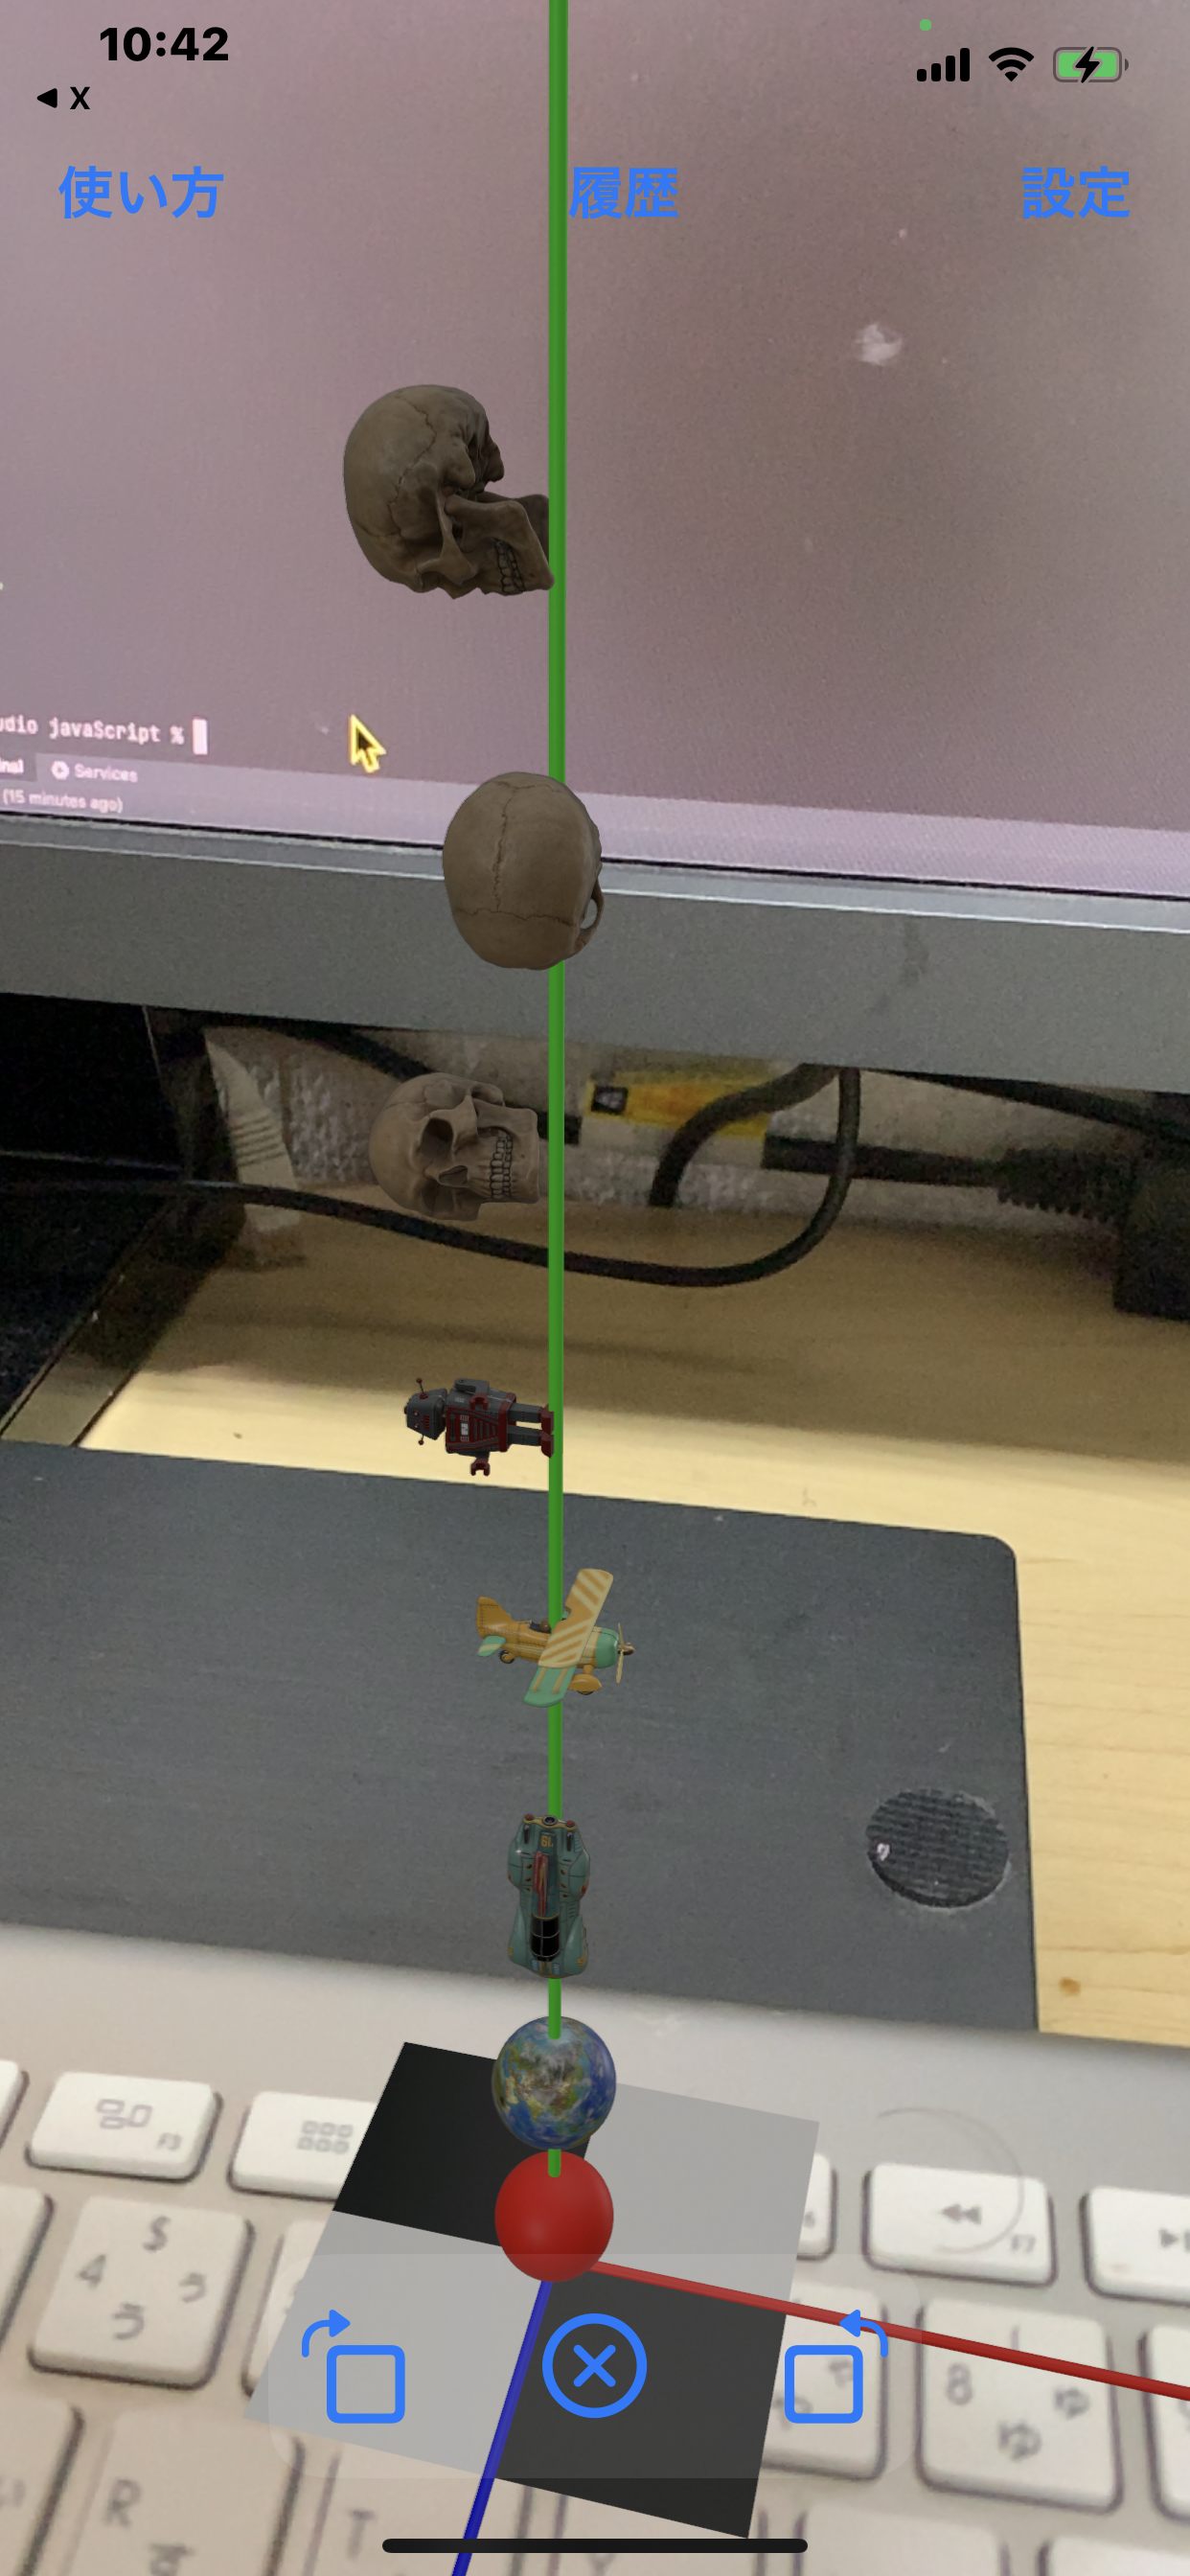
Voxelammingに内蔵しているデフォルトモデルを表示することができます。現在モデルは19種類を選択できます。エンティティネームを指定すると、move_modelメソッドでモデルを移動させることができます。
内蔵モデル一覧
- Mercury
- Venus
- Earth
- Mars
- Jupiter
- Saturn
- Uranus
- Neptune
- Pluto
- Sun
- Moon
- ToyBiplane
- ToyCar
- Drummer
- Robot
- ToyRocket
- RocketToy1
- RocketToy2
- Skull
# Python
# voxelammingパッケージからVoxelammingクラスをインポートします
from voxelamming_local import Voxelamming
# from voxelamming import Voxelamming

# Voxelammingアプリに表示されている部屋名を指定してください
room_name = "1000"
# Voxelammingクラスのインスタンスを生成します
vox = Voxelamming(room_name)

# ボクセルのサイズを設定します
vox.set_box_size(10)
# ボクセルの配置間隔を設定します
vox.set_build_interval(0.01)
# 座標軸を描きます
vox.set_command('axis')

# ボクセルを配置するため、位置と色を設定します
vox.change_shape('sphere')
vox.create_box(0, 0, 0, 1, 0, 0, 1)
vox.create_model('Earth', 0, 2, 0)
vox.create_model('ToyCar', 0, 4, 0, 90, 0, 0)
vox.create_model('ToyBiplane', 0, 6, 0, 0, 90, 0)
vox.create_model('Robot', 0, 8, 0, 0, 0, 90)
vox.create_model('Skull', 0, 10, 0, 0, 0, 90)
vox.create_model('Skull', 0, 12, 0, 90, 0, 0)
vox.create_model('Skull', 0, 14, 0, 90, 0, 90)

# ボクセルデータをアプリに送信します。
vox.send_data("createModel")
デフォルトモデルの移動
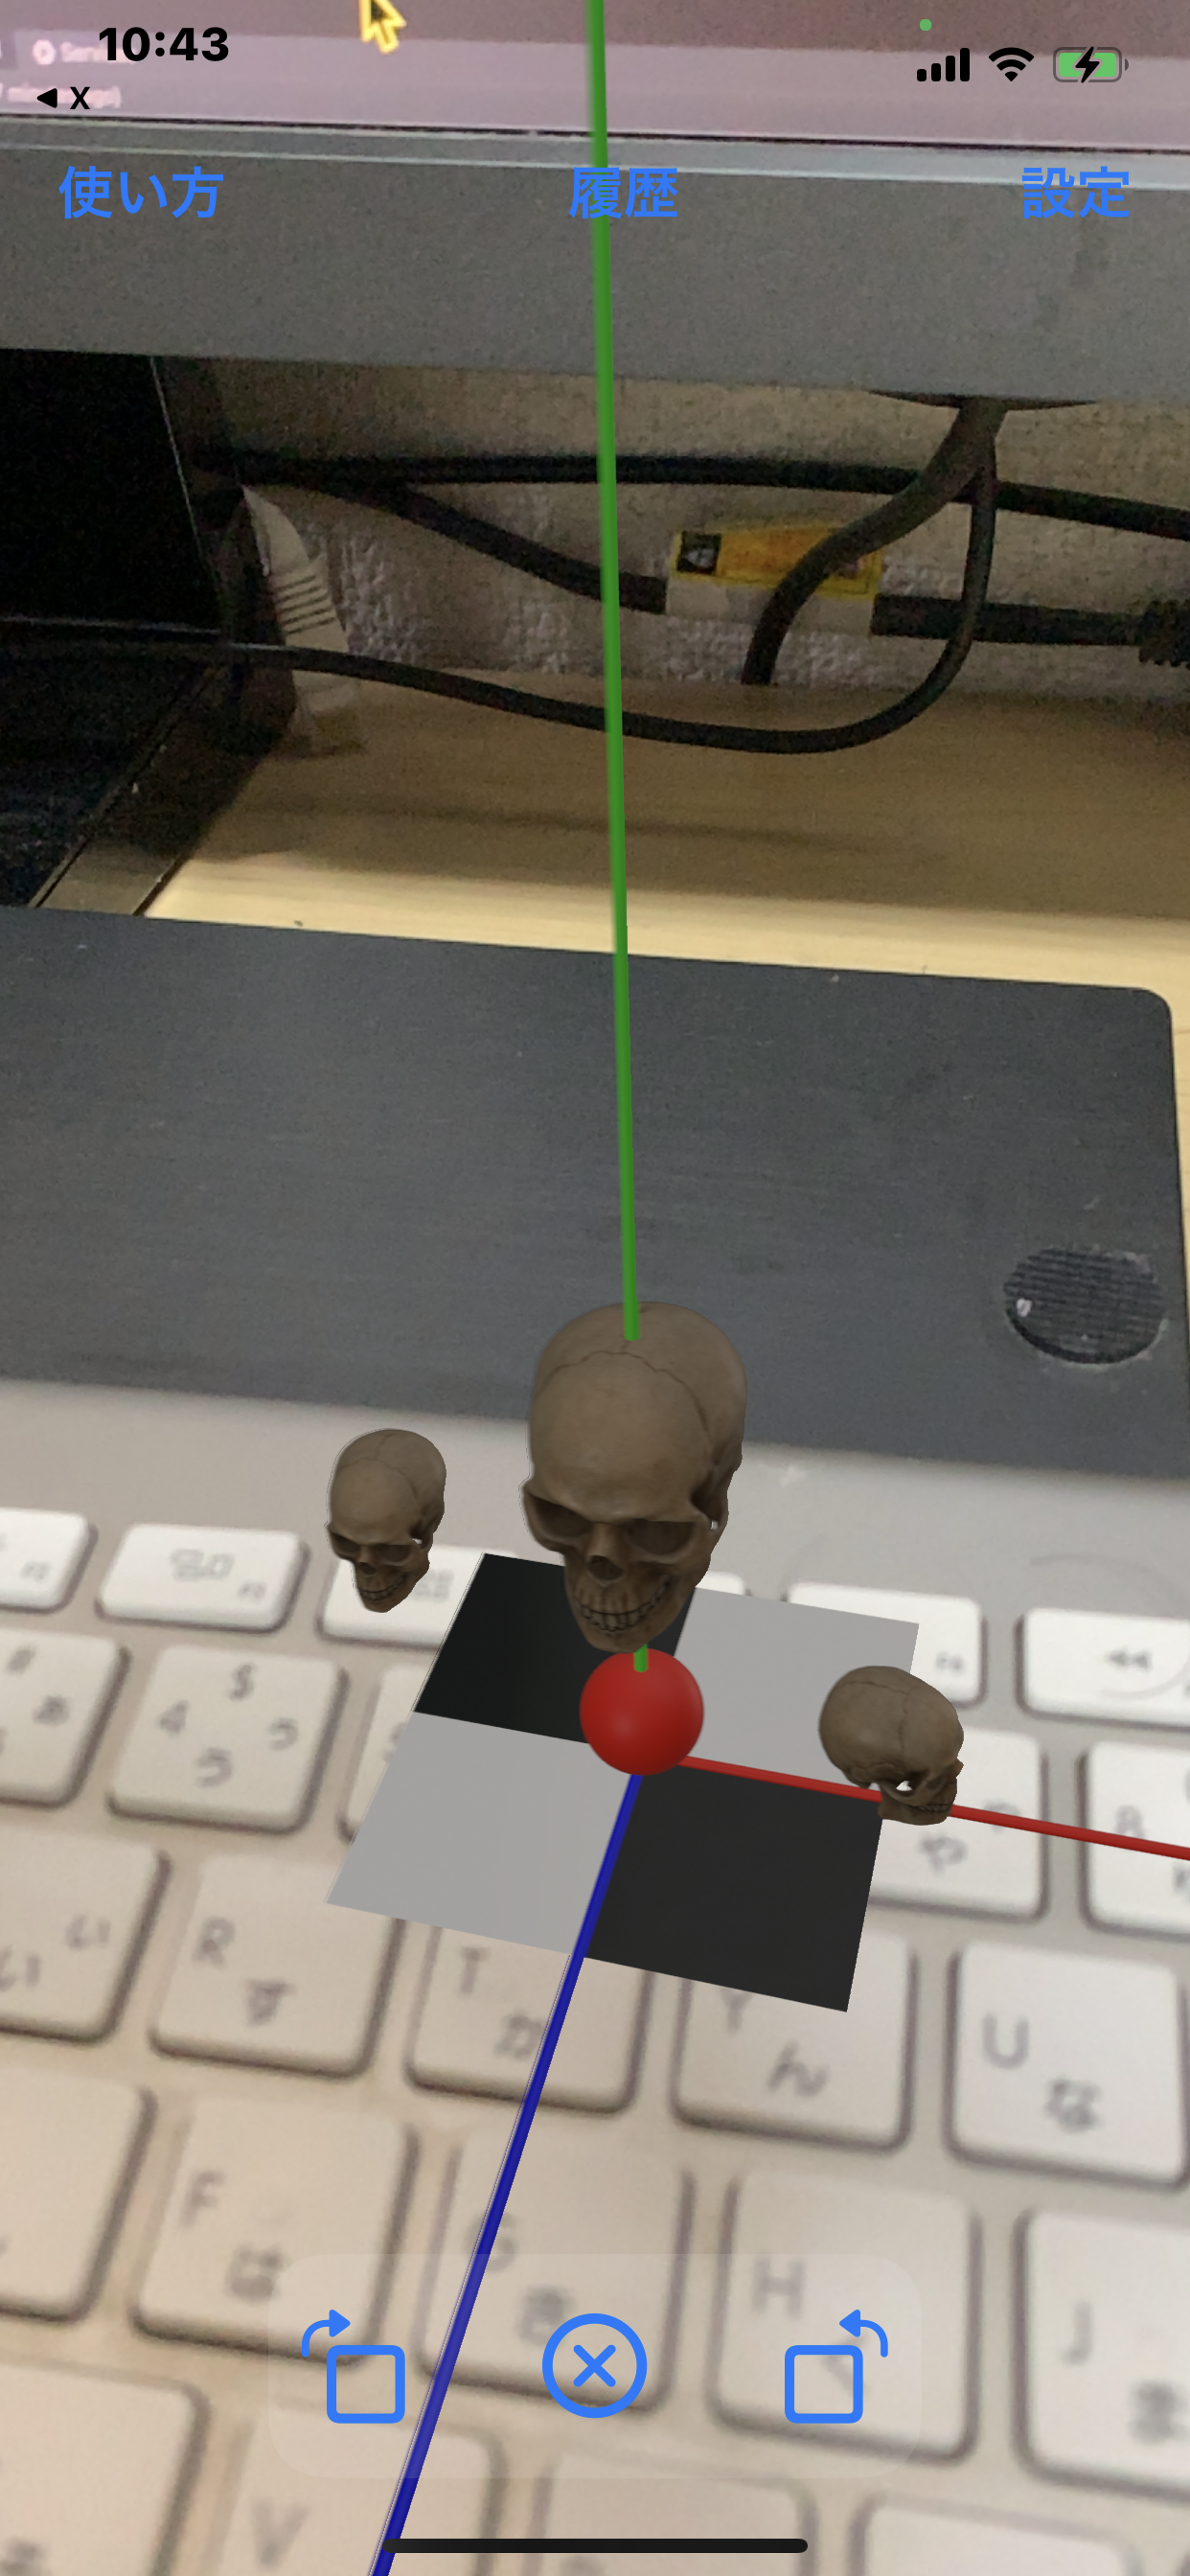
Voxelammingに内蔵しているデフォルトモデルをエンティティネームを付けて表示した後で、move_modelメソッドを使ってモデルを移動させることができます。
# Python
# voxelammingパッケージからVoxelammingクラスをインポートします
from voxelamming import Voxelamming
# from voxelamming_local import Voxelamming  # ローカルで開発している場合はこちらを使う
import time

# Voxelammingアプリに表示されている部屋名を指定してください
room_name = "1000"
# Voxelammingクラスのインスタンスを生成します
vox = Voxelamming(room_name)

# ボクセルのサイズを設定します
box_size = 10
vox.set_box_size(box_size)
# ボクセルの配置間隔を設定します
vox.set_build_interval(0.01)
# 座標軸を描きます
vox.set_command('axis')

# ボクセルを配置するため、位置と色を設定します
vox.change_shape('sphere')
vox.create_box(0, 0, 0, 1, 0, 0, 1)
vox.create_model('Skull', -2, 0, 0, 0, 0, 0, 1, 'skull_model_1')
vox.create_model('Skull', 2, 0, 0, 0, 0, 0, 1, 'skull_model_2')
vox.create_model('Skull', 0, 2, 0, 0, 0, 0, 1, 'skull_model_3')

# ボクセルデータをアプリに送信します。
vox.send_data("Skulls")
# ボクセルデータを初期化
vox.clear_data()

# モデルを移動を行います
for i in range(20):
    time.sleep(0.1)
    vox.set_box_size(box_size)
    vox.move_model('skull_model_1', -2, i * 0.2, 0, 0, 0, 0)
    vox.move_model('skull_model_2', 2, 0, 0, 0, i * 10, 0)
    vox.move_model('skull_model_3', 0, 2, 0, 0, 0, 0, i * 0.1 + 1)
    vox.send_data()
設定
アプリ右上の「Settings」ボタンから設定画面を開けます。デバッグモードをオフにすると、画面の情報表示が無効になります。
ARワールドのリセット
アプリ右下の「リセット」ボタンから、ARワールドをリセットできます。リセットすると、全てのボクセルが削除されます。
ユーザー共有
準備中
ライセンス
作者
creativival