Voxelamming - AR Programming Learning App
![]()
Voxelamming is an AR programming learning app. Even programming beginners can learn programming visually and enjoyably. Voxelamming supports iPhones and iPads with iOS 16 or later, and Apple Vision Pro.
What is Voxelamming?
Voxelamming = Voxel + Programming
Voxelamming is an app that allows you to learn programming using AR technology. You can place voxels (the smallest unit cube in 3D space) with code and create interactive 3D works.
Target users:
- Programming beginners: You can learn the basics of programming while getting visual feedback.
- Generative artists: You can create creative 3D artworks using code.
Features
- Intuitive operation with AR: Placing voxels in the real world enhances spatial awareness while learning programming.
- Various programming languages: Supports Scratch3 MOD, Python, JavaScript (Node.js), Ruby, and Swift.
- Cross-platform: Works on Windows, Mac, and iOS (iPhone, iPad, Apple Vision Pro).
- Free: It is free to download and use.
How to Use
To use Voxelamming, follow these three steps:
- Prepare Your Device: You’ll need an iPhone or iPad with iOS 16 or later, or an Apple Vision Pro.
- Set Up a Plane Anchor: Launch the app and follow the on-screen instructions to place an anchor on a flat surface in the real world.
- Model Voxel Art: Using your computer, write code specifying the position, color, and size of each voxel, then send it to the app. Alternatively, you can directly enter code using the in-app editor.
1. Prepare your device
Download and install the Voxelamming app from the App Store.
2. Set the plane anchor
For iPhone/iPad:
- Launch the Voxelamming app.
- Upon the first launch, you will be asked for permission to use the camera. Tap "Yes" to allow it.
- When the camera starts up, AR automatically searches for a real-world plane. When the plane detection mark (red, green, and blue coordinate axes) appears, tap the screen to place the plane anchor. The plane anchor is composed of white and black tiles.
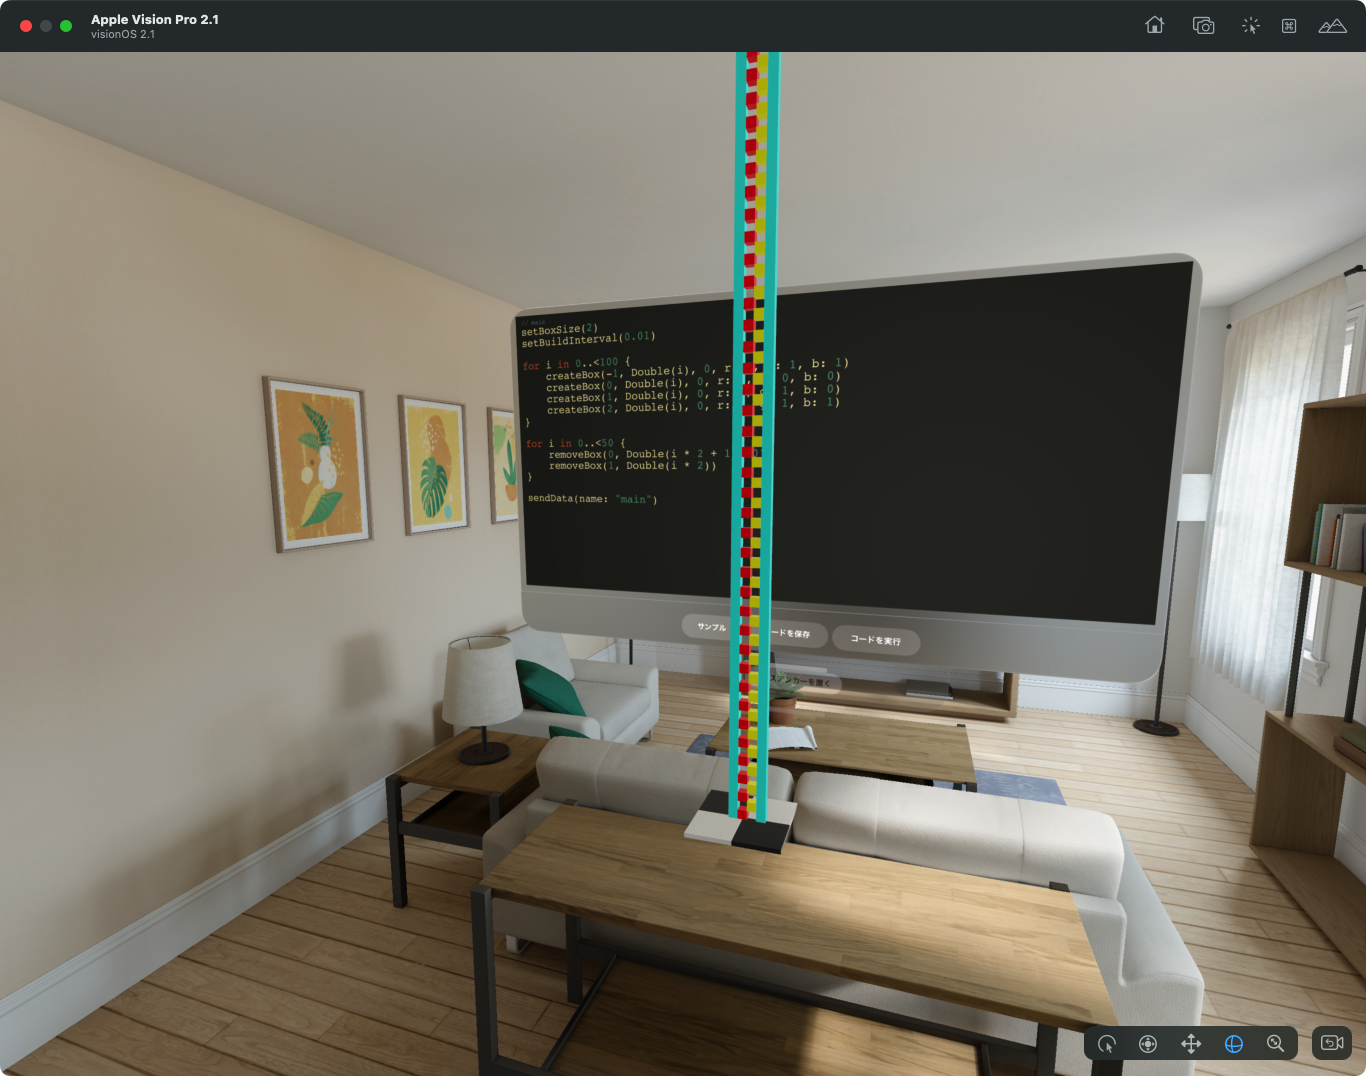
For Apple Vision Pro:
- Launch the Voxelamming Studio app.
- Tap the "Set Base Anchor" button to set the base anchor. The base anchor is composed of white and black tiles.
- You can drag the base anchor to move it.
3. Voxel modeling (programming)
Programming on your computer

Create code to place voxels using your computer (Windows or Mac).
- Choose a programming language: You can choose from Scratch3 MOD, Python, JavaScript (Node.js), Ruby, and Swift.
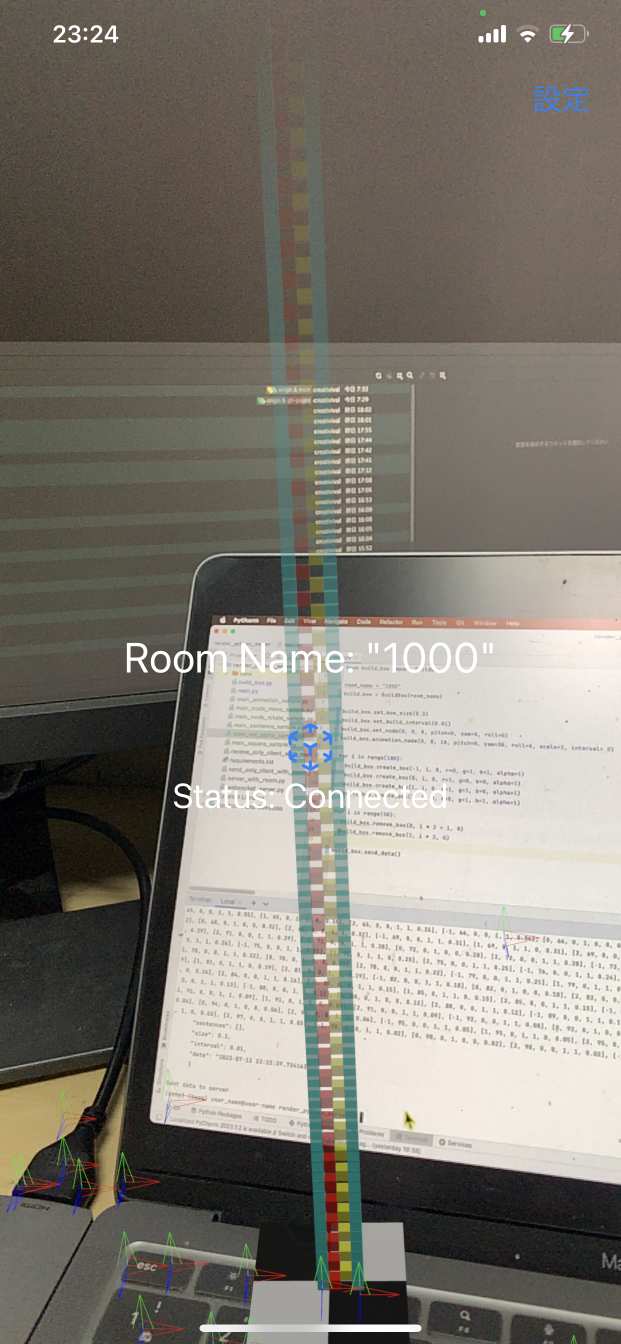
- Check the room name of the WebSocket server: Launch the Voxelamming app on your device and check the room name displayed in the center of the screen.
- Refer to the sample code: Create your own code by referring to the sample code in the sample folder.
Programming in the In-App Editor
You can also write code directly using the editor within the Voxelamming app.
- Open the Editor: Launch the Voxelamming app and select "Code Editor" in the upper left corner.
- Enter Code: Write code specifying the voxel's position, color, size, etc. The code is written in VoxelammingSwift, a Domain Specific Language (DSL) similar to Swift. Although VoxelammingSwift resembles Swift syntax, not all Swift syntax is supported, and some methods specific to Voxelamming may not be executable.
- Sample Code: In the lower left corner of the code editor, you can select sample code from "Samples" to edit and customize. Use these examples as a reference to create your own code.
- Run Code: Tap the "Run" button to execute your code.
- Save Code: Tap the "Save" button to save your code.
- Load Code: Tap the "Load" button to load previously saved code.
Voxel data
Voxel data is data that specifies the position, color, size, etc. of voxels.
- Position: Specified by the values of the x, y, and z axes based on the plane anchor (unit is centimeters).
- x-axis: left and right
- y-axis: up and down
- z-axis: depth (front is positive)
- Size: Specified as a decimal based on 1.0cm.
- Color: Specified by RGB values, as decimals between 0 and 1.
- Placement interval: Specifies the interval at which voxels are placed in seconds. Voxels are placed at 0.01 second intervals by default.
Example: Place a red voxel at the position (x: 10, y: 5, z: -2) with double size.
# Python
vox.set_box_size(2.0)  # Set size to double
vox.create_box(10, 5, -2, 1, 0, 0)  # Place a red voxel
vox.send_data() # Send data
Method description
| Method name | Description | Arguments |
|---|---|---|
set_room_name(room_name) | Sets the room name for communicating with the device. | room_name: Room name (string) |
set_box_size(size) | Sets the size of the voxel (default: 1.0). | size: Size (float) |
set_build_interval(interval) | Sets the placement interval of the voxels (default: 0.01 seconds). | interval: Interval (float) |
change_shape(shape) | Changes the shape of the voxel. | shape: Shape ("box", "sphere", "plane") |
change_material(is_metallic, roughness) | Changes the material of the voxel. | is_metallic: Whether to make it metallic (boolean), roughness: Roughness (float) |
create_box(x, y, z, r, g, b, alpha) | Places a voxel. | x, y, z: Position (float), r, g, b, alpha: Color (float, 0-1) |
create_box(x, y, z, texture) | Places a voxel with texture. | x, y, z: Position (float), texture: Texture name (string) |
remove_box(x, y, z) | Removes a voxel. | x, y, z: Position (float) |
write_sentence(sentence, x, y, z, r, g, b, alpha, font_size, is_fixed_width) | Draws a string with voxels. | sentence: String (string), x, y, z: Position (float), r, g, b, alpha: Color (float, 0-1), font_size: font size (8, 12, 16, 24), is_fixed_width: indicates if the font is monospaced (0 for false, 1 for true) |
set_light(x, y, z, r, g, b, alpha, intensity, interval, light_type) | Places a light. | x, y, z: Position (float), r, g, b, alpha: Color (float, 0-1), intensity: Intensity (float), interval: Blinking interval (float), light_type: Type of light ("point", "spot", "directional") |
set_command(command) | Executes a command. | command: Command ("axis", "japaneseCastle", "float", "liteRender") |
draw_line(x1, y1, z1, x2, y2, z2, r, g, b, alpha) | Draws a line between two points. | x1, y1, z1: Starting point (float), x2, y2, z2: Ending point (float), r, g, b, alpha: Color (float, 0-1) |
create_model(model_name, x, y, z, pitch, yaw, roll, scale, entity_name) | Creates a built-in model (USDZ). | model_name: Name of the model (string), x, y, z: Translation values (float), pitch, yaw, roll: Rotation values (float), scale: Scale (float), entity_name: Name assigned to the created model (string) |
move_model(entity_name, x, y, z, pitch, yaw, roll, scale) | Moves the created model (USDZ). | entity_name: Name assigned to the created model (string), x, y, z: Translation values (float), pitch, yaw, roll: Rotation values (float), scale: Scale (float) |
send_data(name) | Sends voxel data to the device; if the name argument is set, the voxel data can be stored and reproduced as history. | |
clear_data() | Initializes voxel data. | |
transform(x, y, z, pitch, yaw, roll) | Moves and rotates the coordinate system of the voxel. | x, y, z: Translation amount (float), pitch, yaw, roll: Rotation amount (float) |
animate(x, y, z, pitch, yaw, roll, scale, interval) | Animates a voxel. | x, y, z: Translation amount (float), pitch, yaw, roll: Rotation amount (float), scale: Scale (float), interval: Interval (float) |
animate_global(x, y, z, pitch, yaw, roll, scale, interval) | Animates all voxels. | x, y, z: Translation amount (float), pitch, yaw, roll: Rotation amount (float), scale: Scale (float), interval: Interval (float) |
push_matrix() | Saves the current coordinate system to the stack. | |
pop_matrix() | Restores the coordinate system from the stack. | |
frame_in() | Starts recording a frame. | |
frame_out() | Ends recording a frame. | |
set_frame_fps(fps) | Sets the frame rate (default: 2). | fps: Frame rate (int) |
set_frame_repeats(repeats) | Sets the number of frame repetitions (default: 10). | repeats: Number of repetitions (int) |
| Game Method Name | Description | Arguments |
set_game_screen(width, height, angle=90, r=1, g=1, b=0, alpha=0.5) | Sets the game screen size. | width, height: screen size (float), angle: angle (float), r, g, b, alpha: color (float, 0-1) |
set_game_score(score, x=0, y=0) | Sets the game score. | score: game score (int), x, y: position (float) |
send_game_over() | Triggers game over. | |
send_game_clear() | Triggers game clear. | |
create_sprite(sprite_name, color_list, x, y, direction=90, scale=1, visible=True) | Creates a sprite. | sprite_name: sprite name (string), color_list: dot color data (string), x, y: position (float), direction: angle (float), scale: scale (float), visible: visibility (boolean) |
move_sprite(sprite_name, x, y, direction=90, scale=1, visible=True) | Moves a sprite. | sprite_name: sprite name (string), x, y: position (float), direction: angle (float), scale: scale (float), visible: visibility (boolean) |
move_sprite_clone(sprite_name, x, y, direction=90, scale=1,) | Moves a clone of the sprite. Can be executed multiple times and is used when creating multiple sprites. | sprite_name: Sprite name (string), x, y: Position (float), direction: Direction (float), scale: Scale (float) |
display_dot(sprite_name, x, y, direction=90, scale=1) | Used to place multiple dots, such as bullets or particles. | sprite_name: Sprite name (string), x, y: Position (float), direction: Direction (float), scale: Scale (float) |
display_text(sprite_name, x, y, direction=90, scale=1, is_vertical=True, align='') | Displays text on the game screen. | sprite_name: Name of the sprite (string), x, y: Position (float), direction: Angle (float), scale: Scale (float), is_vertical: Vertical text display (boolean), align: Text alignment (combination of 'Top', 'Bottom', 'Right', 'Left') |
Notes:
- The method names above are examples in Python. Method names may differ in other languages.
- Please refer to the sample code for each language for more details.
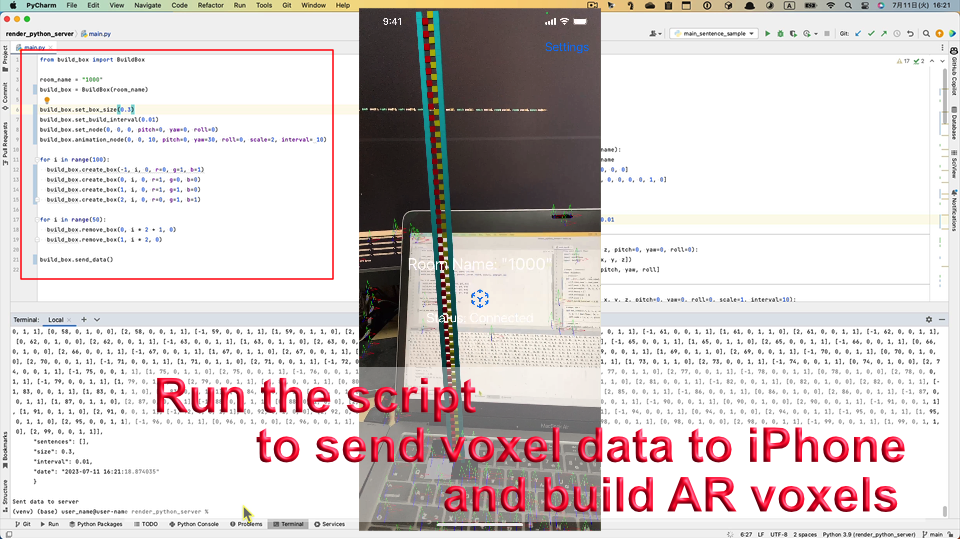
4. Run and check
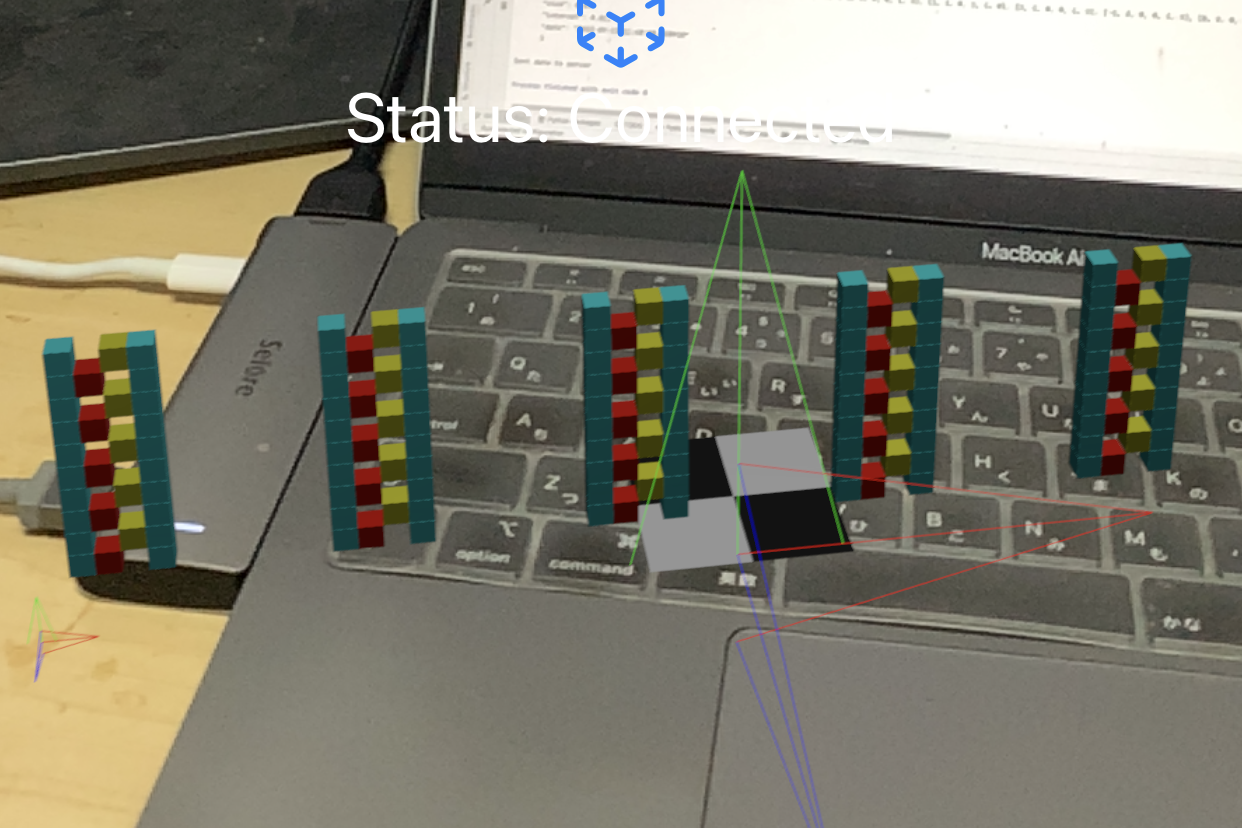
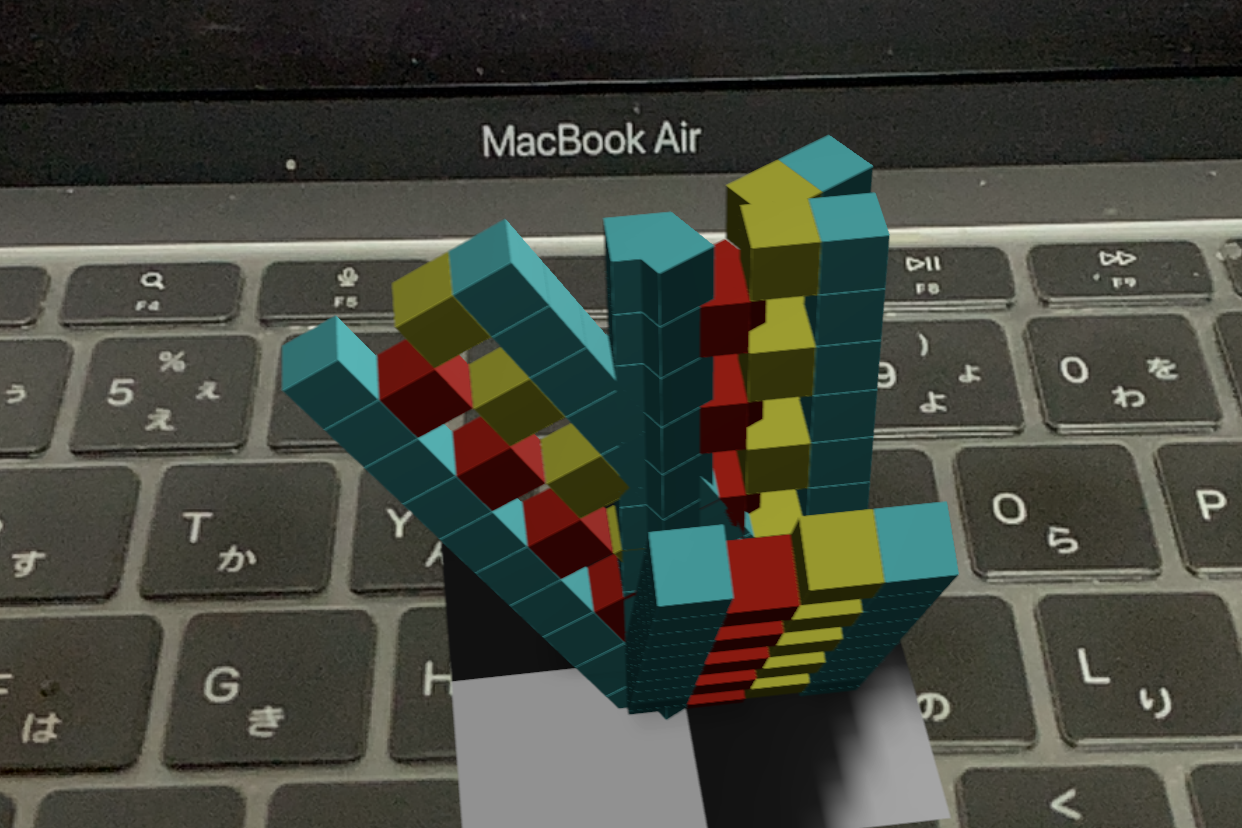
When you run the code you created, the voxel data is sent to the device and the voxels are built in AR space.
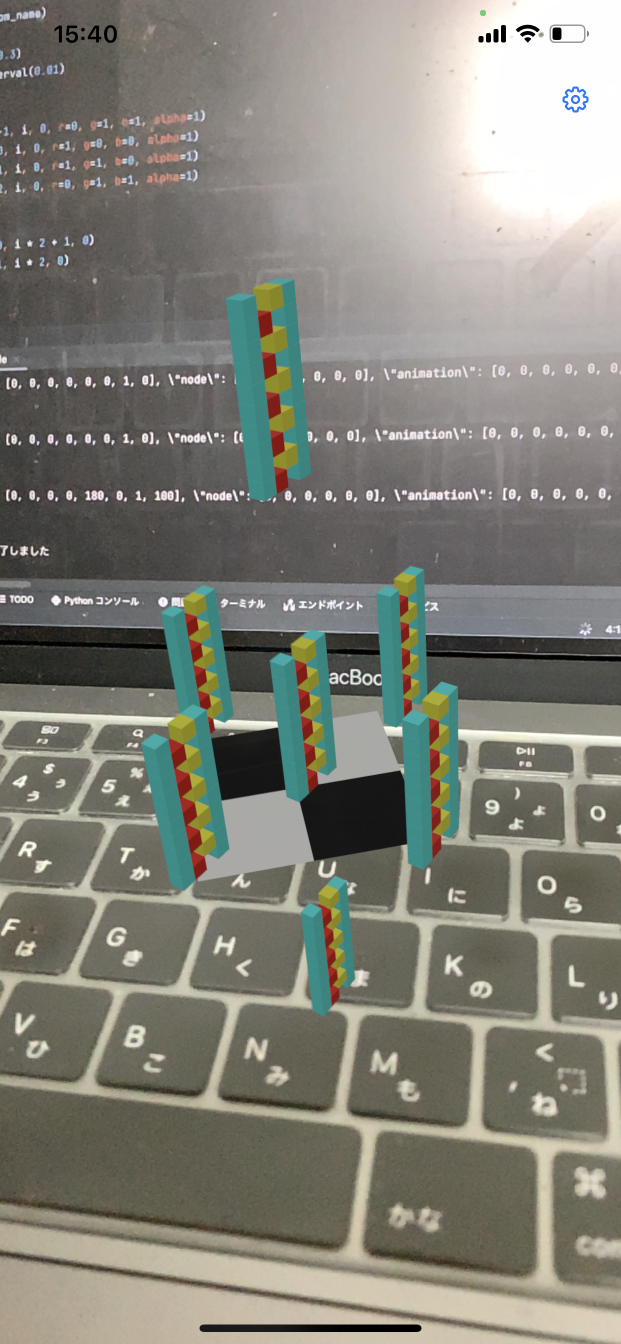
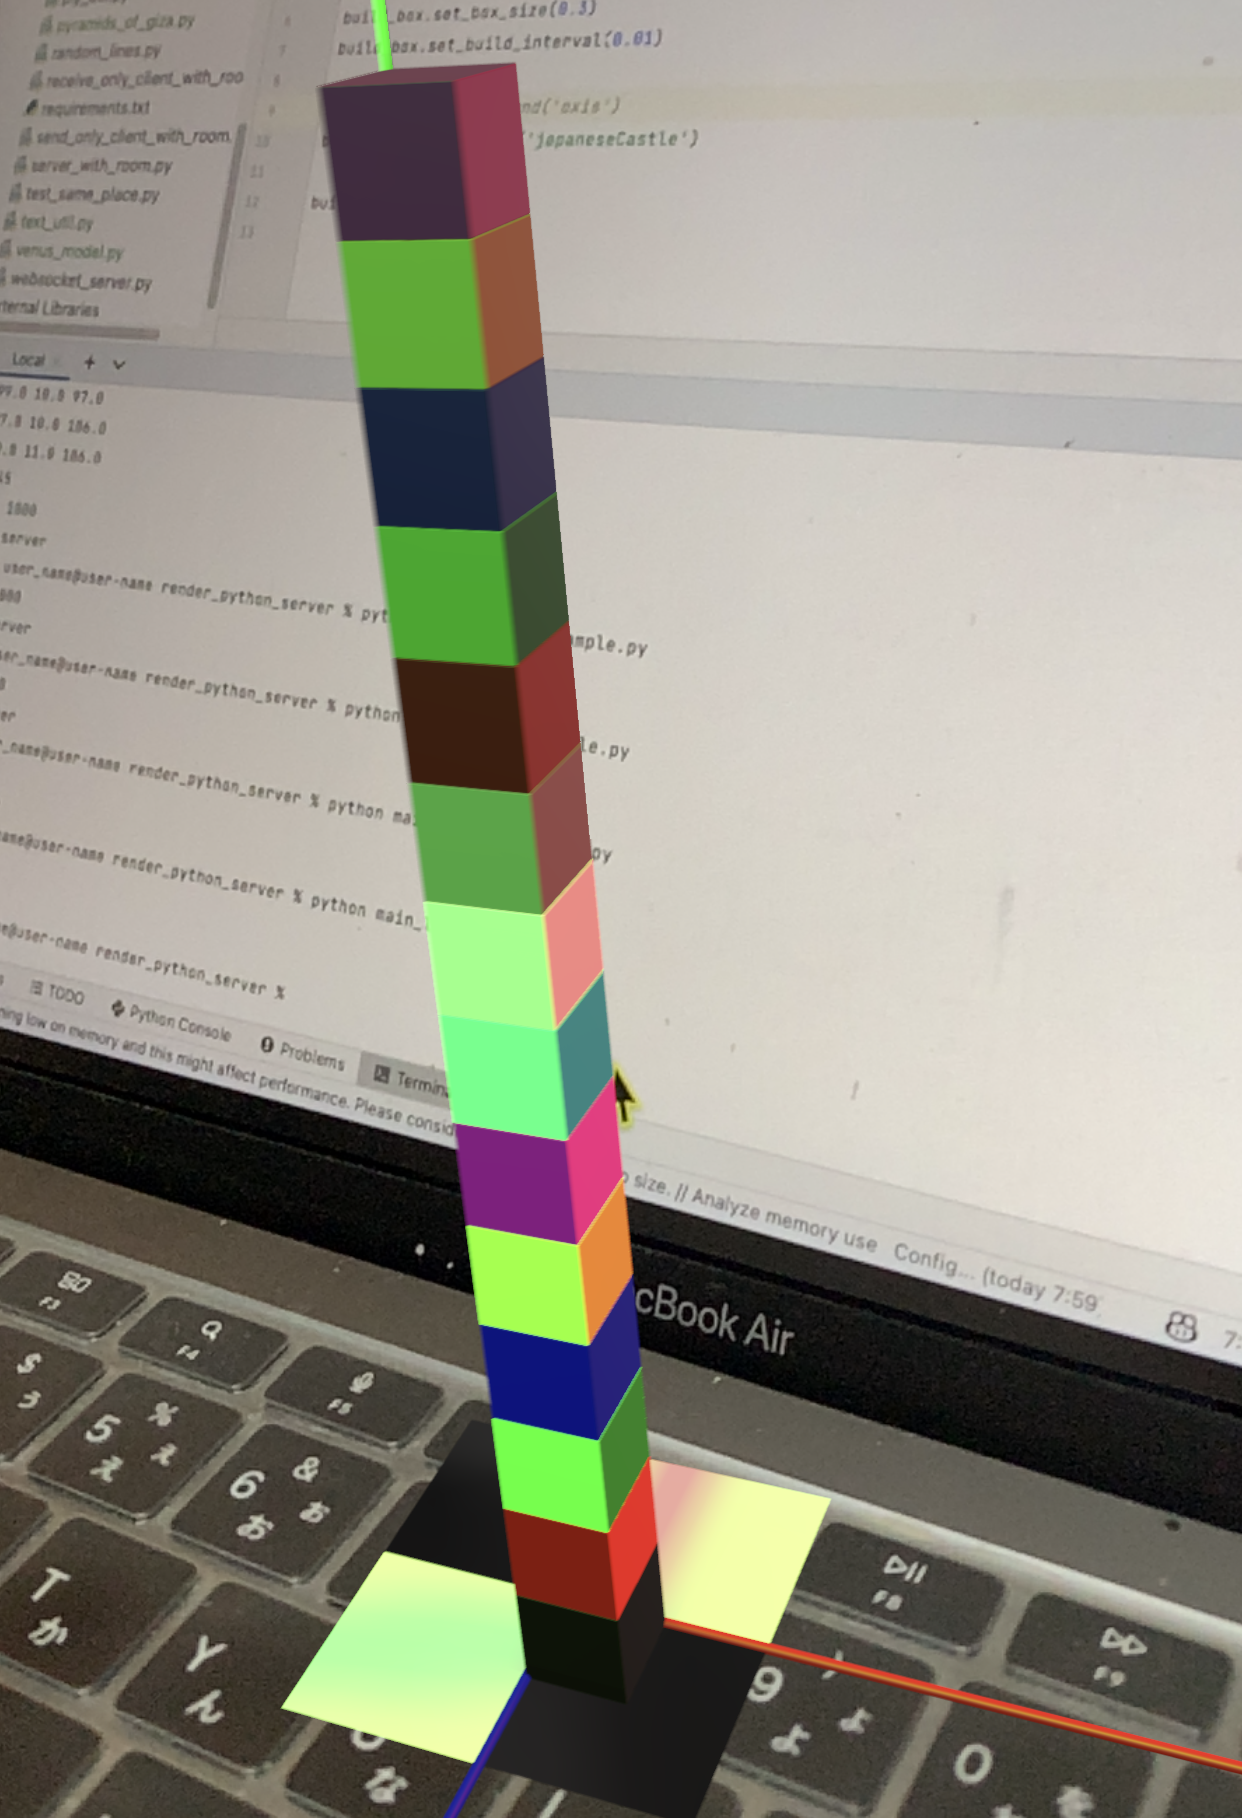
Sample Script
We have prepared sample scripts in the sample folder. If you run the following script, voxels like the top image will be placed.
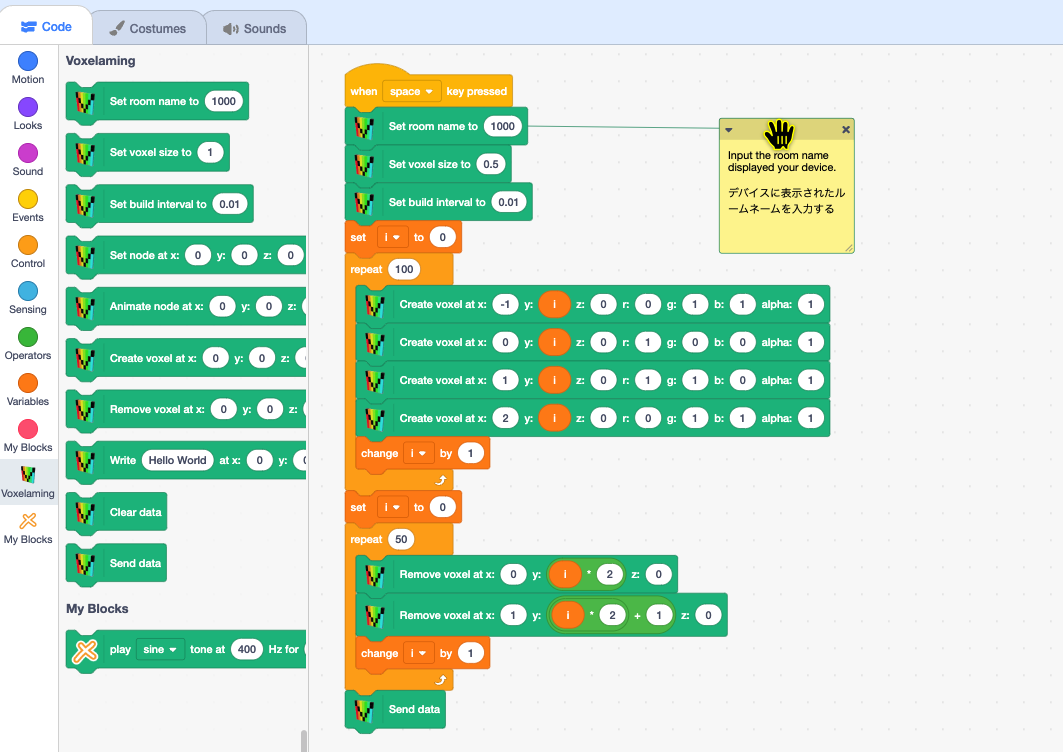
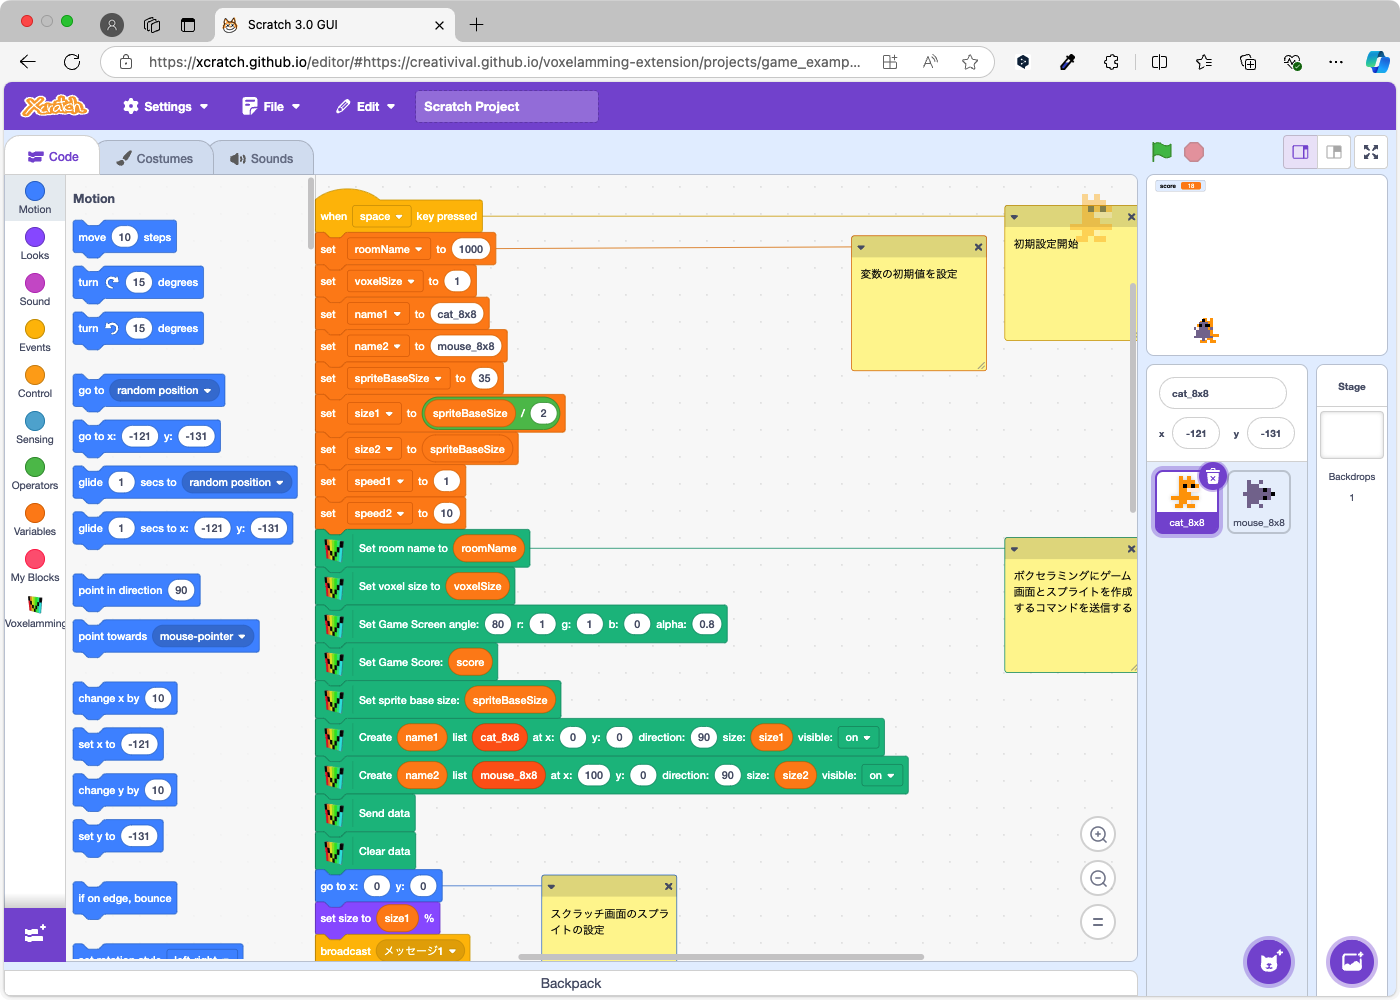
Scratch3 MOD
Please load the Voxelamming extension and create a script.
Play the sample project with Xcratch
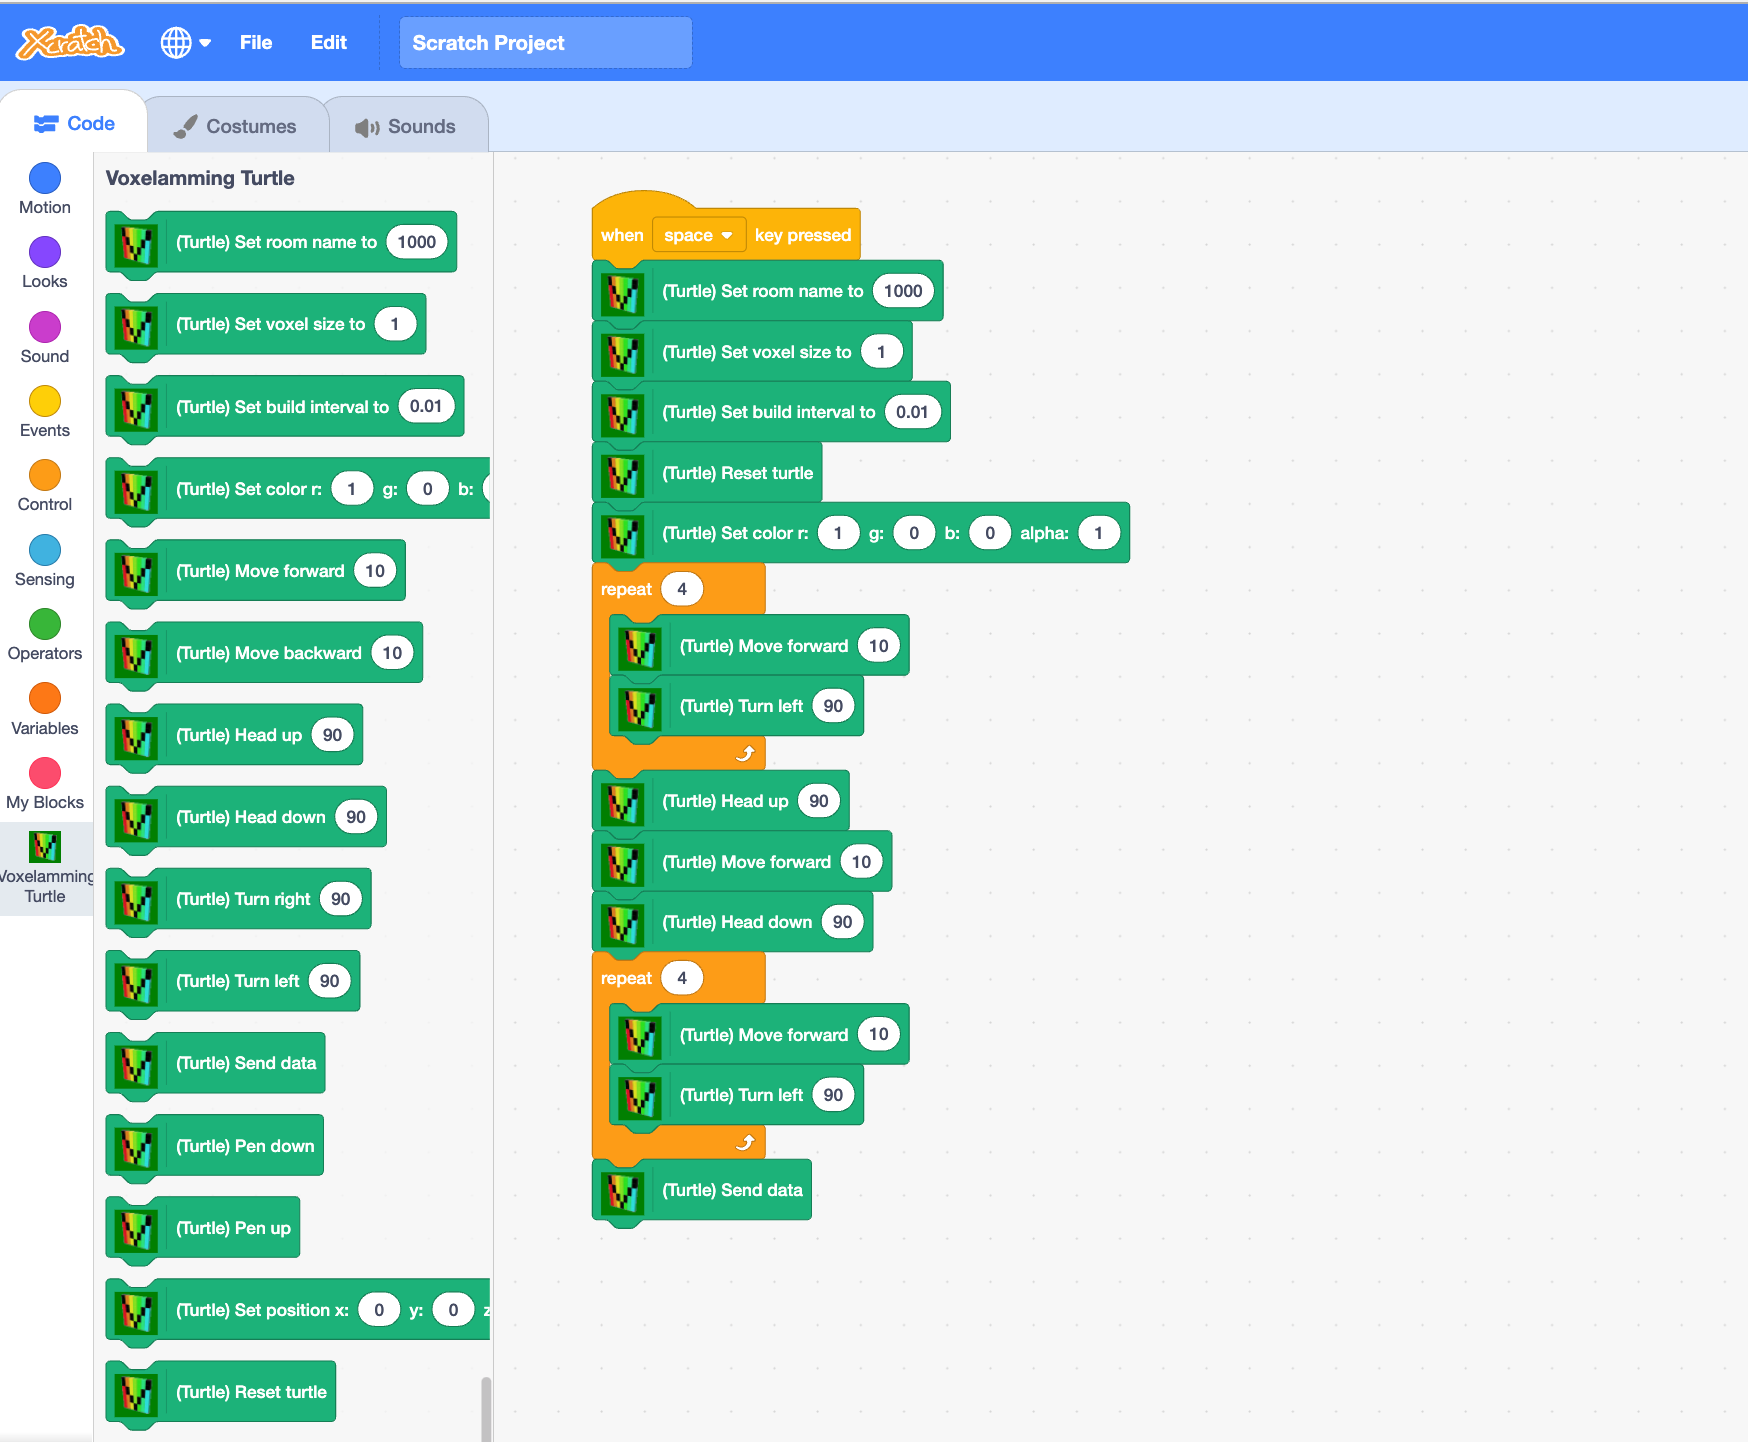
Scratch3 MOD (Turtle Programming)
You can use Scratch3 MOD's turtle programming to place voxels. Since you can intuitively place voxels, it is recommended for programming beginners, especially children.
Play the sample project with Xcratch
Scratch3 MOD (Game Programming)
AR games can be created using Scratch3 MOD game blocks. The logic of the game is set up in the Scratch3 MOD blocks, and the game can be displayed on the AR space by sending the sprite's location information to Boxerming.
Play the sample project with Xcratch
Python (3.6 or higher)
Install package version 0.3.0 or later.
Script
# Python
# Import the Voxelamming class from the voxelamming package
from voxelamming import Voxelamming
# from voxelamming_local import Voxelamming # Use this when developing locally
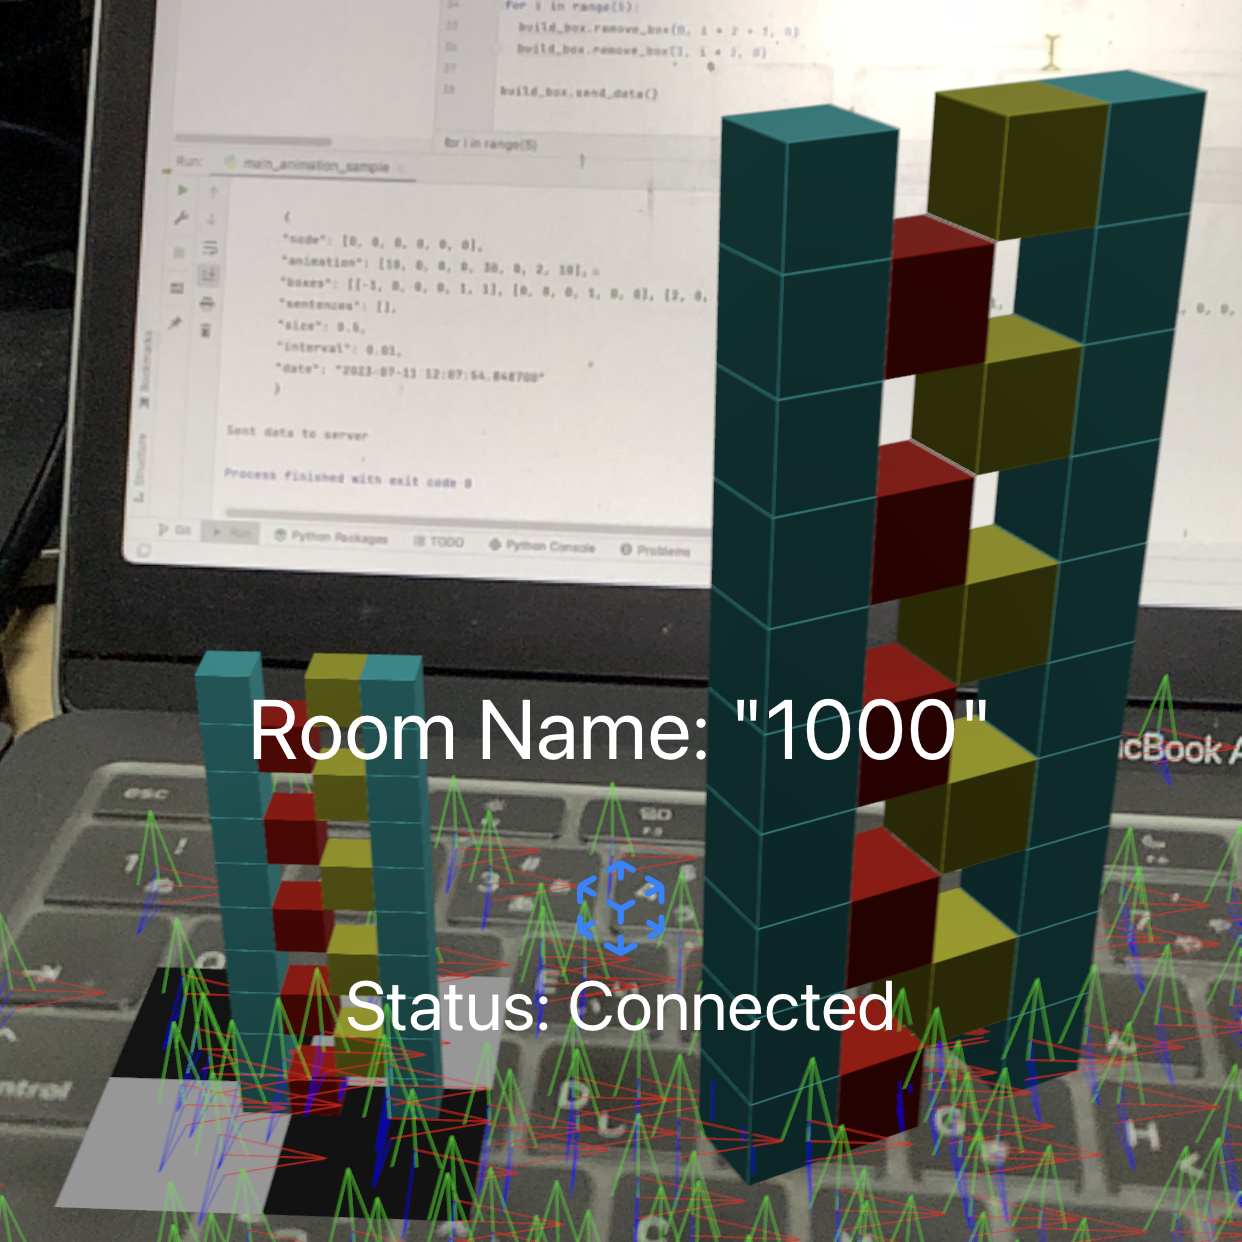
# Specify the room name displayed in the Voxelamming app
room_name = "1000"
# Create an instance of the Voxelamming class
vox = Voxelamming(room_name)
# Set the size of the voxels
vox.set_box_size(1)
# Set the interval for placing voxels
vox.set_build_interval(0.01)
# Set the position and color to place the voxels
for i in range(100):
vox.create_box(-1, i, 0, r=0, g=1, b=1, alpha=1)
vox.create_box(0, i, 0, r=1, g=0, b=0, alpha=1)
vox.create_box(1, i, 0, r=1, g=1, b=0, alpha=1)
vox.create_box(2, i, 0, r=0, g=1, b=1, alpha=1)
# Set the position to remove the voxels
for i in range(50):
vox.remove_box(0, i * 2 + 1, 0)
vox.remove_box(1, i * 2, 0)
# Send voxel data to the app
vox.send_data("main")
# vox.close_connection()
How to run
$ pip install voxelamming
$ pip install --upgrade voxelamming
$ sample/python
$ python main.py

or

$ python3 main.py
Game Script
# Python
import pyxel
import time
import random
# from voxelamming import Voxelamming
from voxelamming_local import Voxelamming  # Use this when developing locally


class Player:
    name = 'spaceship_8x8'
    dot_data = (
        '-1 -1 -1 8 8 -1 -1 -1 -1 -1 3 7 7 3 -1 -1 -1 -1 -1 7 7 -1 -1 -1 -1 -1 7 7 7 7 -1 -1 -1 7 7 7 7 7 7 -1 3 7'
        ' 7 7 7 7 7 3 -1 8 8 7 7 8 8 -1 -1 -1 -1 8 8 -1 -1 -1'
    )

    def __init__(self, x, y, speed):
        self.direction = 0
        self.x = x
        self.y = y
        self.img = 0
        self.u = 0
        self.v = 0
        self.w = 8
        self.h = 8
        self.speed = speed

    def update(self):
        if pyxel.btn(pyxel.KEY_LEFT):
            self.x -= self.speed
        if pyxel.btn(pyxel.KEY_RIGHT):
            self.x += self.speed


class Enemy:
    name = 'enemy_8x8'
    dot_data = (
        '-1 -1 3 -1 -1 3 -1 -1 -1 3 -1 3 3 -1 3 -1 3 -1 3 3 3 3 -1 3 3 3 3 3 3 3 3 3 3 3 -1 3 3 -1 3 3 3 3 3 3 3 3'
        ' 3 3 -1 3 3 -1 -1 3 3 -1 3 -1 -1 -1 -1 -1 -1 3'
    )

    def __init__(self, x, y):
        self.direction = 0
        self.x = x
        self.y = y
        self.img = 0
        self.u = 0
        self.v = 8
        self.w = 8
        self.h = 8


class Missile:
    def __init__(self, x, y, color_id, direction=0, width=1, height=1):
        self.x = x
        self.y = y
        self.direction = direction
        self.color_id = color_id
        self.width = width
        self.height = height


class App:
    def __init__(self):
        # Pyxel settings
        self.window_width = 160  # The width of the AR window becomes the value multiplied by self.dot_size (in centimeters)
        self.window_height = 120  # The height of the AR window becomes the value multiplied by self.dot_size (in centimeters)
        self.score = 0
        self.game_over = False
        self.game_clear = False

        # Player settings
        self.player = Player(self.window_width // 2, self.window_height - 10, 2)
        self.missiles = []
        self.player_missile_speed = 2

        # Enemy settings
        self.enemy_rows = 3
        self.enemy_cols = 6
        self.enemy_speed = 1
        self.enemy_direction = 1
        self.enemies = []
        self.enemy_missiles = []
        self.enemy_missile_speed = 2

        # Initialize enemies
        for row in range(self.enemy_rows):
            for col in range(self.enemy_cols):
                enemy_x = col * 16 + 20
                enemy_y = row * 12 + 20
                enemy = Enemy(enemy_x, enemy_y)
                self.enemies.append(enemy)

        # Voxelamming settings (executed before Pyxel initialization)
        self.dot_size = 1  # The size of the sprite dots displayed in the AR space (in centimeters)
        self.window_angle = 80  # Tilt angle of the AR window (in degrees)
        self.vox = Voxelamming('1000')
        self.init_voxelamming()

        # Pyxel initialization
        pyxel.init(self.window_width, self.window_height, title="Pyxel Invader Game", fps=30)
        pyxel.mouse(True)
        pyxel.load("invader_game.pyxres")
        pyxel.run(self.update, self.draw)

    def update(self):
        if self.game_over or self.game_clear:
            # Show cursor
            pyxel.mouse(True)

            if pyxel.btnp(pyxel.MOUSE_BUTTON_LEFT):
                self.reset_game()
            return

        # Hide cursor
        pyxel.mouse(False)

        # Player controls
        self.player.update()

        if pyxel.btnp(pyxel.KEY_SPACE):
            missile_x = self.player.x + self.player_missile_speed
            missile_y = self.player.y
            missile_clor_id = 10  # Blue
            missile_direction = 0
            missile_width = 2
            missile_height = 4
            self.missiles.append(
                Missile(missile_x, missile_y, missile_clor_id, missile_direction, missile_width, missile_height))

        # Move missiles
        for missile in self.missiles[:]:
            missile.y -= 2
            if missile.y < 0:
                self.missiles.remove(missile)

        # Move enemies
        move_down = False
        for enemy in self.enemies:
            enemy.x += self.enemy_speed * self.enemy_direction

        for enemy in self.enemies:
            if enemy.x > pyxel.width - 8 or enemy.x < 0:
                self.enemy_direction *= -1
                move_down = True
                break  # Change direction immediately when reaching the edge

        if move_down:
            for enemy in self.enemies:
                enemy.y += 8

                # Game over if the enemy reaches the bottom of the screen
                if enemy.y > pyxel.height - 16:
                    self.game_over = True

        # Enemy missile firing
        if random.random() < 0.03 and self.enemies:
            shooting_enemy = random.choice(self.enemies)
            missile_x = shooting_enemy.x + 4
            missile_y = shooting_enemy.y + 8
            missile_clor_id = 8  # Red
            missile_direction = 0
            missile_width = 2
            missile_height = 4
            self.enemy_missiles.append(
                Missile(missile_x, missile_y, missile_clor_id, missile_direction, missile_width, missile_height))

        # Move enemy missiles
        for missile in self.enemy_missiles[:]:
            missile.y += self.enemy_missile_speed
            if missile.y > pyxel.height * 2:
                self.enemy_missiles.remove(missile)

        # Collision detection between missiles and enemies
        for missile in self.missiles[:]:
            for enemy in self.enemies[:]:
                if (enemy.x < missile.x < enemy.x + 16 and
                        enemy.y < missile.y < enemy.y + 12):
                    self.missiles.remove(missile)
                    self.enemies.remove(enemy)
                    self.score += 10
                    break

        # Collision detection between player and enemy missiles
        for missile in self.enemy_missiles[:]:
            if (self.player.x < missile.x < self.player.x + 8 and
                    self.player.y < missile.y < self.player.y + 8):
                self.game_over = True

        # Collision detection between player and enemies
        for enemy in self.enemies:
            if (self.player.x < enemy.x < self.player.x + 8 and
                    self.player.y < enemy.y < self.player.y + 8):
                self.game_over = True

        # Check for game clear
        if not self.enemies:
            self.game_clear = True

        # Update Voxelamming
        self.update_voxelamming()

    def draw(self):
        pyxel.cls(0)
        pyxel.text(5, 4, f"Score: {self.score}", 7)

        if self.game_clear:
            pyxel.text(pyxel.width // 2 - 20, pyxel.height // 2, "GAME CLEAR!", pyxel.frame_count % 16)
            pyxel.text(self.window_width // 2 - 26, self.window_height // 2 + 8, "Click to start",
                       pyxel.frame_count % 16)
        elif self.game_over:
            pyxel.text(pyxel.width // 2 - 20, pyxel.height // 2, "GAME OVER", pyxel.frame_count % 16)
            pyxel.text(self.window_width // 2 - 26, self.window_height // 2 + 8, "Click to start",
                       pyxel.frame_count % 16)
        else:
            # Draw player
            pyxel.blt(self.player.x, self.player.y, self.player.img, self.player.u, self.player.v, self.player.w,
                      self.player.h, 0)

            # Draw enemies
            for enemy in self.enemies:
                pyxel.blt(enemy.x, enemy.y, enemy.img, enemy.u, enemy.v, enemy.w, enemy.h, 0)

            # Draw missiles
            for missile in self.missiles:
                pyxel.rect(missile.x, missile.y, missile.width, missile.height, missile.color_id)

            # Draw enemy missiles
            for missile in self.enemy_missiles:
                pyxel.rect(missile.x, missile.y, missile.width, missile.height, missile.color_id)

    def reset_game(self):
        self.score = 0  # Reset score
        self.game_over = False
        self.game_clear = False

        # Player settings
        self.player = Player(self.window_width // 2, self.window_height - 10, 2)
        self.missiles = []

        # Enemy settings
        self.enemy_rows = 3
        self.enemy_cols = 6
        self.enemy_speed = 1
        self.enemy_direction = 1
        self.enemies = []
        self.enemy_missiles = []
        self.enemy_missile_speed = 2

        # Initialize enemies
        for row in range(self.enemy_rows):
            for col in range(self.enemy_cols):
                enemy_x = col * 16 + 20
                enemy_y = row * 12 + 20
                enemy = Enemy(enemy_x, enemy_y)
                self.enemies.append(enemy)

    def init_voxelamming(self):

        # Initialize Voxelamming
        self.vox.set_box_size(self.dot_size)
        self.vox.set_game_screen(self.window_width, self.window_height, self.window_angle, red=1, green=1, blue=0,
                                 alpha=0.8)
        self.vox.set_game_score(self.score)

        # Display the player's sprite
        vox_x, vox_y = self.convert_sprite_position_to_voxelamming(self.player.x, self.player.y)
        self.vox.create_sprite(self.player.name, self.player.dot_data, vox_x, vox_y, self.player.direction, 1)

        # Since there are multiple enemies, create a template and display it in multiple locations
        self.vox.create_sprite(Enemy.name, Enemy.dot_data)
        for enemy in self.enemies:
            vox_x, vox_y = self.convert_sprite_position_to_voxelamming(enemy.x, enemy.y)
            self.vox.move_sprite(enemy.name, vox_x, vox_y, enemy.direction, 1)

        self.vox.send_data()
        self.vox.clear_data()

    def update_voxelamming(self):
        # Send sprite information every 0.1 seconds
        if pyxel.frame_count % 3 == 0 or self.game_clear or self.game_over:  # Default Pyxel FPS is 30
            self.vox.set_box_size(self.dot_size)
            self.vox.set_game_screen(self.window_width, self.window_height, self.window_angle, red=1, green=1,
                                     blue=0, alpha=0.5)
            self.vox.set_game_score(self.score, -66, 57)

            # Move sprites
            vox_x, vox_y = self.convert_sprite_position_to_voxelamming(self.player.x, self.player.y)
            self.vox.move_sprite(self.player.name, vox_x, vox_y, self.player.direction, 1)

            # Enemy movement is displayed as templates in multiple locations
            for enemy in self.enemies:
                vox_x, vox_y = self.convert_sprite_position_to_voxelamming(enemy.x, enemy.y)
                self.vox.move_sprite_clone(enemy.name, vox_x, vox_y, enemy.direction, 1)

            # Missiles are displayed as dots
            for missile in self.missiles + self.enemy_missiles:
                vox_x, vox_y = self.convert_dot_position_to_voxelamming(missile.x, missile.y, missile.width, missile.height)
                self.vox.display_dot(vox_x, vox_y, missile.direction, missile.color_id, missile.width,
                                     missile.height)

            # Change the screen to blue and display the game clear
            if self.game_clear:
                self.vox.set_game_screen(self.window_width, self.window_height, self.window_angle, red=0, green=0,
                                         blue=1, alpha=0.8)
                self.vox.set_command('gameClear')

            # Change the screen to red and display game over
            if self.game_over:
                self.vox.set_game_screen(self.window_width, self.window_height, self.window_angle, red=1, green=0,
                                         blue=0, alpha=0.8)
                self.vox.set_command('gameOver')

            self.vox.send_data()

            # Wait for 1 second after game clear or game over, then send data again
            if self.game_clear or self.game_over:
                time.sleep(1)
                self.vox.send_data()

            self.vox.clear_data()

    def convert_sprite_position_to_voxelamming(self, x, y):
        return x - self.window_width // 2 + 4, self.window_height // 2 - (y + 4)

    def convert_dot_position_to_voxelamming(self, x, y, width=1, height=1):
        return x - self.window_width // 2 + width / 2, self.window_height // 2 - (y + height / 2)


if __name__ == "__main__":
    App()
How to run
After placing the base anchor with voxelamming, start the Pyxel game.
$ pip install voxelamming pyxel
$ pip install --upgrade voxelamming
$ sample/python
$ python game_sample.py

or

$ python3 game_sample.py
JavaScript (Node.js)
Install package version 0.3.0 or later.
Script
// JavaScript (Node.js)
import { Voxelamming } from 'voxelamming';

const roomName = '1000';
const vox = new Voxelamming(roomName);

vox.setBoxSize(0.5);
vox.setBuildInterval(0.01);

for (let i = 0; i < 100; i++) {
  vox.createBox(-1, i, 0, 0, 1, 1);
  vox.createBox(0, i, 0, 1, 0, 0);
  vox.createBox(1, i, 0, 1, 1, 0);
  vox.createBox(2, i, 0, 0, 1, 1);
}

for (let i = 0; i < 50; i++) {
  vox.removeBox(0, i * 2, 0);
  vox.removeBox(1, i * 2 + 1, 0);
}

await vox.sendData("main");
console.log('send data done')
How to run
$ sample/javaScript
$ npm install voxelamming
$ node main.mjs
Ruby
Install package version 0.3.0 or later.
Script
# Ruby
require 'voxelamming'
# require_relative 'voxelamming'

room_name = '1000'
vox = Voxelamming::VoxelammingManager.new(room_name)
# vox = VoxelammingManager.new(room_name)

vox.set_box_size(0.5)
vox.set_build_interval(0.01)

for i in 0...100
  vox.create_box(-1, i, 0, r: 0, g: 1, b: 1)
  vox.create_box(0, i, 0, r: 1, g: 0, b: 0)
  vox.create_box(1, i, 0, r: 1, g: 1, b: 0)
  vox.create_box(2, i, 0, r: 0, g: 1, b: 1)
end

for i in 0...50
  vox.remove_box(0, i * 2, 0)
  vox.remove_box(1, i * 2 + 1, 0)
end

vox.send_data(name: 'main')
How to run
$ sample/ruby
$ gem install voxelamming
$ ruby main.rb
Swift
Script
// Swift
import Foundation

if #available(iOS 15.0, macOS 12.0, *) {
    let roomName = "1000"
    let vox = Voxelamming(roomName: roomName)
    vox.setBoxSize(0.5)
    vox.setBuildInterval(0.01)

    Task {
        do {
            for i in 0..<100 {
                vox.createBox(-1, Double(i), 0, r: 0, g: 1, b: 1)
                vox.createBox(0, Double(i), 0, r: 1, g: 0, b: 0)
                vox.createBox(1, Double(i), 0, r: 1, g: 1, b: 0)
                vox.createBox(2, Double(i), 0, r: 0, g: 1, b: 1)
            }

            for i in 0..<50 {
                vox.removeBox(0, Double(i * 2), 0)
                vox.removeBox(1, Double(i * 2 + 1), 0)
            }

            try await vox.sendData()
        } catch {
            print("An error occurred: \(error)")
        }
    }

    RunLoop.main.run(until: Date(timeIntervalSinceNow: 10)) // Or longer depending on your needs
} else {
    fatalError("This script requires iOS 15.0 / macOS 12.0 or later.")
}
How to run
$ cd sample/swift/main
$ swift run
Showcase
Here are some examples of works that can be created with Voxelamming.
Sphere
create a sphere in voxels; the size of the sphere can be adjusted by changing the radius variable.
# Python
# Import the Voxelamming class from the voxelamming package
from voxelamming import Voxelamming
# from voxelamming_local import Voxelamming  # Use this when developing locally

# Set the radius of the sphere
radius = 11

# Specify the room name displayed in the Voxelamming app
room_name = "1000"
# Create an instance of the Voxelamming class
vox = Voxelamming(room_name)

# Configure voxel settings
vox.set_box_size(2)
vox.set_build_interval(0.01)

# Set the position and color to place the voxels
for i in range(-radius, radius + 1):
    for j in range(-radius, radius + 1):
        for k in range(-radius, radius + 1):
            if (radius - 1) ** 2 <= i ** 2 + j ** 2 + k ** 2 < radius ** 2:
                print(i, j, k)
                vox.create_box(i, j, k, 0, 1, 1)

# Send voxel data to the app
vox.send_data("main_sphere_sample")

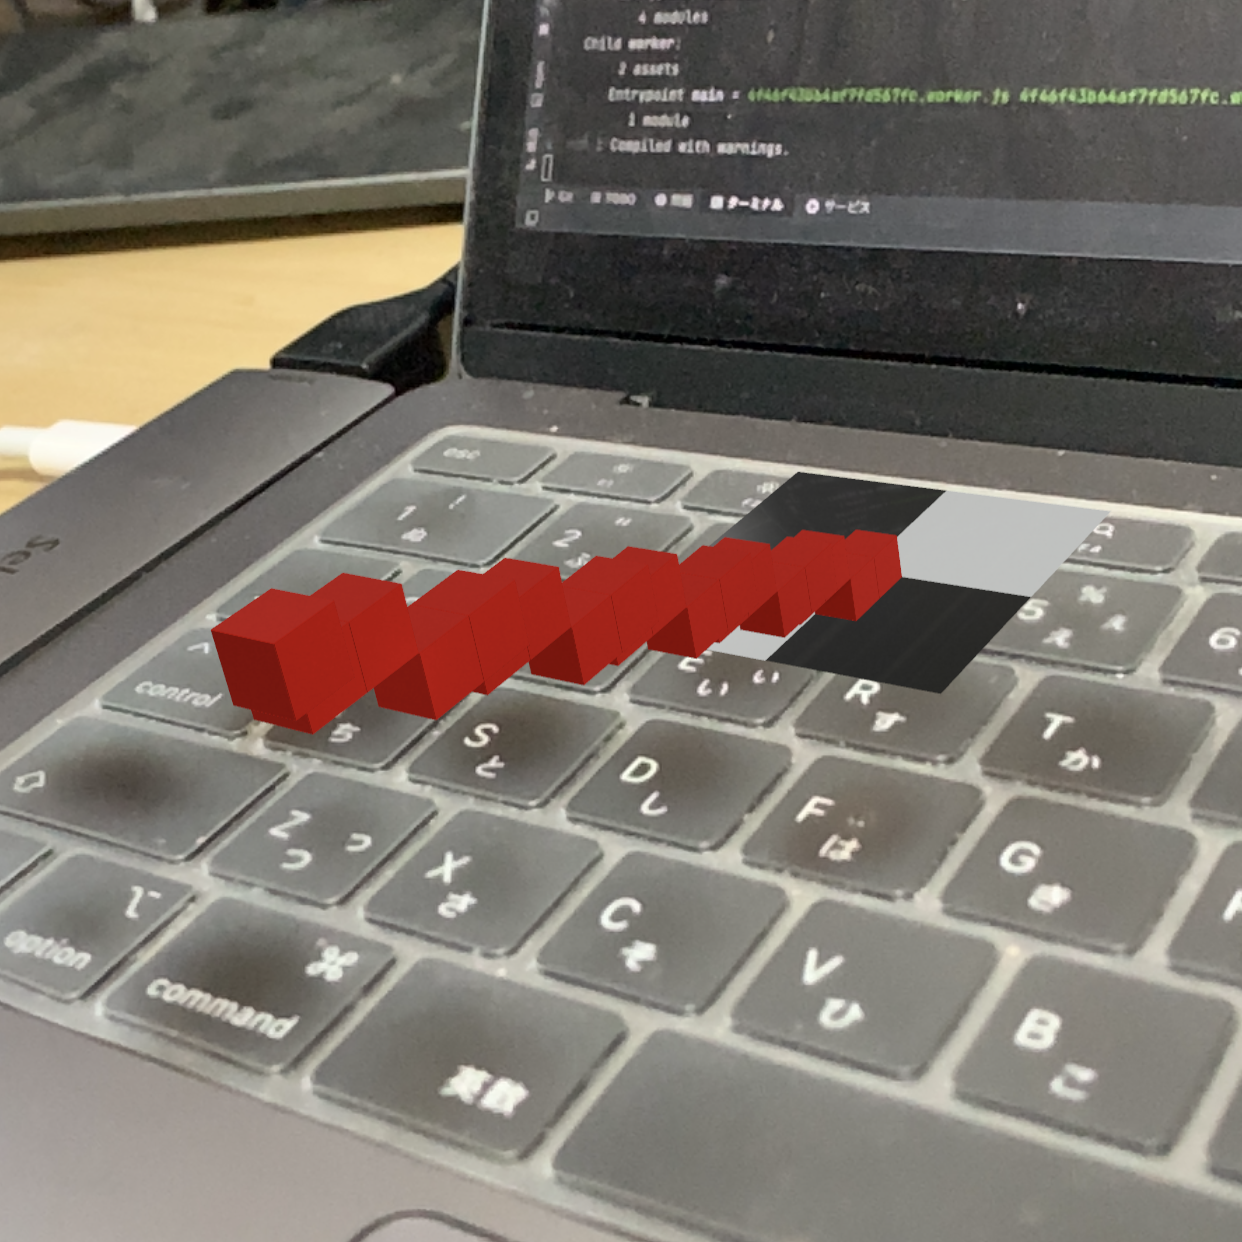
Node Placement
Voxelamming allows structures to be created in 3D space by placing nodes.
Location information can be specified for the nodes.
# Python
import time
from voxelamming import Voxelamming

room_name = "1000"
vox = Voxelamming(room_name)

vox.set_box_size(0.5)
vox.set_build_interval(0.01)

for i in range(10):
  vox.create_box(-1, i, 0, r=0, g=1, b=1)
  vox.create_box(0, i, 0, r=1, g=0, b=0)
  vox.create_box(1, i, 0, r=1, g=1, b=0)
  vox.create_box(2, i, 0, r=0, g=1, b=1)

for i in range(5):
  vox.remove_box(0, i * 2 + 1, 0)
  vox.remove_box(1, i * 2, 0)

for i in range(5):
  vox.transform(-25 + i * 10, 0, 0, pitch=0, yaw=0, roll=0)
  vox.send_data()
  time.sleep(1)
Node Rotation
Voxelamming allows nodes to be rotated around the x-, y- and z-axes by changing the values of pitch, yaw and roll.
# Python
import time
# Import the Voxelamming class from the voxelamming package
from voxelamming import Voxelamming
# from voxelamming_local import Voxelamming  # Use this when developing locally

# Set variables
rotations = [
    [0, 0, 0],
    [30, 0, 0],
    [0, 30, 0],
    [0, 0, 30],
]

# Specify the room name displayed in the Voxelamming app
room_name = "1000"
# Create an instance of the Voxelamming class
vox = Voxelamming(room_name)

# Configure voxel settings
vox.set_box_size(0.5)
vox.set_build_interval(0.01)

for i in range(10):
    vox.create_box(-1, i, 0, r=0, g=1, b=1)
    vox.create_box(0, i, 0, r=1, g=0, b=0)
    vox.create_box(1, i, 0, r=1, g=1, b=0)
    vox.create_box(2, i, 0, r=0, g=1, b=1)

for i in range(5):
    vox.remove_box(0, i * 2 + 1, 0)
    vox.remove_box(1, i * 2, 0)

for rotation in rotations:
    pitch, yaw, roll = rotation

    vox.transform(0, 0, 0, pitch=pitch, yaw=yaw, roll=roll)
    # Send voxel data to the app
    vox.send_data()
    time.sleep(0.1)
Node Animation
Node animations can be positioned, sized and rotated. The speed of the animation can be adjusted by changing the animation interval (interval).
# Python
from time import sleep
# Import the Voxelamming class from the voxelamming package
from voxelamming_local import Voxelamming

# Specify the room name displayed in the Voxelamming app
room_name = "1000"
# Create an instance of the Voxelamming class
vox = Voxelamming(room_name)
# Configure voxel settings
vox.set_box_size(0.5)
vox.set_build_interval(0.01)

for i in range(10):
    vox.create_box(-1, i, 0, r=0, g=1, b=1)
    vox.create_box(0, i, 0, r=1, g=0, b=0)
    vox.create_box(1, i, 0, r=1, g=1, b=0)
    vox.create_box(2, i, 0, r=0, g=1, b=1)

for i in range(5):
    vox.remove_box(0, i * 2 + 1, 0)
    vox.remove_box(1, i * 2, 0)

# Send voxel data to the app (1st time)
vox.send_data()

# Wait for 0.1 seconds
sleep(0.1)

vox.animate(10, 0, 0, pitch=0, yaw=30, roll=0, scale=2, interval=10)

# Send voxel data to the app (2nd time)
vox.send_data()
Global Animation
Global animation animates all nodes. You can specify position, rotation, scale and animation interval (interval).
# Python
from time import sleep
# Import the Voxelamming class from the voxelamming package
from voxelamming import Voxelamming
# from voxelamming_local import Voxelamming  # Use this when developing locally

# Specify the room name displayed in the Voxelamming app
room_name = "1000"
# Create an instance of the Voxelamming class
vox = Voxelamming(room_name)
# Configure voxel settings
vox.set_box_size(0.3)
vox.set_build_interval(0.01)

# Set positions and colors for voxel placement
for i in range(10):
    vox.create_box(-1, i, 0, r=0, g=1, b=1, alpha=1)
    vox.create_box(0, i, 0, r=1, g=0, b=0, alpha=1)
    vox.create_box(1, i, 0, r=1, g=1, b=0, alpha=1)
    vox.create_box(2, i, 0, r=0, g=1, b=1, alpha=1)

for i in range(5):
    vox.remove_box(0, i * 2 + 1, 0)
    vox.remove_box(1, i * 2, 0)

# Set positions for voxel placement
node_positions = [
    [0, 0, 0],
    [-10, 0, 0],
    [10, 0, 0],
    [0, -20, 0],
    [0, 20, 0],
    [0, 0, -10],
    [0, 0, 10]
]

for x, y, z in node_positions:
    # Set positions for voxel placement
    vox.transform(x, y, z, pitch=0, yaw=0, roll=0)
    # Send voxel data to the app (sending multiple times with different positions)
    vox.send_data()
    # Wait for 0.1 seconds
    sleep(0.1)

vox.animate_global(0, 0, 0, pitch=0, yaw=180, roll=0, scale=1, interval=100)

# Send voxel data to the app (global animation)
vox.send_data()
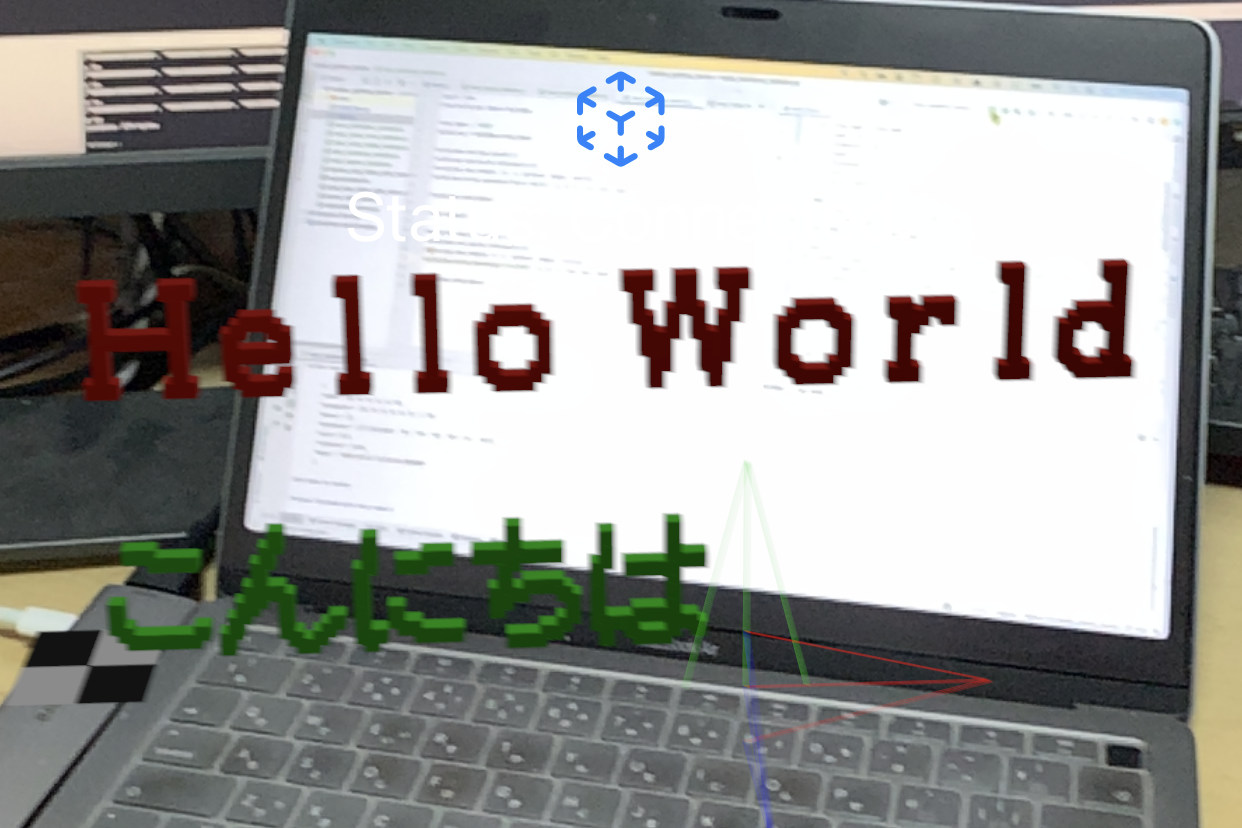
Text Display
Displays text in voxels. The text, position, colour and transparency can be specified. Fonts are available in Japanese, English and numbers.
# Python
# Import the Voxelamming class from the voxelamming package
from voxelamming import Voxelamming
# from voxelamming_local import Voxelamming  # Use this when developing locally

# Specify the room name displayed in the Voxelamming app
room_name = "1000"
# Create an instance of the Voxelamming class
vox = Voxelamming(room_name)
# Configure voxel settings
vox.set_box_size(0.5)
vox.set_build_interval(0.01)

# Set positions and colors for voxel placement
# Font sizes can be chosen from 8, 12, 16, 24
# If is_fixed_width is set to True, the character spacing is fixed
vox.write_sentence("Voxel", 0, 130, 0, r=1, g=0, b=1, alpha=1, font_size=24)
vox.write_sentence("Voxel", 0, 106, 0, r=1, g=0, b=1, alpha=1, font_size=24, is_fixed_width=True)
vox.write_sentence("Hello World", 0, 90, 0, r=1, g=0, b=0, alpha=1, font_size=16)
vox.write_sentence("Hello World", 0, 64, 0, r=1, g=0, b=0, alpha=1, font_size=16, is_fixed_width=True)
vox.write_sentence("こんにちは", 0, 48, 0, r=0, g=1, b=0, alpha=1, font_size=12)
vox.write_sentence("こんにちは", 0, 32, 0, r=0, g=1, b=0, alpha=1, font_size=12, is_fixed_width=True)
vox.write_sentence("今日は", 0, 16, 0, r=0, g=0, b=1, alpha=1, font_size=8)
vox.write_sentence("今日は", 0, 0, 0, r=0, g=0, b=1, alpha=1, font_size=8, is_fixed_width=True)
# Send voxel data to the app
vox.send_data("write_sentence")
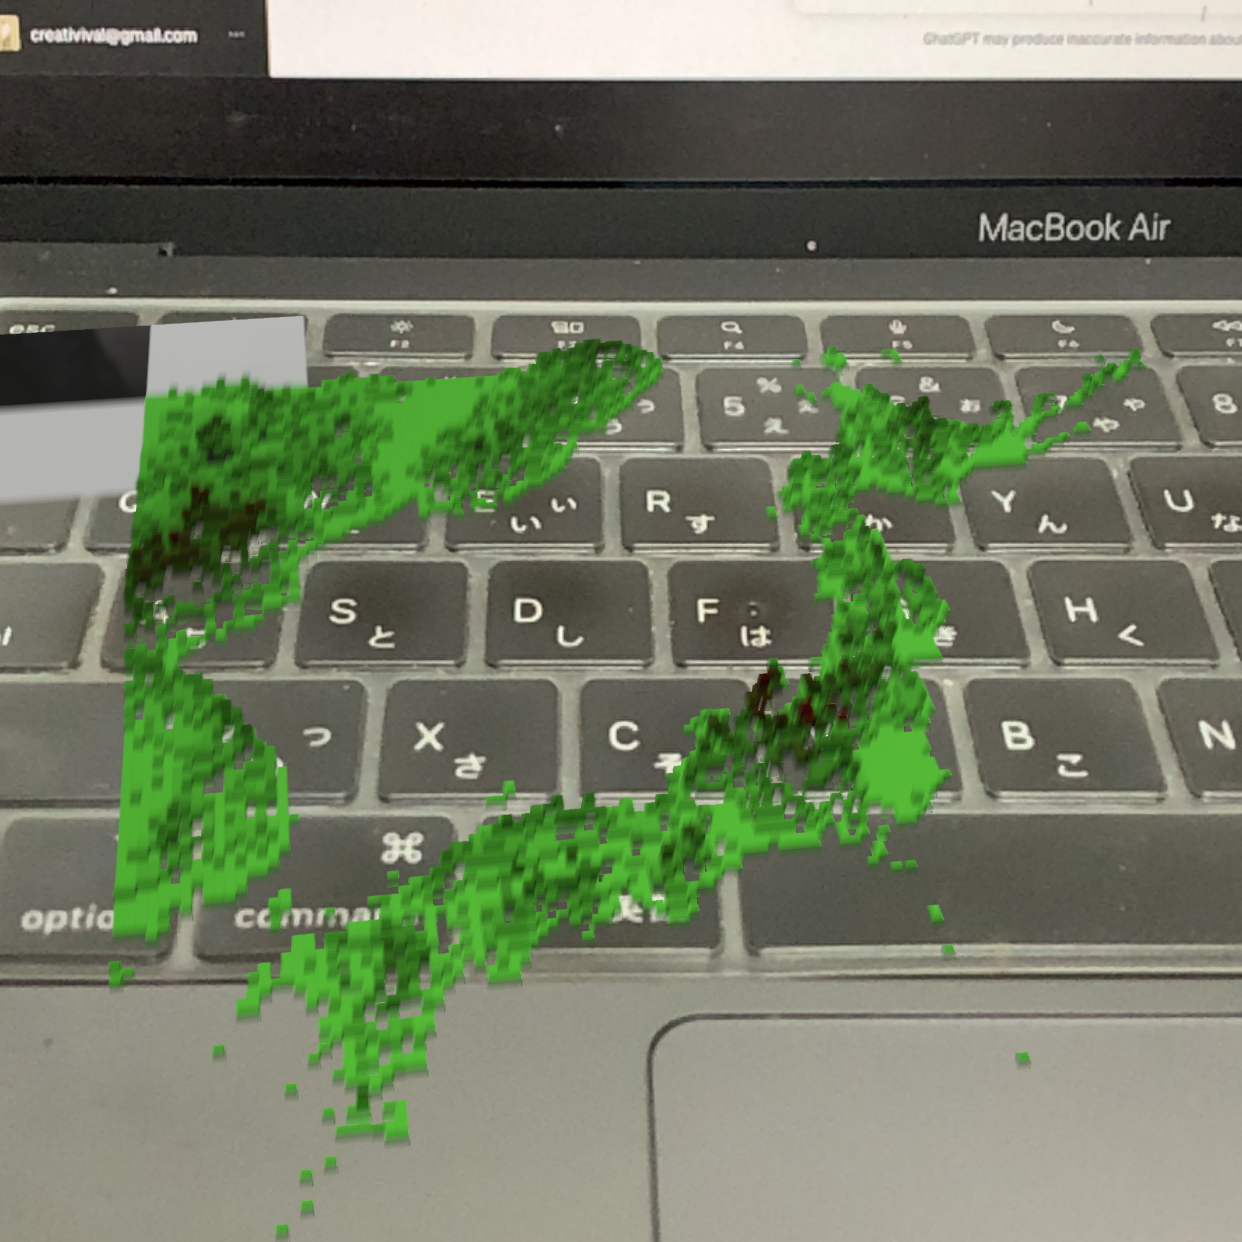
Map
The map is created in voxel. The map data uses elevation data from Geographical Survey Institute maps. The map data is read from a CSV file and converted to voxels.
# Python
# Import the Voxelamming class from the voxelamming package
from voxelamming import Voxelamming, get_map_data_from_csv, get_box_color
# from voxelamming_local import Voxelamming, get_map_data_from_csv, get_box_color

# Variable settings
column_num, row_num = 257, 257
csv_file = '../map_file/map_38_138_100km.csv'
height_scale = 100
high_color = (0.5, 0, 0)
low_color = (0, 1, 0)

# Specify the room name displayed in the Voxelamming app
room_name = "1000"
# Create an instance of the Voxelamming class
vox = Voxelamming(room_name)

# Configure voxel settings
vox.set_box_size(1)
vox.set_build_interval(0.001)
vox.set_command('liteRender')  # Command to reduce rendering load

# Set positions and colors for voxel placement
map_data = get_map_data_from_csv(csv_file, height_scale)
boxes = map_data['boxes']
max_height = map_data['maxHeight']
# skip = 1  # high power device
skip = 2  # normal
# skip = 4  # low power device

for j in range(row_num // skip):
    for i in range(column_num // skip):
        print(i, j)
        x = i - column_num // (skip * 2)
        z = j - row_num // (skip * 2)
        y = boxes[j * skip][i * skip]
        r, g, b = get_box_color(y, max_height, high_color, low_color)

        if y > 0:
            vox.create_box(x, y, z, r, g, b, 1)

# Send voxel data to the app
vox.send_data("main_map_sample")
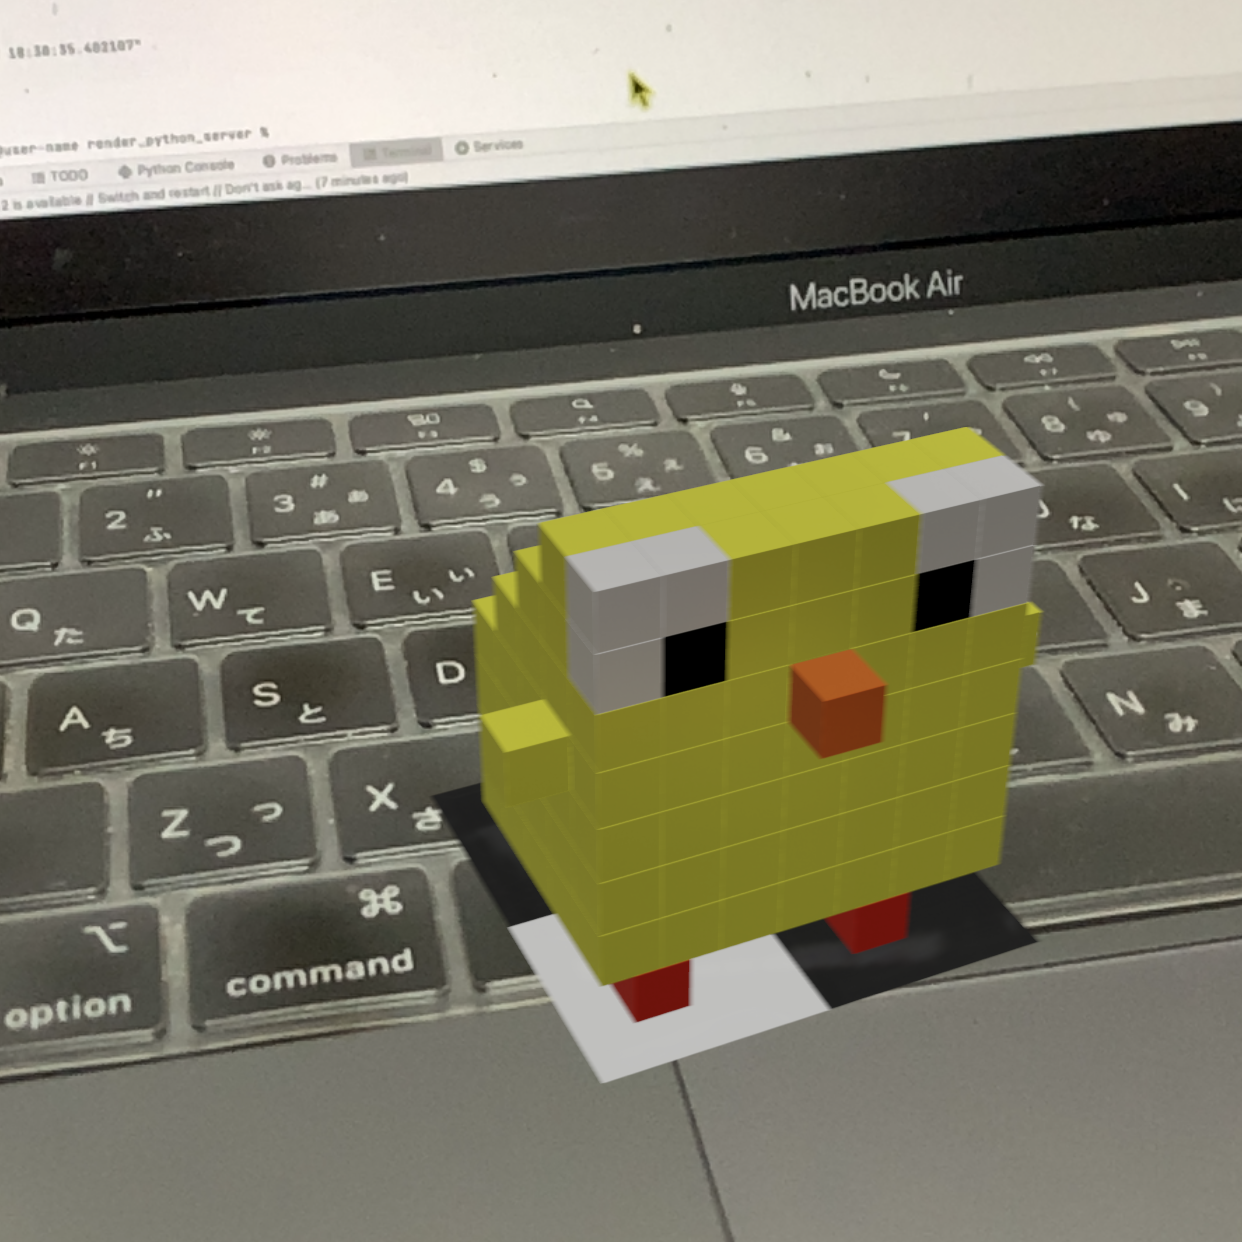
Displaying Models Created with MagicaVoxel
Import voxel art created in MagicaVoxel Export MagicaVoxel voxel art in PLY format and import it into Voxelamming.
# Python
# Import the Voxelamming class from the voxelamming package
from voxelamming import Voxelamming, get_boxes_from_ply
# from voxelamming_local import Voxelamming, get_boxes_from_ply

ply_file_name = '../ply_file/piyo.ply'

# Specify the room name displayed in the Voxelamming app
room_name = "1000"
# Create an instance of the Voxelamming class
vox = Voxelamming(room_name)

# Configure voxel settings
vox.set_box_size(1)
vox.set_build_interval(0.01)

# Set positions and colors for voxel placement
boxes = get_boxes_from_ply(ply_file_name)

for box in boxes:
    vox.create_box(*box)

# Send voxel data to the app
vox.send_data("main_make_model_sample")
Transparent Voxel
The transparency of the voxel can be set. The transparency is specified by a value between 0 and 1.
# Python
# Import the Voxelamming class from the voxelamming package
from voxelamming import Voxelamming
# from voxelamming_local import Voxelamming  # Use this when developing locally

# Specify the room name displayed in the Voxelamming app
room_name = "1000"
# Create an instance of the Voxelamming class
vox = Voxelamming(room_name)

# Configure voxel settings
vox.set_box_size(0.3)
vox.set_build_interval(0.01)
vox.transform(0, 0, 0, pitch=0, yaw=0, roll=0)
vox.animate(0, 0, 10, pitch=0, yaw=30, roll=0, scale=2, interval=0)

# Set positions and colors for voxel placement
for i in range(100):
    alpha = (100 - i) / 100
    vox.create_box(-1, i, 0, r=0, g=1, b=1, alpha=alpha)
    vox.create_box(0, i, 0, r=1, g=0, b=0, alpha=alpha)
    vox.create_box(1, i, 0, r=1, g=1, b=0, alpha=alpha)
    vox.create_box(2, i, 0, r=0, g=1, b=1, alpha=alpha)

for i in range(50):
    vox.remove_box(0, i * 2 + 1, 0)
    vox.remove_box(1, i * 2, 0)

# Send voxel data to the app
vox.send_data("main_set_alpha_sample")
Drawing a line
Draw a line segment by specifying two points. You can specify the colour of the line; use the float command to draw a smooth line.
# Python
import time
# Import the Voxelamming class from the voxelamming package
from voxelamming import Voxelamming
# from voxelamming_local import Voxelamming  # Use this when developing locally

# Specify the room name displayed in the Voxelamming app
room_name = "1000"
# Create an instance of the Voxelamming class
vox = Voxelamming(room_name)
# Configure voxel settings
vox.set_box_size(0.5)
vox.set_build_interval(0.01)
# vox.set_command('float')

# Draw a line using the draw_line method
vox.draw_line(0, 0, 0, 5, 10, 20, r=1, g=0, b=0, alpha=1)
vox.send_data()

# Send voxel data to the app
vox.send_data("main_draw_line_sample")
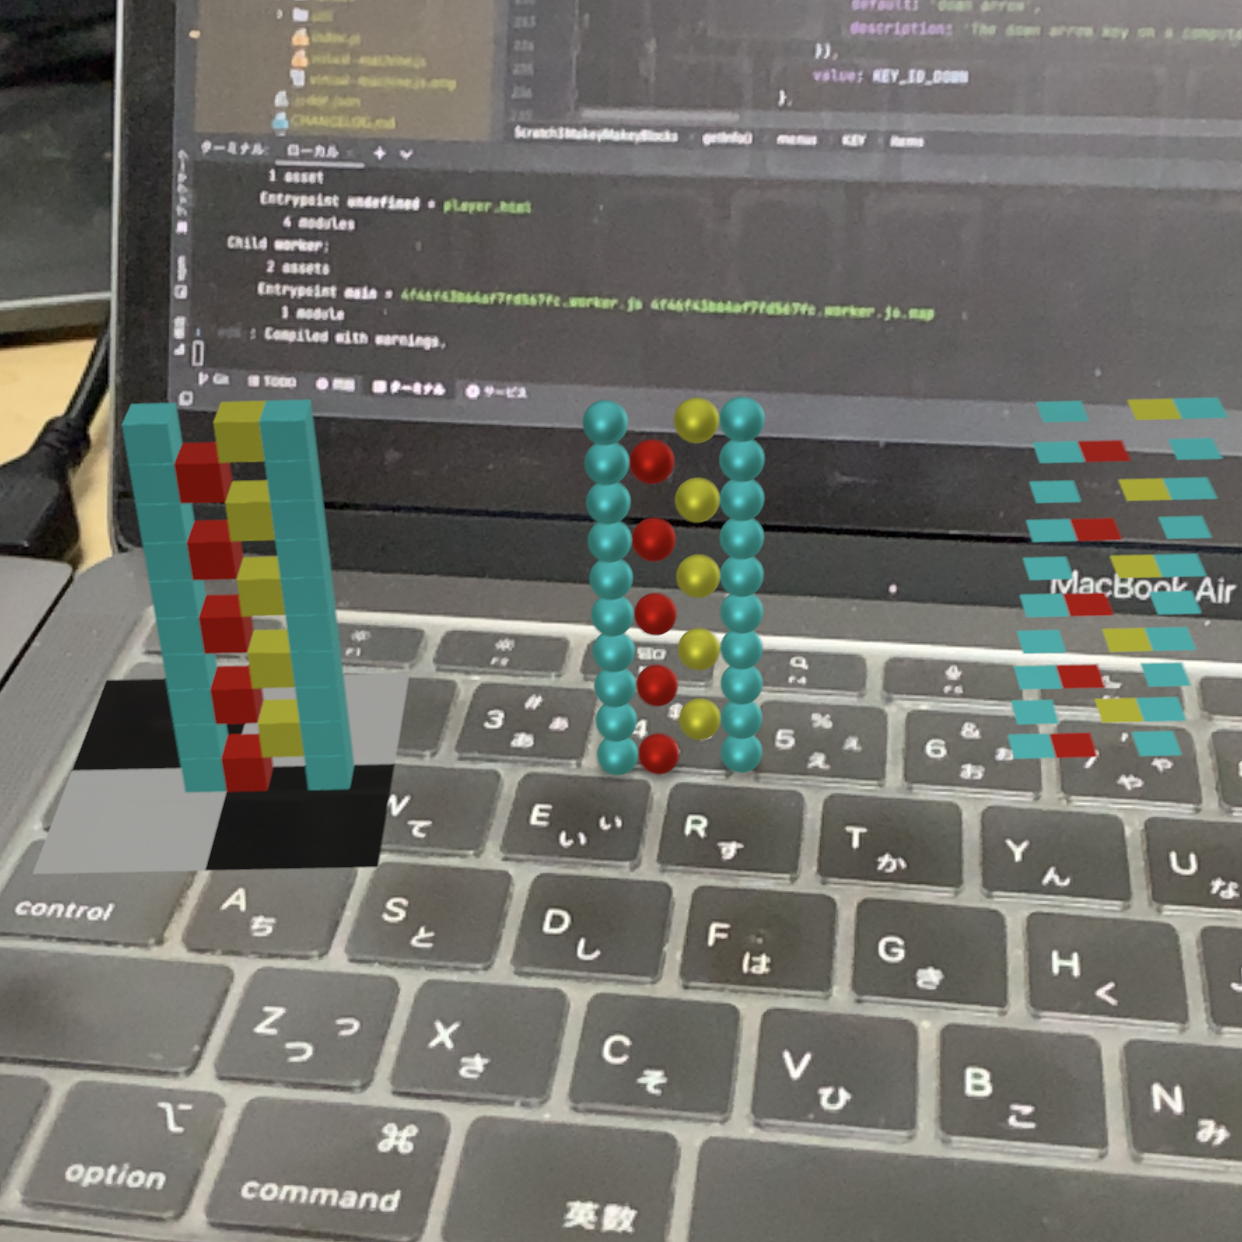
Changing the shape (cube, sphere, plane)
The shape of the voxel can be changed. Shapes are available for cubes, spheres and planes.
# Python
import time
# Import the Voxelamming class from the voxelamming package
from voxelamming import Voxelamming
# from voxelamming_local import Voxelamming  # Use this when developing locally

# Specify the room name displayed in the Voxelamming app
room_name = "1000"
# Create an instance of the Voxelamming class
vox = Voxelamming(room_name)
# Configure voxel settings
vox.set_box_size(0.5)
vox.set_build_interval(0.01)

# Set the position and color to place voxels
for i in range(10):
    vox.create_box(-1, i, 0, r=0, g=1, b=1, alpha=1)
    vox.create_box(0, i, 0, r=1, g=0, b=0, alpha=1)
    vox.create_box(1, i, 0, r=1, g=1, b=0, alpha=1)
    vox.create_box(2, i, 0, r=0, g=1, b=1, alpha=1)

for i in range(5):
    vox.remove_box(0, i * 2 + 1, 0)
    vox.remove_box(1, i * 2, 0)

vox.send_data('box')  # Send voxel data to the app.

time.sleep(0.1)

vox.transform(10, 0, 0, pitch=0, yaw=0, roll=0)
vox.change_shape('sphere')
vox.send_data('sphere')  # Send voxel data of the sphere to the app.

time.sleep(0.1)

vox.transform(20, 0, 0, pitch=0, yaw=0, roll=0)
vox.change_shape('plane')
# Send voxel data to the app.
vox.send_data('plane')  # Send voxel data of the plane to the app.
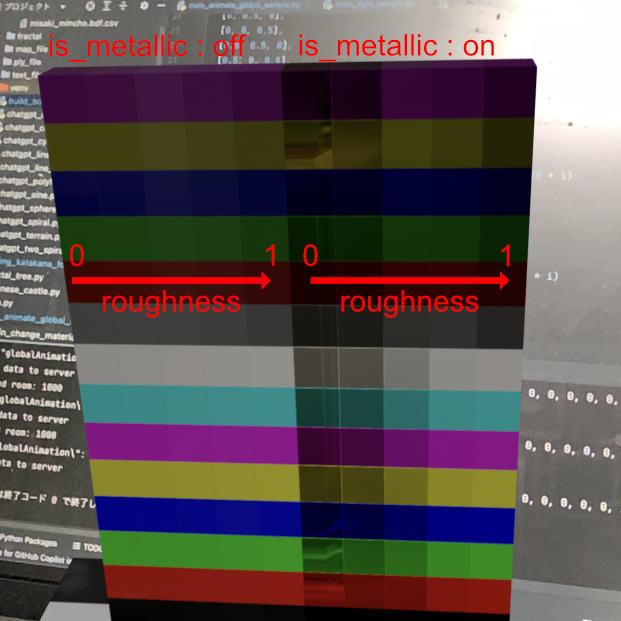
Changing the material (texture)
The material can be set to have a metallic sheen or a roughness. If metallicness (is_metallic) is set to true, the material reflects the environment like a mirror. Roughness sets the surface roughness from 0 to 1.
# Python
from time import sleep
# Import the Voxelamming class from the voxelamming package
from voxelamming import Voxelamming
# from voxelamming_local import Voxelamming  # Use this when developing locally

# Specify the room name displayed in the Voxelamming app
room_name = "1000"
# Create an instance of the Voxelamming class
vox = Voxelamming(room_name)
# Configure voxel settings
vox.set_box_size(1)
vox.set_build_interval(0.01)

# Set the position and color to place voxels
colors = [
    [0, 0, 0],
    [1, 0, 0],
    [0, 1, 0],
    [0, 0, 1],
    [1, 1, 0],
    [1, 0, 1],
    [0, 1, 1],
    [1, 1, 1],
    [0.5, 0.5, 0.5],
    [0.5, 0, 0],
    [0, 0.5, 0],
    [0, 0, 0.5],
    [0.5, 0.5, 0],
    [0.5, 0, 0.5],
]

for i, color in enumerate(colors):
    vox.create_box(0, i, 0, *color, alpha=1)

for i in range(5):
    vox.change_material(is_metallic=False, roughness=0.25 * i)
    vox.transform(i, 0, 0, pitch=0, yaw=0, roll=0)
    # Send voxel data to the app.
    vox.send_data()
    sleep(0.1)

for i in range(5):
    vox.change_material(is_metallic=True, roughness=0.25 * i)
    vox.transform(5 + i, 0, 0, pitch=0, yaw=0, roll=0)
    # Send voxel data to the app.
    vox.send_data()
    sleep(0.1)
Light (iOS only)
Light sources (lights) can be placed. You can set the position, colour, intensity and type of light (directional, spot, point) of the light.
# Python
# Import the Voxelamming class from the voxelamming package
from voxelamming import Voxelamming
# from voxelamming_local import Voxelamming  # Use this when developing locally

# Specify the room name displayed in the Voxelamming app
room_name = "1000"
# Create an instance of the Voxelamming class
vox = Voxelamming(room_name)
# Configure voxel settings
vox.set_box_size(1)
vox.set_build_interval(0.01)

# Set the position and color to place voxels
colors = [
    [0, 0, 0],
    [1, 0, 0],
    [0, 1, 0],
    [0, 0, 1],
    [1, 1, 0],
    [1, 0, 1],
    [0, 1, 1],
    [1, 1, 1],
    [0.5, 0.5, 0.5],
    [0.5, 0, 0],
    [0, 0.5, 0],
    [0, 0, 0.5],
    [0.5, 0.5, 0],
    [0.5, 0, 0.5],
]

for i, color in enumerate(colors):
    vox.create_box(0, i, 0, *color, alpha=1)

# Set lights
vox.set_light(1, 1, 0, r=1, g=0, b=0, alpha=1, intensity=20000, interval=2, light_type='directional')
vox.set_light(0, 1, 1, r=0, g=1, b=0, alpha=1, intensity=20000, interval=3, light_type='spot')
vox.set_light(-1, 1, 0, r=0, g=0, b=1, alpha=1, intensity=20000, interval=5, light_type='point')

# Add the 'axis' command
vox.set_command('axis')

# Send voxel data to the app
vox.send_data("main_light_sample")
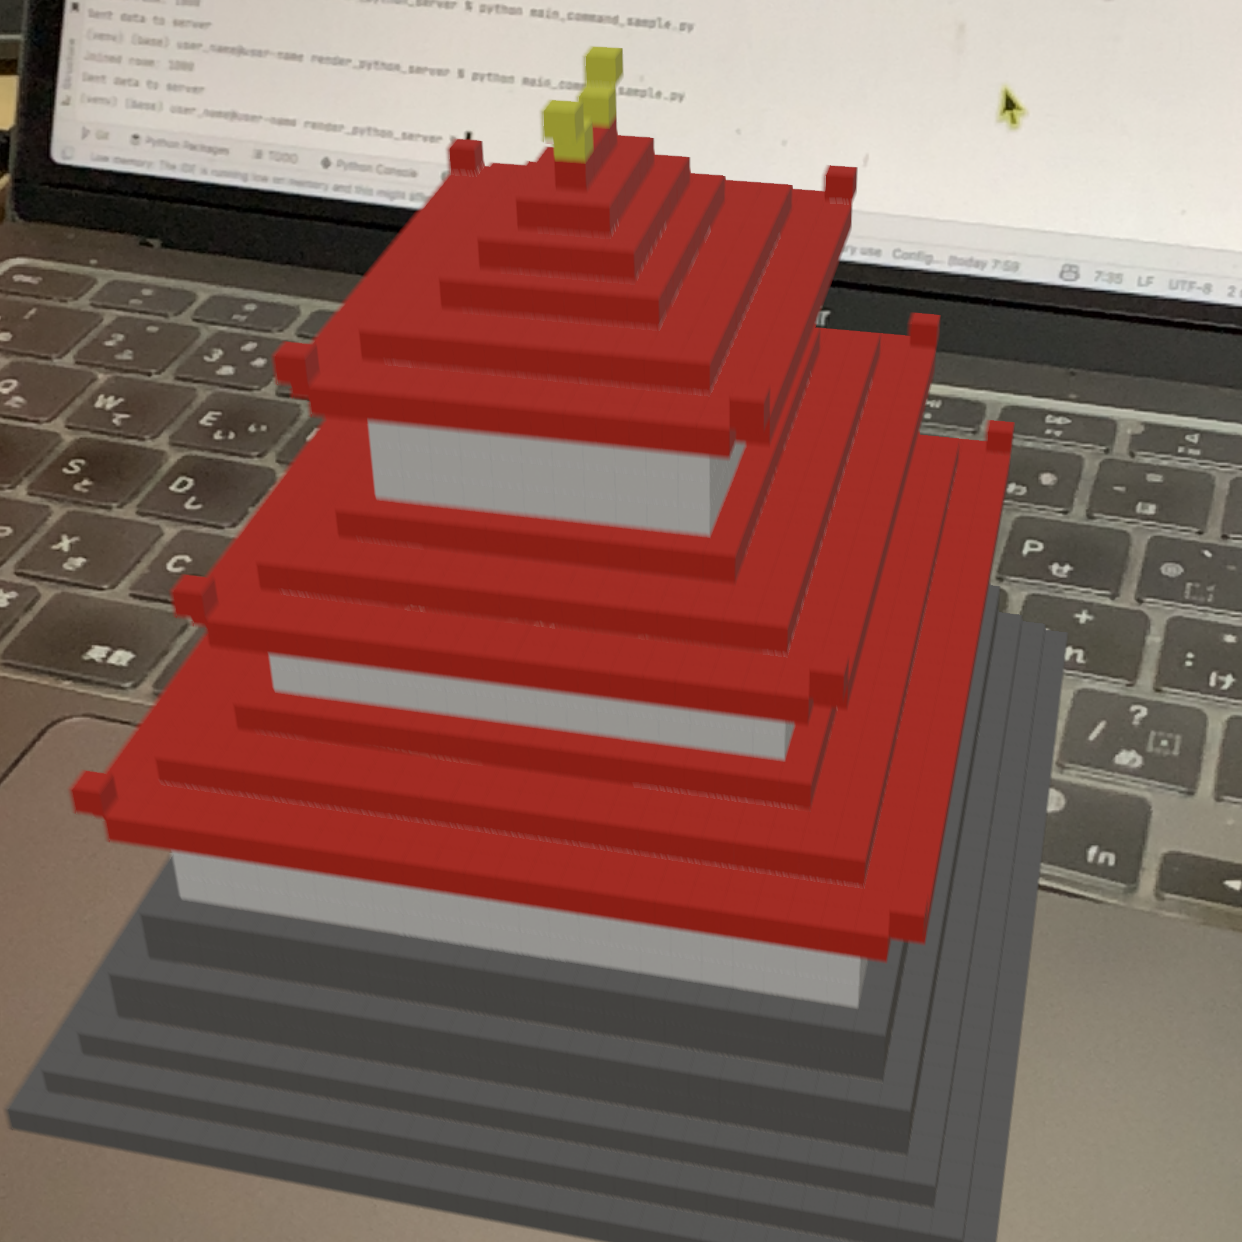
Command
A command is an instruction to perform a specific action. Commands can be used to perform specific actions. japaneseCastle command allows you to build a castle in Japan.
# Python
# Import the Voxelamming class from the voxelamming package
from voxelamming import Voxelamming
# from voxelamming_local import Voxelamming  # Use this when developing locally

# Specify the room name displayed in the Voxelamming app
room_name = "1000"
# Create an instance of the Voxelamming class
vox = Voxelamming(room_name)
# Use the secret command to quickly create a Japanese castle
vox.set_command('japaneseCastle')
# Send voxel data to the app
vox.send_data("castle_command")
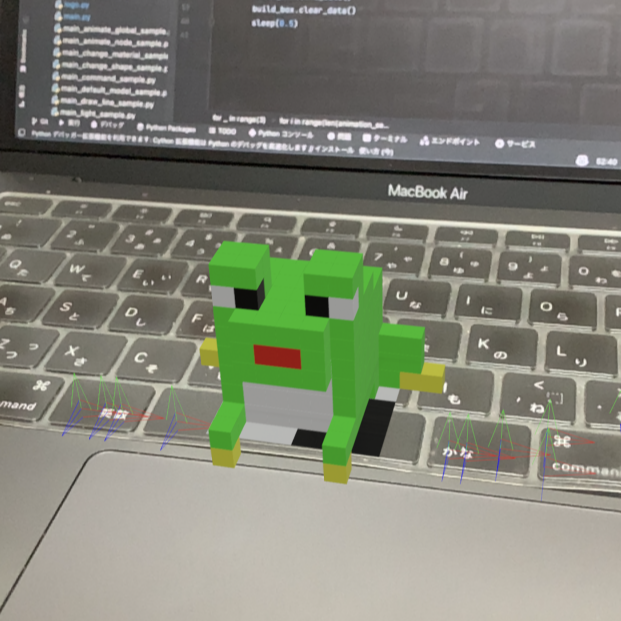
Reset Command
The Reset command deletes all voxels. The model can be animated by alternately creating and resetting the model.
# Python
from time import sleep
# Import the Voxelamming class from the voxelamming package
from voxelamming import Voxelamming, get_boxes_from_ply
# from voxelamming_local import Voxelamming, get_boxes_from_ply

# Define animation settings
animation_settings = [
    {
        'model': 'frog1.ply',
        'position': [0, 0, 0, 0, 0, 0],
    },
    {
        'model': 'frog2.ply',
        'position': [0, 0, 0, 0, 0, 0],
    },
    {
        'model': 'frog3.ply',
        'position': [0, 0, 0, 0, 0, 0],
    },
    {
        'model': 'frog4.ply',
        'position': [0, 5, 0, 0, 0, 0],
    },
    {
        'model': 'frog5.ply',
        'position': [0, 10, 0, 0, 0, 0],
    },
    {
        'model': 'frog4.ply',
        'position': [0, 5, 0, 0, 0, 0],
    },
    {
        'model': 'frog3.ply',
        'position': [0, 0, 0, 0, 0, 0],
    },
    {
        'model': 'frog2.ply',
        'position': [0, 0, 0, 0, 0, 0],
    },
]

# Specify the room name displayed in the Voxelamming app
room_name = "1000"
# Create an instance of the Voxelamming class
vox = Voxelamming(room_name)

for _ in range(3):
    for i in range(len(animation_settings)):
        model = animation_settings[i]['model']
        position = animation_settings[i]['position']

        for box in get_boxes_from_ply(model):
            vox.create_box(*box)

        vox.set_box_size(0.5)
        vox.set_build_interval(0)
        vox.transform(*position)
        vox.send_data()
        sleep(0.1)

        vox.clear_data()
        vox.set_command('reset')
        vox.send_data()
        vox.clear_data()
        sleep(0.1)
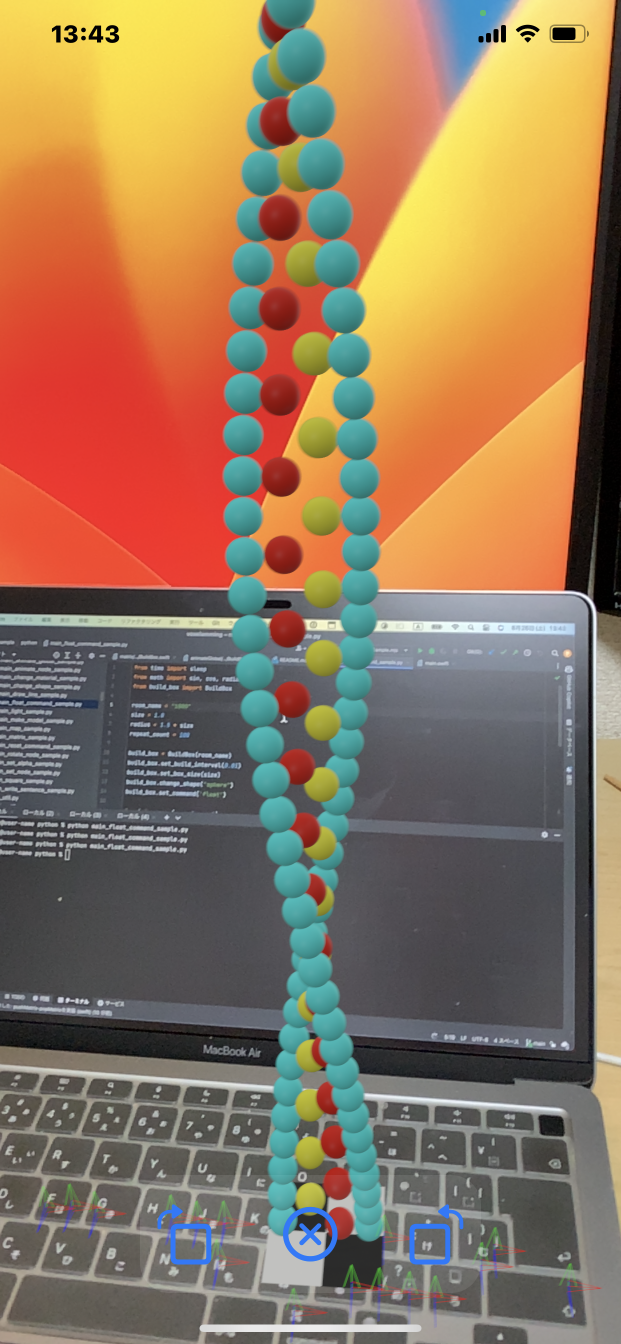
Float Command
The Float command allows voxels to be positioned precisely in 0.01 units (normally 1 unit).
# Python
from time import sleep
from math import sin, cos, radians, pi, sqrt
# Import the Voxelamming class from the voxelamming package
from voxelamming import Voxelamming
# from voxelamming_local import Voxelamming  # Use this when developing locally

# Specify the room name displayed in the Voxelamming app
room_name = "1000"
size = 1
radius = 1.5
repeat_count = 100

# Create an instance of the Voxelamming class
vox = Voxelamming(room_name)
# Configure voxel settings
vox.set_build_interval(0.01)
vox.set_box_size(size)
vox.change_shape("sphere")
vox.set_command('float')

# Set position and color to place voxels
for i in range(repeat_count):
    angle = radians(i * 720 / repeat_count)
    x = radius * cos(angle)
    y = i
    z = radius * sin(angle)

    vox.create_box(x, y, z, r=0, g=1, b=1, alpha=1)
    vox.create_box(-x, y, -z, r=0, g=1, b=1, alpha=1)
    if i % 2 == 0:
        vox.create_box(x / 3, y, z / 3, r=1, g=0, b=0, alpha=1)
    else:
        vox.create_box(-x / 3, y, -z / 3, r=1, g=1, b=0, alpha=1)

# Send voxel data to the app
vox.send_data("main_float_command_sample")
Saving and Restoring the Coordinate System
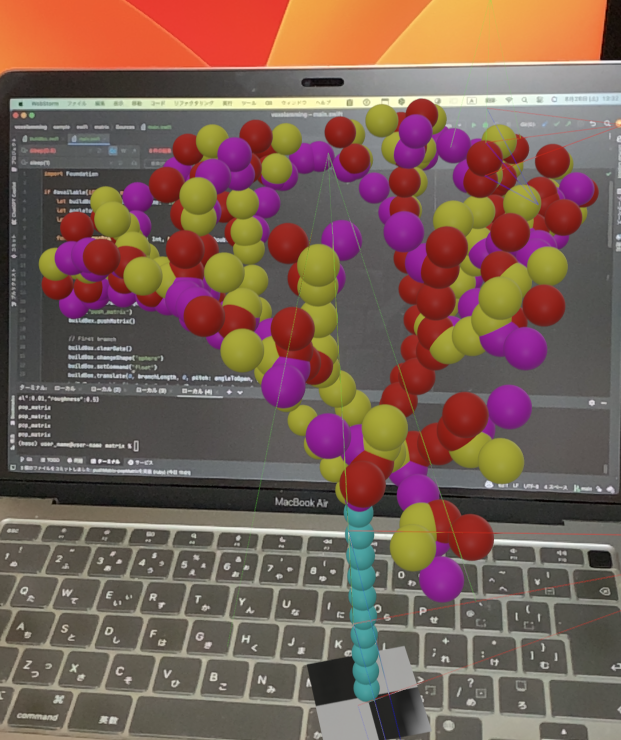
Coordinate systems (matrices) can be saved and restored with the push_matrix command and the pop_matrix command. This example uses a matrix to recursively create a fractal tree.
# Python
# Import the Voxelamming class from the voxelamming package
from voxelamming import Voxelamming
# from voxelamming_local import Voxelamming  # Use this when developing locally


# Function to draw a three-branch tree
def draw_three_branches(count, branch_length):
    count -= 1
    if count < 0:
        return

    # Draw branches
    shortened_branch_length = branch_length * length_ratio
    print('push_matrix')
    vox.push_matrix()

    # First branch
    vox.transform(0, branch_length, 0, pitch=angle_to_open, yaw=0, roll=0)
    vox.draw_line(0, 0, 0, 0, shortened_branch_length, 0, r=1, g=0, b=1)
    draw_three_branches(count, shortened_branch_length)

    # Second branch
    vox.transform(0, branch_length, 0, pitch=angle_to_open, yaw=120, roll=0)
    vox.draw_line(0, 0, 0, 0, shortened_branch_length, 0, r=1, g=0, b=0)
    draw_three_branches(count, shortened_branch_length)

    # Third branch
    vox.transform(0, branch_length, 0, pitch=angle_to_open, yaw=240, roll=0)
    vox.draw_line(0, 0, 0, 0, shortened_branch_length, 0, r=1, g=1, b=0)
    draw_three_branches(count, shortened_branch_length)

    print('pop_matrix')
    vox.pop_matrix()

# Variable settings
initial_length = 10
repeat_count = 5
angle_to_open = 30
length_ratio = 0.8

# Specify the room name displayed in the Voxelamming app
room_name = "1000"
# Create an instance of the Voxelamming class
vox = Voxelamming(room_name)

vox.change_shape('sphere')
vox.set_command('float')
vox.draw_line(0, 0, 0, 0, initial_length, 0, r=0, g=1, b=1)

draw_three_branches(repeat_count, initial_length)
vox.send_data("main_matrix_sample")
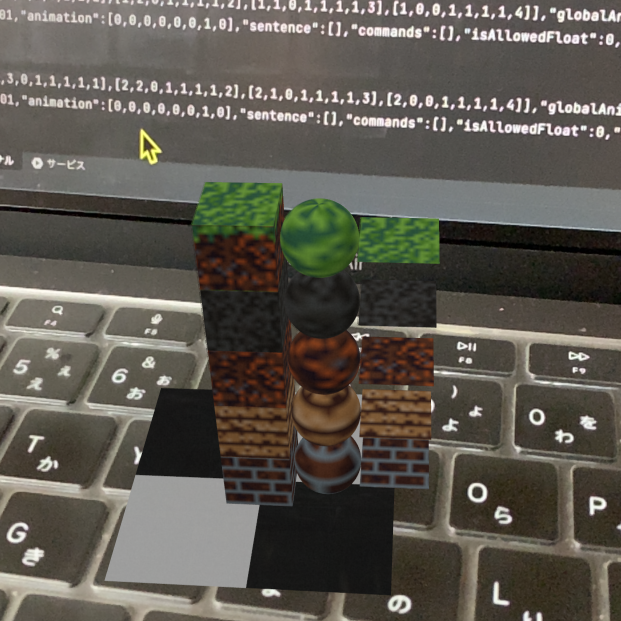
Texture
Voxel textures can be set, textures can be pasted onto voxels by specifying an image." Textures for "grass", "stone", "dirt", "planks" and "bricks" are available.
# Python
from time import sleep
# Import the Voxelamming class from the voxelamming package
from voxelamming import Voxelamming
# from voxelamming_local import Voxelamming  # Use this when developing locally

texture_names = ["grass", "stone", "dirt", "planks", "bricks"]
# Specify the room name displayed in the Voxelamming app
room_name = "1000"
# Create an instance of the Voxelamming class
vox = Voxelamming(room_name)

# Set up voxel settings
vox.set_box_size(1)
vox.set_build_interval(0.01)

# Configure the position and texture for placing voxels
for i, texture in enumerate(texture_names):
    vox.create_box(0, len(texture_names) - i - 1, 0, texture=texture)

# Send voxel data to the app
vox.send_data()
# Clear the voxel data
vox.clear_data()
sleep(0.1)

# Set up voxel settings
vox.set_box_size(1)
vox.set_build_interval(0.01)
vox.change_shape('sphere')

# Configure the position and texture for placing voxels
for i, texture in enumerate(texture_names):
    vox.create_box(1, len(texture_names) - i - 1, 0, texture=texture)

# Send voxel data to the app
vox.send_data()
# Clear the voxel data
vox.clear_data()
sleep(0.1)

# Set up voxel settings
vox.set_box_size(1)
vox.set_build_interval(0.01)
vox.change_shape('plane')

# Configure the position and texture for placing voxels
for i, texture in enumerate(texture_names):
    vox.create_box(2, len(texture_names) - i - 1, 0, texture=texture)

# Send voxel data to the app
vox.send_data()
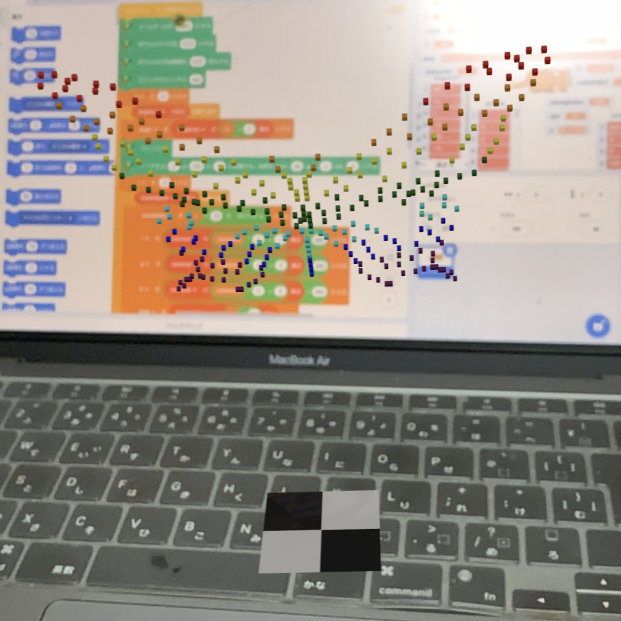
Frame Animation
Multiple frames can be recorded and animated. The FPS and number of repetitions of the animation can be specified.
# Python
from math import sin, cos, radians
# Import the Voxelamming class from the voxelamming package
from voxelamming import Voxelamming
# from voxelamming_local import Voxelamming  # Use this when developing locally

rainbow_colors = [
    [255, 0, 0],  # Red
    [255, 165, 0],  # Orange
    [255, 255, 0],  # Yellow
    [0, 128, 0],  # Green
    [0, 255, 255],  # Cyan
    [0, 0, 255],  # Blue
    [128, 0, 128],  # Purple
    [128, 0, 128]  # Purple
]
butterfly_list = [
    [0, 0, 0, 0, 0, 0, 0, 0, 0, 0, 0, 0, 0, 0, 0, 0, 0, 0, 0, 0, 0, 0, 0, 0, 0, 0, 0, 0, 0, 0, 0, 0, 0, 0, 0, 0, 0, 0,
     0, 0, 0, 0, 0, 0, 0, 0, 0, 0, 0, 0, 0, 0],
    [0, 0, 0, 0, 0, 0, 0, 0, 0, 0, 0, 0, 0, 0, 0, 0, 0, 0, 0, 0, 0, 0, 0, 0, 0, 0, 0, 0, 0, 0, 0, 0, 0, 0, 0, 0, 0, 0,
     0, 0, 0, 0, 1, 0, 0, 0, 1, 0, 0, 0, 0, 0],
    [0, 0, 0, 0, 0, 0, 0, 0, 0, 0, 0, 0, 0, 0, 0, 0, 0, 0, 0, 0, 0, 0, 0, 0, 0, 0, 0, 0, 0, 0, 0, 0, 0, 0, 0, 0, 0, 0,
     1, 0, 0, 0, 0, 0, 0, 0, 0, 0, 0, 1, 0, 0],
    [0, 0, 0, 0, 0, 0, 0, 0, 0, 0, 0, 0, 0, 0, 0, 0, 0, 0, 0, 0, 0, 0, 0, 0, 0, 0, 0, 0, 0, 0, 0, 0, 0, 0, 0, 1, 0, 0,
     0, 0, 0, 0, 0, 0, 1, 0, 0, 0, 0, 0, 0, 0],
    [0, 0, 0, 0, 0, 0, 0, 0, 0, 0, 0, 0, 0, 0, 0, 0, 0, 0, 0, 0, 0, 0, 0, 0, 0, 0, 0, 0, 0, 0, 0, 0, 0, 0, 0, 0, 0, 0,
     0, 0, 0, 0, 0, 0, 0, 0, 0, 0, 0, 0, 0, 0],
    [0, 0, 0, 0, 0, 0, 0, 0, 0, 0, 0, 0, 0, 0, 0, 0, 0, 0, 0, 0, 0, 0, 0, 0, 0, 0, 0, 0, 0, 0, 0, 1, 0, 0, 0, 0, 0, 0,
     0, 1, 0, 0, 0, 0, 0, 1, 0, 0, 0, 0, 1, 0],
    [0, 0, 0, 0, 0, 0, 0, 0, 0, 0, 0, 0, 0, 0, 0, 0, 0, 0, 0, 0, 0, 0, 0, 0, 0, 0, 0, 0, 0, 0, 0, 0, 0, 0, 0, 0, 0, 0,
     0, 0, 0, 0, 0, 0, 0, 0, 0, 0, 0, 0, 0, 0],
    [0, 0, 0, 0, 0, 0, 0, 0, 0, 0, 0, 0, 0, 0, 0, 0, 0, 0, 0, 0, 0, 0, 0, 0, 0, 0, 0, 0, 0, 0, 0, 0, 0, 0, 0, 0, 0, 0,
     0, 0, 0, 0, 0, 0, 0, 0, 0, 0, 0, 0, 0, 0],
    [0, 0, 0, 0, 0, 0, 0, 0, 0, 0, 0, 0, 0, 0, 0, 0, 0, 0, 0, 0, 0, 0, 0, 0, 0, 0, 1, 0, 0, 0, 0, 0, 0, 0, 0, 1, 0, 0,
     0, 0, 0, 0, 0, 1, 0, 0, 0, 0, 1, 0, 0, 0],
    [0, 0, 0, 0, 0, 0, 0, 0, 0, 0, 0, 0, 0, 0, 0, 0, 0, 0, 0, 0, 0, 0, 0, 0, 0, 0, 0, 0, 0, 0, 0, 0, 0, 0, 0, 0, 0, 0,
     0, 0, 0, 0, 0, 0, 0, 0, 0, 0, 0, 0, 0, 0],
    [0, 0, 0, 0, 0, 0, 0, 0, 0, 0, 0, 0, 0, 0, 0, 0, 0, 0, 0, 0, 0, 0, 0, 0, 0, 0, 0, 0, 0, 0, 0, 0, 0, 0, 0, 0, 0, 0,
     0, 0, 0, 0, 0, 0, 0, 0, 0, 0, 0, 0, 0, 0],
    [0, 0, 0, 0, 0, 0, 0, 0, 0, 0, 0, 0, 0, 0, 0, 0, 0, 0, 0, 0, 0, 0, 1, 0, 0, 0, 0, 0, 0, 0, 0, 1, 0, 0, 0, 0, 0, 1,
     0, 0, 0, 0, 0, 1, 0, 0, 0, 0, 1, 0, 0, 0],
    [0, 0, 0, 0, 0, 0, 0, 0, 0, 0, 0, 0, 0, 0, 0, 0, 0, 0, 0, 0, 0, 0, 0, 0, 0, 0, 0, 0, 0, 0, 0, 0, 0, 0, 0, 0, 0, 0,
     0, 0, 0, 0, 0, 0, 0, 0, 0, 0, 0, 0, 0, 0],
    [0, 0, 0, 0, 0, 0, 0, 0, 0, 0, 0, 0, 0, 0, 0, 0, 0, 0, 0, 0, 0, 0, 0, 0, 0, 0, 0, 0, 0, 0, 0, 0, 0, 0, 0, 0, 0, 0,
     0, 0, 0, 0, 0, 0, 0, 0, 0, 0, 0, 0, 0, 0],
    [0, 0, 0, 0, 0, 0, 0, 0, 0, 0, 0, 0, 0, 0, 0, 0, 0, 0, 0, 1, 0, 0, 0, 0, 0, 0, 0, 1, 0, 0, 0, 0, 0, 0, 1, 0, 0, 0,
     0, 0, 0, 1, 0, 0, 0, 0, 1, 0, 0, 0, 0, 0],
    [0, 0, 0, 0, 0, 0, 0, 0, 0, 0, 0, 0, 0, 0, 0, 0, 0, 0, 0, 0, 0, 0, 0, 0, 0, 0, 0, 0, 0, 0, 0, 0, 0, 0, 0, 0, 0, 0,
     0, 0, 0, 0, 0, 0, 0, 0, 0, 0, 0, 0, 0, 0],
    [0, 0, 0, 0, 0, 0, 0, 0, 0, 0, 0, 0, 0, 0, 0, 0, 0, 0, 0, 0, 0, 0, 0, 0, 0, 0, 0, 0, 0, 0, 0, 0, 0, 0, 0, 0, 0, 0,
     0, 0, 0, 0, 0, 0, 0, 0, 0, 0, 0, 0, 0, 0],
    [0, 0, 0, 0, 0, 1, 0, 0, 0, 0, 0, 0, 0, 0, 0, 0, 1, 0, 0, 0, 0, 0, 0, 1, 0, 0, 0, 0, 0, 0, 0, 1, 0, 0, 0, 0, 0, 0,
     0, 1, 0, 0, 0, 0, 1, 0, 0, 0, 0, 0, 0, 0],
    [0, 0, 0, 0, 0, 0, 0, 0, 0, 0, 0, 0, 0, 0, 0, 0, 0, 0, 0, 0, 0, 0, 0, 0, 0, 0, 0, 0, 0, 0, 0, 0, 0, 0, 0, 0, 0, 0,
     0, 0, 0, 0, 0, 0, 0, 0, 0, 0, 0, 0, 0, 0],
    [0, 0, 0, 0, 1, 0, 0, 0, 0, 0, 0, 0, 0, 0, 0, 0, 0, 0, 0, 0, 0, 0, 0, 0, 0, 0, 0, 0, 0, 0, 0, 0, 0, 0, 0, 0, 0, 0,
     0, 0, 0, 0, 0, 0, 0, 0, 0, 0, 0, 0, 0, 0],
    [0, 0, 0, 0, 0, 0, 0, 0, 0, 0, 0, 0, 0, 1, 0, 0, 0, 0, 0, 1, 0, 0, 0, 0, 0, 0, 0, 0, 1, 0, 0, 0, 0, 0, 0, 0, 0, 1,
     0, 0, 0, 0, 0, 1, 0, 0, 0, 0, 0, 0, 0, 0],
    [0, 0, 0, 1, 0, 0, 0, 0, 0, 0, 0, 0, 0, 0, 0, 0, 0, 0, 0, 0, 0, 0, 0, 0, 0, 0, 0, 0, 0, 0, 0, 0, 0, 0, 0, 0, 0, 0,
     0, 0, 0, 0, 0, 0, 0, 0, 0, 0, 0, 0, 0, 0],
    [0, 0, 0, 0, 0, 0, 0, 0, 0, 0, 0, 0, 0, 0, 0, 0, 0, 0, 0, 0, 0, 0, 0, 0, 0, 0, 0, 0, 0, 0, 0, 0, 0, 0, 0, 0, 0, 0,
     0, 0, 0, 0, 0, 0, 0, 0, 0, 0, 0, 0, 0, 0],
    [0, 0, 1, 0, 0, 0, 0, 0, 0, 0, 0, 1, 0, 0, 0, 0, 1, 0, 0, 0, 0, 0, 0, 0, 0, 1, 0, 0, 0, 0, 0, 0, 0, 0, 0, 0, 1, 0,
     0, 0, 0, 0, 0, 1, 0, 0, 0, 0, 0, 0, 0, 0],
    [0, 0, 0, 0, 0, 0, 0, 0, 0, 0, 0, 0, 0, 0, 0, 0, 0, 0, 0, 0, 0, 0, 0, 0, 0, 0, 0, 0, 0, 0, 0, 0, 0, 0, 0, 0, 0, 0,
     0, 0, 0, 0, 0, 0, 0, 0, 0, 0, 0, 0, 0, 0],
    [0, 0, 1, 0, 0, 0, 0, 0, 0, 0, 0, 0, 0, 0, 0, 0, 0, 0, 0, 0, 0, 0, 0, 0, 0, 0, 0, 0, 0, 0, 0, 0, 0, 0, 0, 0, 0, 0,
     0, 0, 0, 0, 0, 0, 0, 0, 0, 0, 0, 0, 0, 0],
    [0, 0, 0, 0, 0, 0, 0, 0, 1, 0, 0, 0, 0, 1, 0, 0, 0, 0, 0, 0, 0, 0, 1, 0, 0, 0, 0, 0, 0, 0, 0, 0, 0, 0, 0, 1, 0, 0,
     0, 0, 0, 0, 1, 0, 0, 0, 0, 0, 0, 0, 0, 0],
    [0, 1, 0, 0, 0, 0, 0, 0, 0, 0, 0, 0, 0, 0, 0, 0, 0, 0, 0, 0, 0, 0, 0, 0, 0, 0, 0, 0, 0, 0, 0, 0, 0, 0, 0, 0, 0, 0,
     0, 0, 0, 0, 0, 0, 0, 0, 0, 0, 0, 0, 0, 0],
    [0, 0, 0, 0, 0, 0, 0, 0, 0, 0, 0, 0, 0, 0, 0, 0, 0, 0, 0, 0, 0, 0, 0, 0, 0, 0, 0, 0, 0, 0, 0, 0, 0, 0, 0, 0, 0, 0,
     0, 0, 0, 0, 0, 0, 0, 0, 0, 0, 0, 0, 0, 0],
    [0, 1, 0, 0, 0, 0, 1, 0, 0, 0, 1, 0, 0, 0, 0, 0, 0, 0, 1, 0, 0, 0, 0, 0, 0, 0, 0, 0, 0, 0, 0, 0, 0, 1, 0, 0, 0, 0,
     0, 0, 0, 1, 0, 0, 0, 0, 0, 0, 0, 0, 0, 0],
    [0, 0, 0, 0, 0, 0, 0, 0, 0, 0, 0, 0, 0, 0, 0, 0, 0, 0, 0, 0, 0, 0, 0, 0, 0, 0, 0, 0, 0, 0, 0, 0, 0, 0, 0, 0, 0, 0,
     0, 0, 0, 0, 0, 0, 0, 0, 0, 0, 0, 0, 0, 0],
    [1, 0, 0, 0, 0, 0, 0, 0, 0, 0, 0, 0, 0, 0, 0, 0, 0, 0, 0, 0, 0, 0, 0, 0, 0, 0, 0, 0, 0, 0, 0, 0, 0, 0, 0, 0, 0, 0,
     0, 0, 0, 0, 0, 0, 0, 0, 0, 0, 0, 0, 0, 0],
    [0, 0, 0, 0, 1, 0, 0, 0, 1, 0, 0, 0, 0, 0, 0, 0, 0, 0, 0, 0, 0, 0, 0, 0, 0, 0, 0, 0, 0, 1, 0, 0, 0, 0, 0, 0, 0, 0,
     0, 0, 1, 0, 0, 0, 0, 0, 0, 0, 0, 0, 0, 0],
    [1, 0, 0, 0, 0, 0, 0, 0, 0, 0, 0, 0, 0, 0, 0, 0, 0, 1, 0, 0, 0, 1, 0, 0, 0, 1, 0, 0, 0, 0, 0, 0, 0, 0, 0, 0, 0, 0,
     0, 0, 0, 0, 0, 0, 0, 0, 0, 0, 0, 0, 0, 0],
    [0, 0, 0, 0, 0, 0, 0, 0, 0, 0, 0, 0, 0, 1, 0, 0, 0, 0, 0, 0, 0, 0, 0, 0, 0, 0, 0, 0, 0, 0, 0, 0, 0, 0, 0, 0, 0, 0,
     0, 0, 0, 0, 0, 0, 0, 0, 0, 0, 0, 0, 0, 0],
    [1, 0, 1, 0, 0, 0, 0, 0, 0, 0, 0, 0, 0, 0, 0, 0, 0, 0, 0, 0, 0, 0, 0, 0, 0, 0, 0, 0, 0, 0, 0, 0, 0, 0, 0, 0, 0, 0,
     1, 0, 0, 0, 0, 0, 0, 0, 0, 0, 0, 0, 0, 0],
    [0, 0, 0, 0, 0, 1, 0, 0, 1, 0, 0, 1, 0, 0, 1, 0, 0, 1, 0, 0, 1, 0, 0, 1, 0, 0, 1, 0, 0, 1, 0, 0, 1, 0, 0, 1, 0, 0,
     0, 0, 0, 0, 0, 0, 0, 0, 0, 0, 0, 0, 0, 0],
    [0, 1, 0, 0, 0, 0, 0, 0, 0, 0, 0, 0, 0, 0, 0, 0, 0, 0, 0, 0, 0, 0, 0, 0, 1, 0, 0, 0, 0, 0, 0, 0, 0, 0, 0, 0, 0, 0,
     0, 0, 0, 0, 0, 0, 0, 0, 0, 0, 0, 0, 0, 0],
    [0, 0, 0, 0, 0, 0, 0, 0, 0, 0, 0, 0, 0, 0, 0, 0, 0, 0, 0, 0, 0, 0, 0, 0, 0, 0, 0, 0, 0, 0, 0, 0, 0, 0, 0, 0, 0, 0,
     0, 0, 0, 0, 0, 0, 0, 0, 0, 0, 0, 0, 0, 0],
    [0, 0, 1, 0, 0, 1, 0, 0, 1, 0, 0, 0, 0, 0, 0, 0, 0, 0, 0, 0, 0, 0, 1, 0, 0, 0, 0, 0, 1, 0, 0, 0, 0, 0, 0, 0, 0, 0,
     0, 0, 0, 0, 0, 0, 0, 0, 0, 0, 0, 0, 0, 0],
    [0, 0, 0, 0, 0, 0, 0, 0, 0, 0, 0, 0, 0, 0, 0, 0, 0, 0, 0, 0, 0, 0, 0, 0, 0, 0, 0, 0, 0, 0, 0, 0, 0, 0, 0, 0, 0, 0,
     0, 0, 0, 0, 0, 0, 0, 0, 0, 0, 0, 0, 0, 0],
    [0, 1, 0, 0, 0, 0, 0, 0, 0, 0, 0, 0, 0, 0, 0, 0, 0, 0, 0, 0, 0, 0, 0, 0, 0, 0, 0, 0, 0, 0, 0, 0, 0, 0, 0, 0, 0, 0,
     0, 0, 0, 0, 0, 0, 0, 0, 0, 0, 0, 0, 0, 0],
    [0, 0, 0, 0, 1, 0, 0, 1, 0, 0, 0, 1, 0, 0, 0, 0, 0, 0, 0, 0, 0, 0, 0, 0, 0, 0, 1, 0, 0, 0, 0, 0, 1, 0, 0, 0, 0, 0,
     0, 0, 0, 0, 0, 0, 0, 0, 0, 0, 0, 0, 0, 0],
    [1, 0, 0, 0, 0, 0, 0, 0, 0, 0, 0, 0, 0, 0, 0, 0, 0, 0, 0, 0, 0, 0, 0, 0, 0, 0, 0, 0, 0, 0, 0, 0, 0, 0, 0, 0, 0, 0,
     0, 0, 0, 0, 0, 0, 0, 0, 0, 0, 0, 0, 0, 0],
    [0, 0, 0, 0, 0, 0, 0, 0, 0, 0, 0, 0, 0, 0, 0, 0, 0, 0, 0, 0, 0, 0, 0, 0, 0, 0, 0, 0, 0, 0, 0, 0, 0, 0, 0, 0, 0, 0,
     0, 0, 0, 0, 0, 0, 0, 0, 0, 0, 0, 0, 0, 0],
    [1, 0, 0, 0, 0, 1, 0, 0, 0, 1, 0, 0, 0, 0, 1, 0, 0, 0, 0, 0, 0, 0, 0, 0, 0, 0, 1, 0, 0, 0, 0, 0, 1, 0, 0, 0, 0, 0,
     0, 0, 0, 0, 0, 0, 0, 0, 0, 0, 0, 0, 0, 0],
    [0, 0, 0, 0, 0, 0, 0, 0, 0, 0, 0, 0, 0, 0, 0, 0, 0, 0, 0, 0, 0, 0, 0, 0, 0, 0, 0, 0, 0, 0, 0, 0, 0, 0, 0, 0, 0, 0,
     0, 0, 0, 0, 0, 0, 0, 0, 0, 0, 0, 0, 0, 0],
    [1, 0, 0, 0, 0, 0, 0, 0, 0, 0, 0, 0, 0, 0, 0, 0, 0, 0, 0, 0, 0, 0, 0, 0, 0, 0, 0, 0, 0, 0, 0, 0, 0, 0, 0, 0, 0, 0,
     0, 0, 0, 0, 0, 0, 0, 0, 0, 0, 0, 0, 0, 0],
    [0, 0, 0, 0, 0, 0, 0, 1, 0, 0, 0, 1, 0, 0, 0, 0, 1, 0, 0, 0, 0, 0, 0, 0, 0, 0, 0, 0, 1, 0, 0, 0, 0, 0, 0, 1, 0, 0,
     0, 0, 0, 0, 0, 0, 0, 0, 0, 0, 0, 0, 0, 0],
    [1, 0, 0, 0, 0, 0, 0, 0, 0, 0, 0, 0, 0, 0, 0, 0, 0, 0, 0, 0, 0, 0, 0, 0, 0, 0, 0, 0, 0, 0, 0, 0, 0, 0, 0, 0, 0, 0,
     0, 0, 0, 0, 0, 0, 0, 0, 0, 0, 0, 0, 0, 0],
    [0, 0, 0, 0, 0, 0, 0, 0, 0, 0, 0, 0, 0, 0, 0, 0, 0, 0, 0, 0, 0, 0, 0, 0, 0, 0, 0, 0, 0, 0, 0, 0, 0, 0, 0, 0, 0, 0,
     0, 0, 0, 0, 0, 0, 0, 0, 0, 0, 0, 0, 0, 0],
    [1, 0, 0, 0, 0, 0, 0, 0, 0, 1, 0, 0, 0, 1, 0, 0, 0, 0, 1, 0, 0, 0, 0, 0, 0, 0, 1, 0, 0, 0, 0, 0, 1, 0, 0, 0, 0, 0,
     0, 0, 0, 0, 0, 0, 0, 0, 0, 0, 0, 0, 0, 0],
    [0, 0, 0, 0, 0, 0, 0, 0, 0, 0, 0, 0, 0, 0, 0, 0, 0, 0, 0, 0, 0, 0, 0, 0, 0, 0, 0, 0, 0, 0, 0, 0, 0, 0, 0, 0, 0, 0,
     0, 0, 0, 0, 0, 0, 0, 0, 0, 0, 0, 0, 0, 0],
    [1, 0, 0, 0, 0, 0, 0, 0, 0, 0, 0, 0, 0, 0, 0, 0, 0, 0, 0, 0, 0, 0, 0, 0, 0, 0, 0, 0, 0, 0, 0, 0, 0, 0, 0, 0, 0, 0,
     0, 0, 0, 0, 0, 0, 0, 0, 0, 0, 0, 0, 0, 0],
    [0, 0, 0, 0, 0, 0, 0, 0, 0, 0, 1, 0, 0, 0, 1, 0, 0, 0, 0, 0, 1, 0, 0, 0, 0, 0, 0, 0, 1, 0, 0, 0, 0, 0, 1, 0, 0, 0,
     0, 0, 0, 0, 0, 0, 0, 0, 0, 0, 0, 0, 0, 0],
    [1, 0, 0, 0, 0, 0, 0, 0, 0, 0, 0, 0, 0, 0, 0, 0, 0, 0, 0, 0, 0, 0, 0, 0, 0, 0, 0, 0, 0, 0, 0, 0, 0, 0, 0, 0, 0, 0,
     0, 0, 0, 0, 0, 0, 0, 0, 0, 0, 0, 0, 0, 0],
    [0, 0, 0, 0, 0, 0, 0, 0, 0, 0, 0, 0, 0, 0, 0, 0, 0, 0, 0, 0, 0, 0, 0, 0, 0, 0, 0, 0, 0, 0, 0, 0, 0, 0, 0, 0, 0, 0,
     0, 0, 0, 0, 0, 0, 0, 0, 0, 0, 0, 0, 0, 0],
    [1, 0, 0, 0, 0, 0, 0, 0, 0, 0, 0, 1, 0, 0, 0, 1, 0, 0, 0, 0, 0, 1, 0, 0, 0, 1, 0, 0, 0, 0, 0, 1, 0, 0, 0, 0, 0, 0,
     0, 0, 0, 0, 0, 0, 0, 0, 0, 0, 0, 0, 0, 0],
    [0, 0, 0, 0, 0, 0, 0, 0, 0, 0, 0, 0, 0, 0, 0, 0, 0, 0, 0, 0, 0, 0, 0, 0, 0, 0, 0, 0, 0, 0, 0, 0, 0, 0, 0, 0, 0, 0,
     0, 0, 0, 0, 0, 0, 0, 0, 0, 0, 0, 0, 0, 0],
    [0, 0, 0, 0, 0, 0, 0, 0, 0, 0, 0, 0, 0, 0, 0, 0, 0, 0, 0, 0, 0, 0, 0, 0, 0, 0, 0, 0, 0, 0, 0, 0, 0, 0, 0, 0, 0, 0,
     0, 0, 0, 0, 0, 0, 0, 0, 0, 0, 0, 0, 0, 0],
    [0, 0, 0, 0, 0, 0, 0, 0, 0, 0, 0, 0, 1, 0, 0, 0, 0, 1, 0, 0, 0, 1, 0, 0, 0, 0, 1, 0, 0, 0, 0, 0, 1, 0, 0, 0, 0, 0,
     0, 0, 0, 0, 0, 0, 0, 0, 0, 0, 0, 0, 0, 0],
    [0, 0, 0, 0, 0, 0, 0, 0, 0, 0, 0, 0, 0, 0, 0, 0, 0, 0, 0, 0, 0, 0, 0, 0, 0, 0, 0, 0, 0, 0, 0, 0, 0, 0, 0, 0, 0, 0,
     0, 0, 0, 0, 0, 0, 0, 0, 0, 0, 0, 0, 0, 0],
    [0, 0, 0, 0, 0, 0, 0, 0, 0, 0, 0, 0, 0, 0, 0, 0, 0, 0, 0, 0, 0, 0, 0, 0, 0, 0, 0, 0, 0, 0, 0, 0, 0, 0, 0, 0, 0, 0,
     0, 0, 0, 0, 0, 0, 0, 0, 0, 0, 0, 0, 0, 0],
    [0, 0, 0, 0, 0, 0, 0, 0, 0, 0, 0, 0, 1, 0, 0, 0, 0, 0, 1, 0, 0, 0, 0, 0, 1, 0, 0, 0, 0, 1, 0, 0, 0, 0, 0, 0, 0, 0,
     0, 0, 0, 0, 0, 0, 0, 0, 0, 0, 0, 0, 0, 0],
    [0, 0, 0, 0, 0, 0, 0, 0, 0, 0, 0, 0, 0, 0, 0, 0, 0, 0, 0, 0, 0, 1, 0, 0, 0, 0, 0, 0, 0, 0, 0, 0, 0, 0, 0, 0, 0, 0,
     0, 0, 0, 0, 0, 0, 0, 0, 0, 0, 0, 0, 0, 0],
    [0, 0, 0, 0, 0, 0, 0, 0, 0, 0, 0, 0, 0, 0, 0, 0, 0, 0, 0, 0, 0, 0, 0, 0, 0, 0, 0, 0, 0, 0, 0, 0, 0, 0, 0, 0, 0, 0,
     0, 0, 0, 0, 0, 0, 0, 0, 0, 0, 0, 0, 0, 0],
    [0, 0, 0, 0, 0, 0, 0, 0, 0, 0, 0, 0, 0, 0, 1, 0, 0, 0, 0, 0, 0, 0, 0, 0, 0, 0, 0, 0, 0, 1, 0, 0, 0, 0, 0, 0, 0, 0,
     0, 0, 0, 0, 0, 0, 0, 0, 0, 0, 0, 0, 0, 0],
    [0, 0, 0, 0, 0, 0, 0, 0, 0, 0, 0, 0, 0, 0, 0, 0, 0, 0, 0, 0, 0, 0, 0, 0, 0, 0, 0, 0, 0, 0, 0, 0, 0, 0, 0, 0, 0, 0,
     0, 0, 0, 0, 0, 0, 0, 0, 0, 0, 0, 0, 0, 0],
    [0, 0, 0, 0, 0, 0, 0, 0, 0, 0, 0, 0, 0, 0, 0, 0, 0, 0, 0, 0, 0, 0, 1, 0, 0, 0, 0, 1, 0, 0, 0, 0, 0, 0, 0, 0, 0, 0,
     0, 0, 0, 0, 0, 0, 0, 0, 0, 0, 0, 0, 0, 0],
    [0, 0, 0, 0, 0, 0, 0, 0, 0, 0, 0, 0, 0, 0, 0, 0, 1, 0, 0, 0, 0, 0, 0, 0, 0, 1, 0, 0, 0, 1, 0, 1, 0, 0, 0, 0, 0, 0,
     0, 0, 0, 0, 0, 0, 0, 0, 0, 0, 0, 0, 0, 0],
    [0, 0, 0, 0, 0, 0, 0, 0, 0, 0, 0, 0, 0, 0, 0, 0, 0, 0, 0, 0, 0, 0, 0, 0, 0, 0, 0, 0, 0, 0, 0, 0, 0, 0, 0, 0, 0, 0,
     0, 0, 0, 0, 0, 0, 0, 0, 0, 0, 0, 0, 0, 0],
    [0, 0, 0, 0, 0, 0, 0, 0, 0, 0, 0, 0, 0, 0, 0, 0, 0, 0, 1, 1, 0, 0, 0, 0, 0, 0, 0, 0, 0, 0, 0, 0, 0, 0, 0, 0, 0, 0,
     0, 0, 0, 0, 0, 0, 0, 0, 0, 0, 0, 0, 0, 0],
    [0, 0, 0, 0, 0, 0, 0, 0, 0, 0, 0, 0, 0, 0, 0, 0, 0, 0, 0, 0, 0, 0, 0, 0, 0, 0, 0, 0, 0, 0, 0, 0, 1, 1, 0, 0, 0, 0,
     0, 0, 0, 0, 0, 0, 0, 0, 0, 0, 0, 0, 0, 0],
    [0, 0, 0, 0, 0, 0, 0, 0, 0, 0, 0, 0, 0, 0, 0, 0, 0, 0, 0, 0, 0, 0, 0, 0, 0, 0, 0, 0, 0, 0, 0, 0, 0, 0, 0, 0, 0, 0,
     0, 0, 0, 0, 0, 0, 0, 0, 0, 0, 0, 0, 0, 0],
    [0, 0, 0, 0, 0, 0, 0, 0, 0, 0, 0, 0, 0, 0, 0, 0, 0, 0, 0, 0, 0, 0, 0, 0, 0, 0, 0, 0, 0, 0, 0, 0, 0, 0, 0, 0, 0, 0,
     0, 0, 0, 0, 0, 0, 0, 0, 0, 0, 0, 0, 0, 0],
    [0, 0, 0, 0, 0, 0, 0, 0, 0, 0, 0, 0, 0, 0, 0, 0, 0, 0, 0, 0, 0, 0, 0, 0, 0, 0, 0, 0, 0, 0, 0, 0, 0, 0, 1, 1, 0, 0,
     0, 0, 0, 0, 0, 0, 0, 0, 0, 0, 0, 0, 0, 0],
    [0, 0, 0, 0, 0, 0, 0, 0, 0, 0, 0, 0, 0, 0, 0, 0, 0, 0, 0, 0, 0, 0, 0, 0, 0, 0, 0, 0, 0, 0, 0, 0, 0, 0, 0, 0, 0, 0,
     0, 0, 0, 0, 0, 0, 0, 0, 0, 0, 0, 0, 0, 0],
    [0, 0, 0, 0, 0, 0, 0, 0, 0, 0, 0, 0, 0, 0, 0, 0, 0, 0, 0, 0, 0, 0, 0, 0, 0, 0, 0, 0, 0, 0, 0, 0, 0, 0, 0, 0, 0, 0,
     0, 0, 0, 0, 0, 0, 0, 0, 0, 0, 0, 0, 0, 0],
    [0, 0, 0, 0, 0, 0, 0, 0, 0, 0, 0, 0, 0, 0, 0, 0, 0, 0, 0, 0, 0, 0, 0, 0, 0, 0, 0, 0, 0, 0, 0, 0, 0, 0, 0, 0, 1, 0,
     0, 0, 0, 0, 0, 0, 0, 0, 0, 0, 0, 0, 0, 0],
    [0, 0, 0, 0, 0, 0, 0, 0, 0, 0, 0, 0, 0, 0, 0, 0, 0, 0, 0, 0, 0, 0, 0, 0, 0, 0, 0, 0, 0, 0, 0, 0, 0, 0, 0, 0, 0, 0,
     0, 0, 0, 0, 0, 0, 0, 0, 0, 0, 0, 0, 0, 0],
]

# Specify the room name displayed in the Voxelamming app
room_name = "1000"
# Create an instance of the Voxelamming class
vox = Voxelamming(room_name)
# Set up voxel settings
vox.set_box_size(0.15)
# vox.set_build_interval(0.01)
vox.set_command('float')
vox.set_frame_fps(2)
vox.set_frame_repeats(10)

# Configure the position and color for placing voxels
for angle in [30, 15, 0, -15, -30, -15, 0, 15]:
    vox.frame_in()
    vox.transform(0, 100, 0, 30, 0, 0)

    for j, row in enumerate(butterfly_list):
        color = rainbow_colors[j // 10]

        for i, dot in enumerate(row):
            if dot != 0:
                x = i * cos(radians(angle))
                y = -j
                z = i * sin(radians(angle))
                r = color[0] / 255
                g = color[1] / 255
                b = color[2] / 255
                vox.create_box(x, y, z, r, g, b)
                vox.create_box(-x, y, z, r, g, b)
    vox.frame_out()

# Send voxel data to the app
vox.send_data('main_frame_sample')
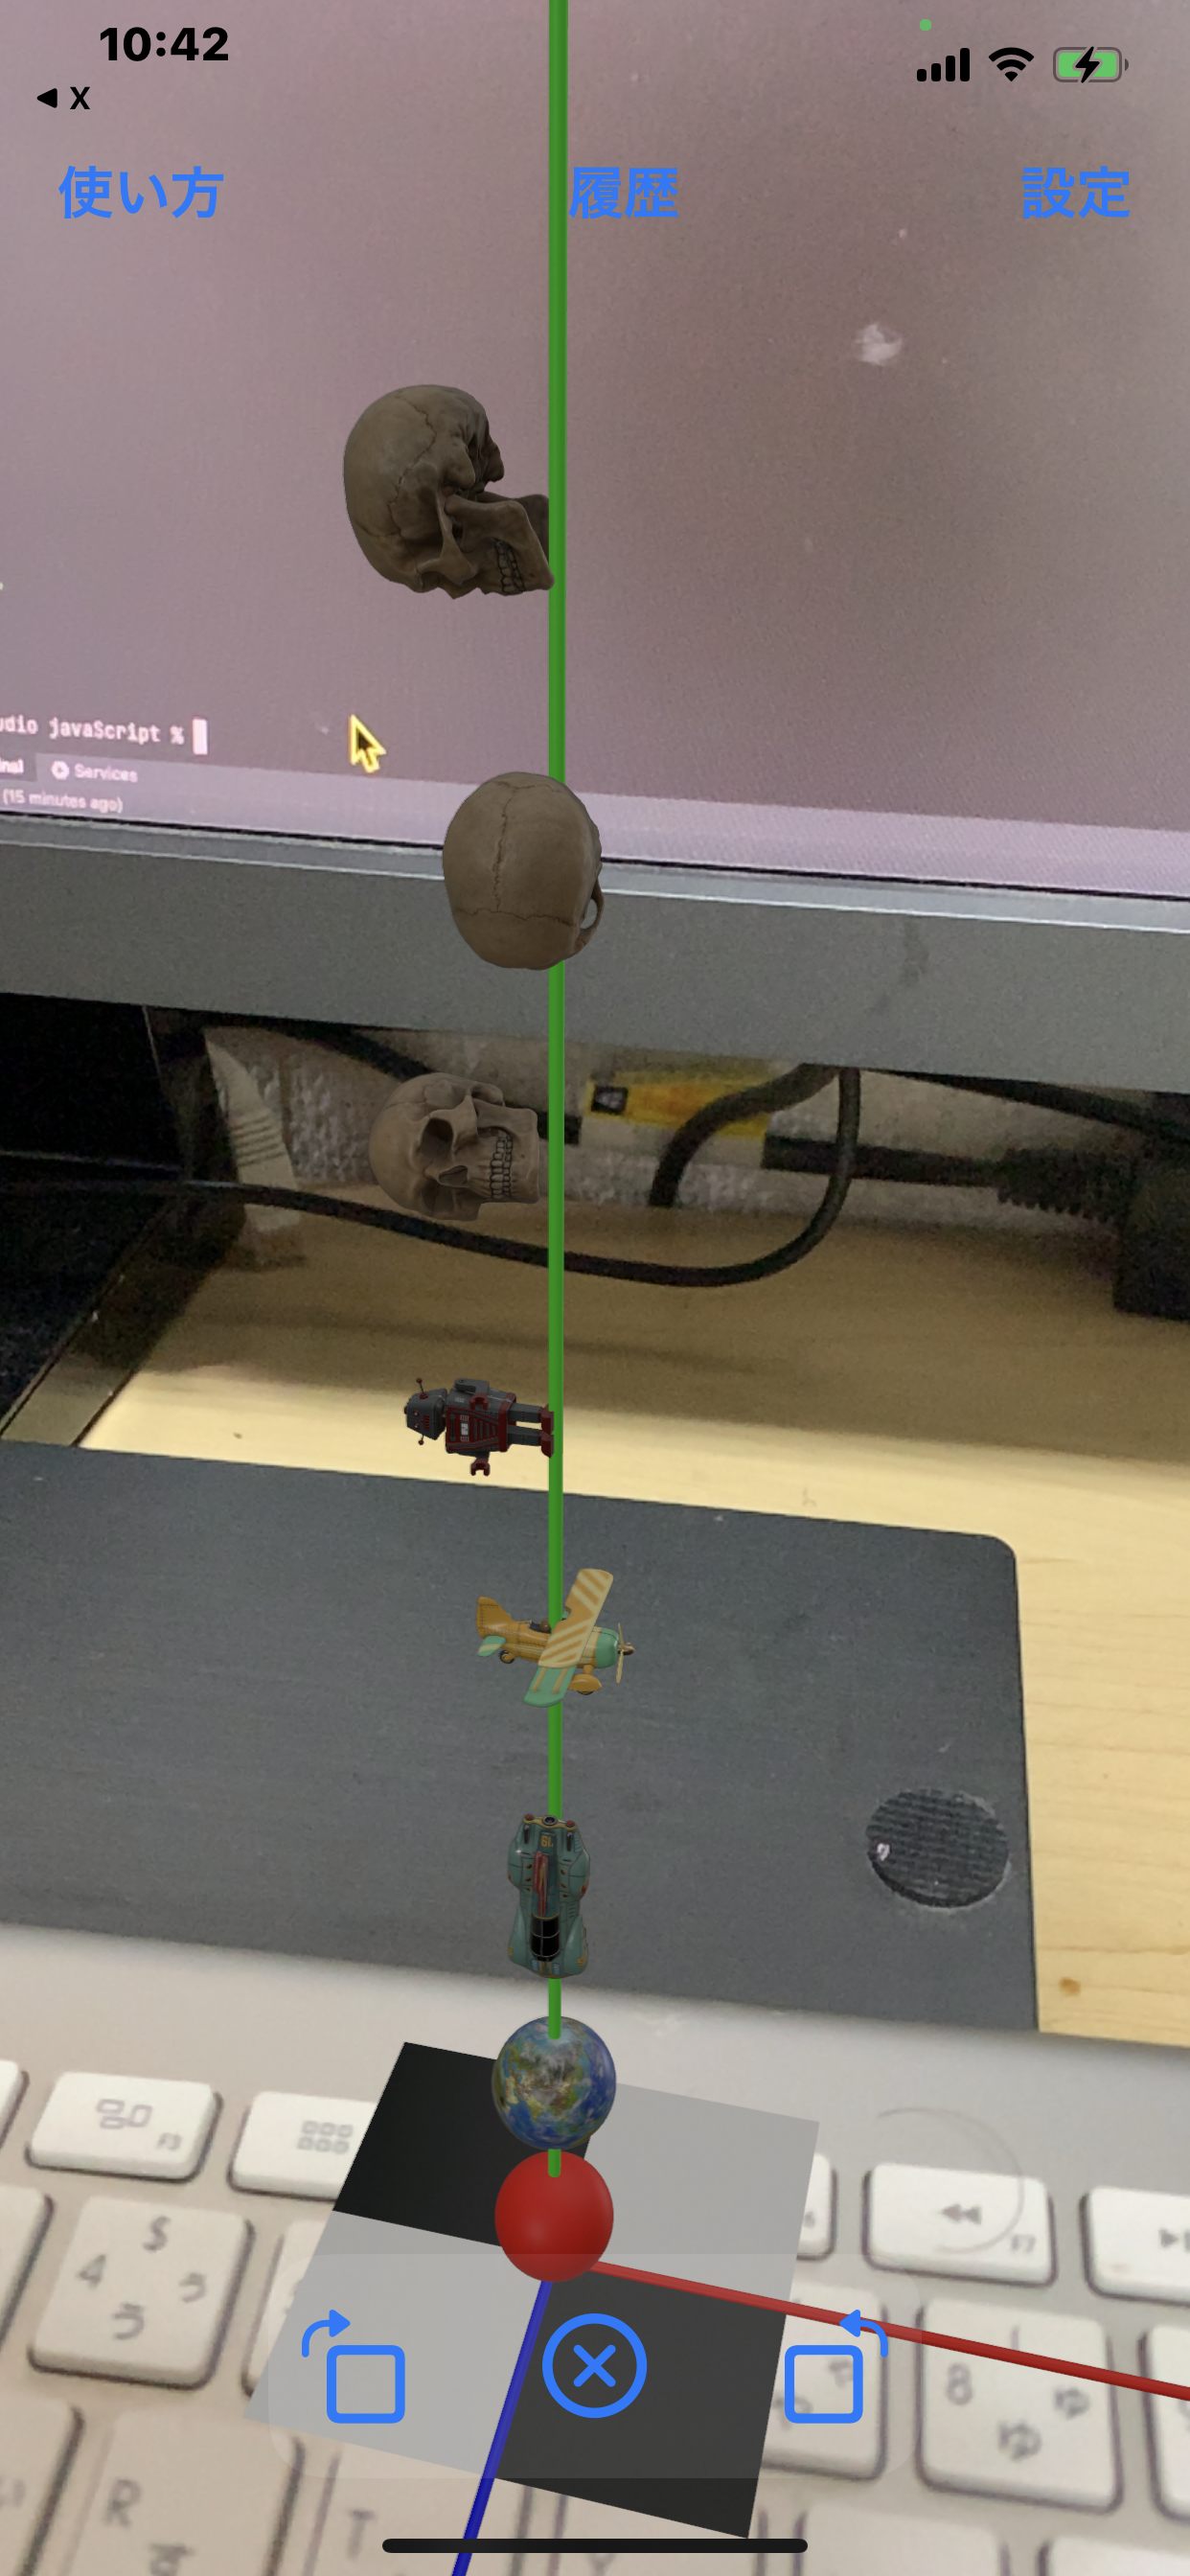
Displaying Default Models
You can display the default models built into Voxelamming. Currently, there are 19 models to choose from. By specifying an entity name, you can move the model using the move_model method.
List of built-in models:
- Mercury
- Venus
- Earth
- Mars
- Jupiter
- Saturn
- Uranus
- Neptune
- Pluto
- Sun
- Moon
- ToyBiplane
- ToyCar
- Drummer
- Robot
- ToyRocket
- RocketToy1
- RocketToy2
- Skull
# Python
# Import the Voxelamming class from the voxelamming package
from voxelamming_local import Voxelamming
# from voxelamming import Voxelamming

# Specify the room name displayed in the Voxelamming app
room_name = "1000"
# Create an instance of the Voxelamming class
vox = Voxelamming(room_name)

# Set the voxel size
vox.set_box_size(10)
# Set the voxel placement interval
vox.set_build_interval(0.01)
# Draw coordinate axes
vox.set_command('axis')

# Configure the position and color for placing voxels
vox.change_shape('sphere')
vox.create_box(0, 0, 0, 1, 0, 0, 1)
vox.create_model('Earth', 0, 2, 0)
vox.create_model('ToyCar', 0, 4, 0, 90, 0, 0)
vox.create_model('ToyBiplane', 0, 6, 0, 0, 90, 0)
vox.create_model('Robot', 0, 8, 0, 0, 0, 90)
vox.create_model('Skull', 0, 10, 0, 0, 0, 90)
vox.create_model('Skull', 0, 12, 0, 90, 0, 0)
vox.create_model('Skull', 0, 14, 0, 90, 0, 90)

# Send voxel data to the app
vox.send_data("createModel")
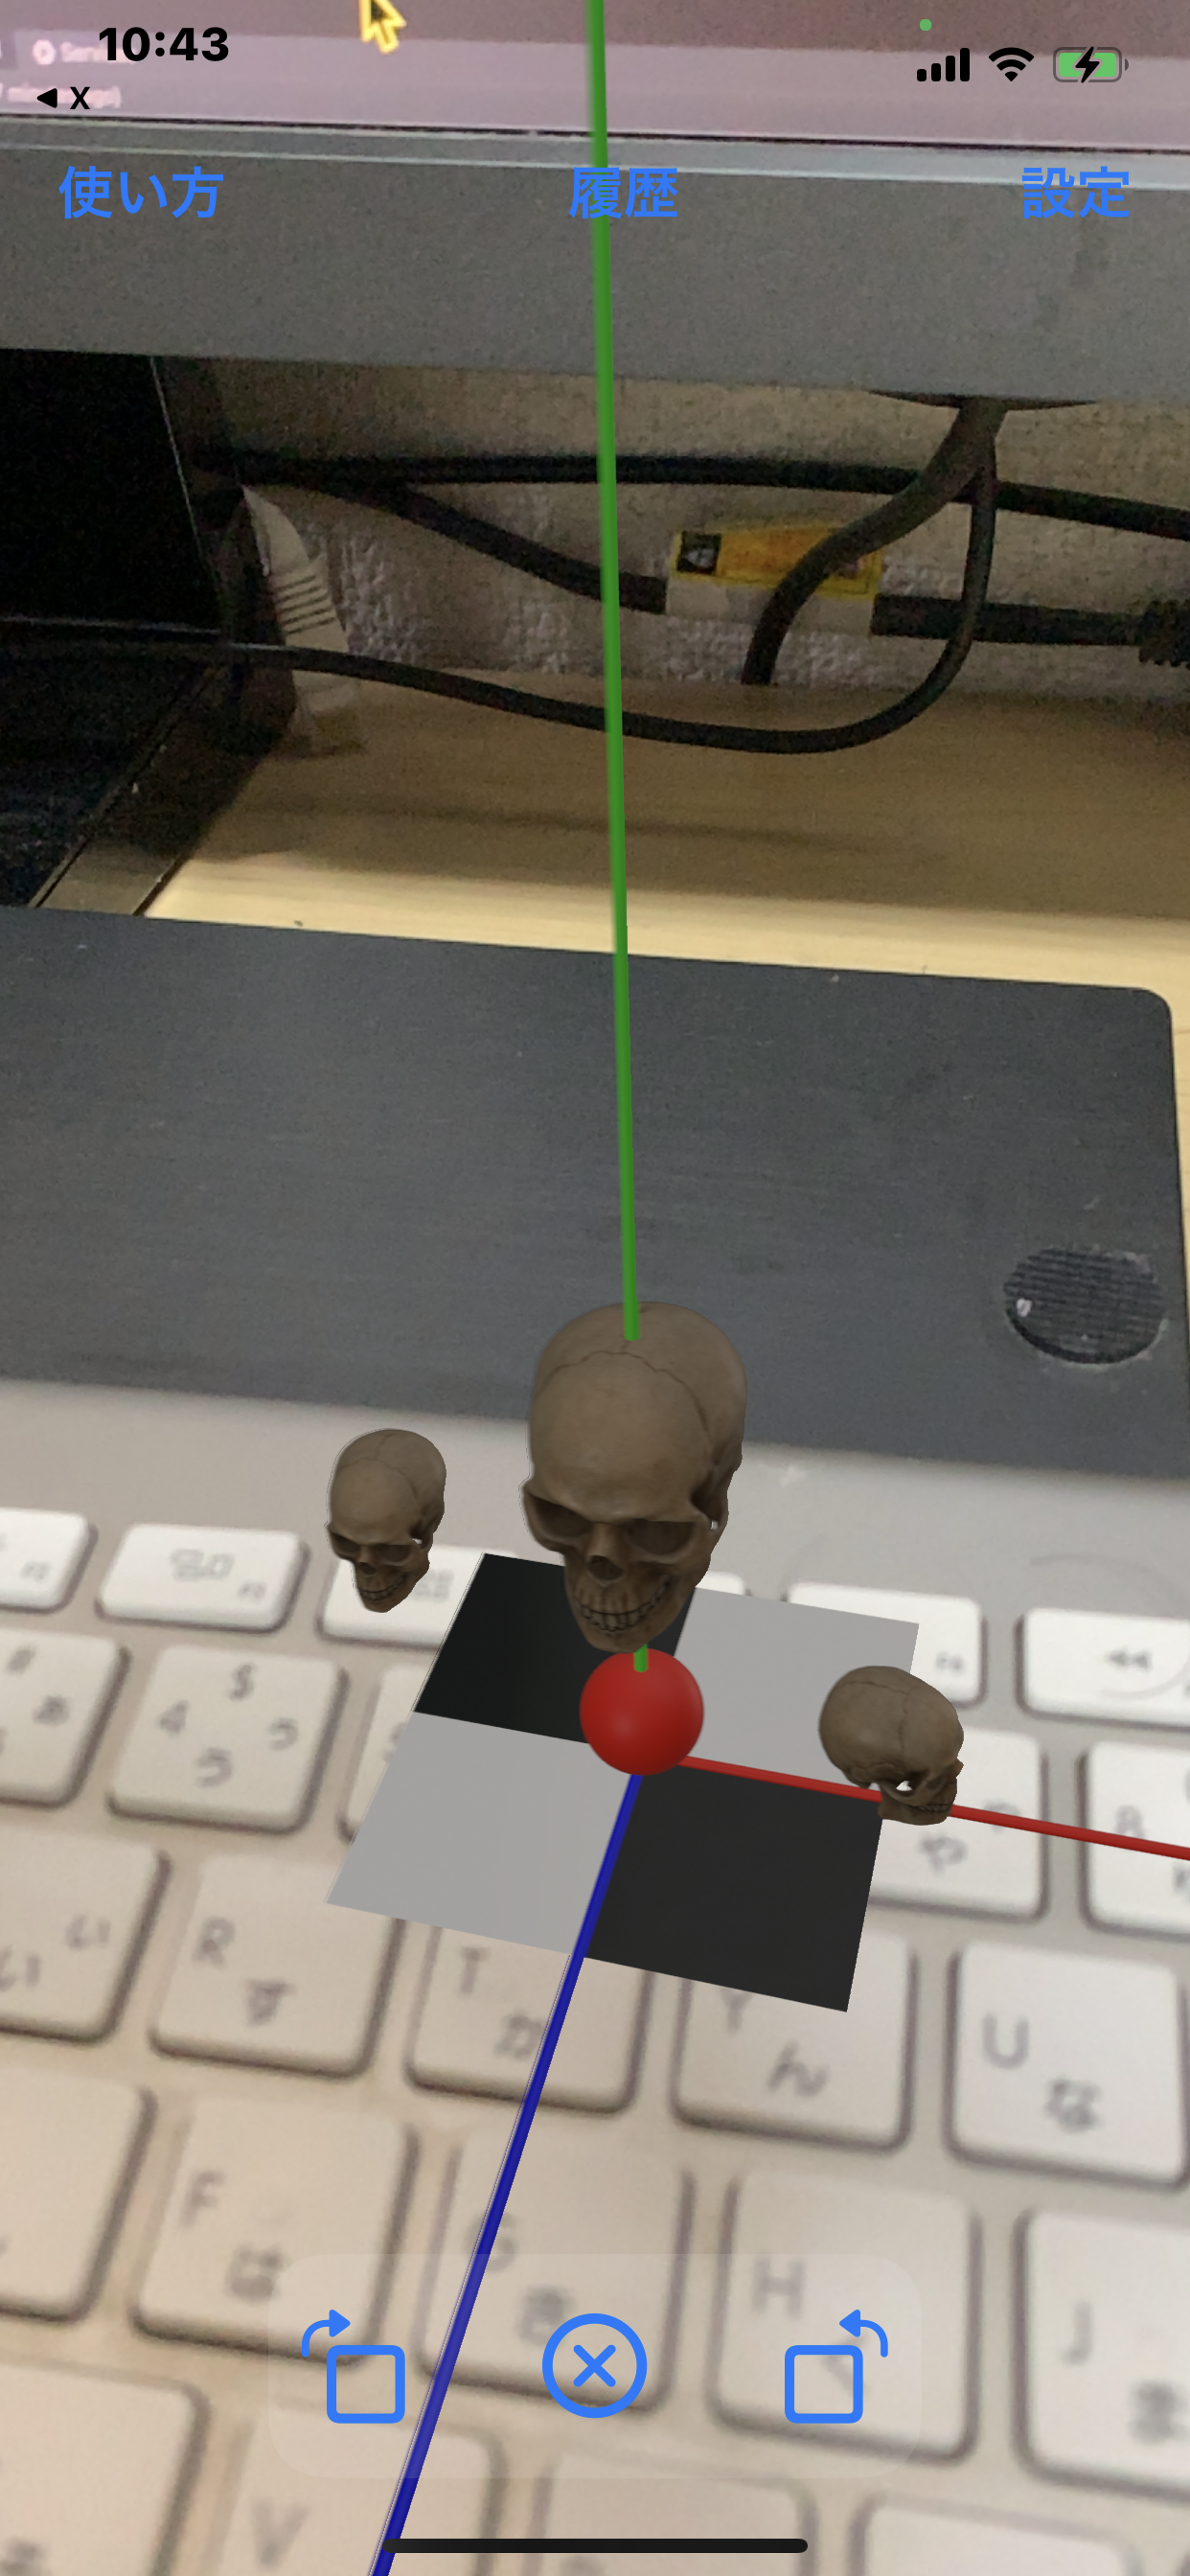
Moving Default Models
After displaying a default model built into Voxelamming with an entity name, you can move the model using the move_model method.
# Python
# Import the Voxelamming class from the voxelamming package
from voxelamming import Voxelamming
# from voxelamming_local import Voxelamming  # Use this when developing locally
import time

# Specify the room name displayed in the Voxelamming app
room_name = "1000"
# Create an instance of the Voxelamming class
vox = Voxelamming(room_name)

# Set the voxel size
box_size = 10
vox.set_box_size(box_size)
# Set the voxel placement interval
vox.set_build_interval(0.01)
# Draw coordinate axes
vox.set_command('axis')

# Configure the position and color for placing voxels
vox.change_shape('sphere')
vox.create_box(0, 0, 0, 1, 0, 0, 1)
vox.create_model('Skull', -2, 0, 0, 0, 0, 0, 1, 'skull_model_1')
vox.create_model('Skull', 2, 0, 0, 0, 0, 0, 1, 'skull_model_2')
vox.create_model('Skull', 0, 2, 0, 0, 0, 0, 1, 'skull_model_3')

# Send voxel data to the app
vox.send_data("Skulls")
# Clear voxel data
vox.clear_data()

# Move the models
for i in range(20):
    time.sleep(0.1)
    vox.set_box_size(box_size)
    vox.move_model('skull_model_1', -2, i * 0.2, 0, 0, 0, 0)
    vox.move_model('skull_model_2', 2, 0, 0, 0, i * 10, 0)
    vox.move_model('skull_model_3', 0, 2, 0, 0, 0, 0, i * 0.1 + 1)
    vox.send_data()
Settings
You can open the settings screen from the "Settings" button at the top right of the app. Turning off debug mode will disable information display on the screen.
Resetting the AR World
You can reset the AR world from the "Reset" button at the bottom right of the app. Resetting will delete all voxels.
User Sharing
Coming soon
License
Author
creativival